Cluster Administration
The Basics
To access your Cluster Administration features, log in to the Web Portal on the server. The description in this guide presumes that you are signed in as the Master Administrator (aka., Cluster Administrator, Server Administrator). Some of the options listed may not be available if you are logged in with different permissions (e.g. Delegated Administrator). In this document the CentreStack will also be referred to as simply, Cluster Server.
Tip
The Web Portal URL is the server’s DNS name, the IP Address or local host if you are on the server console.
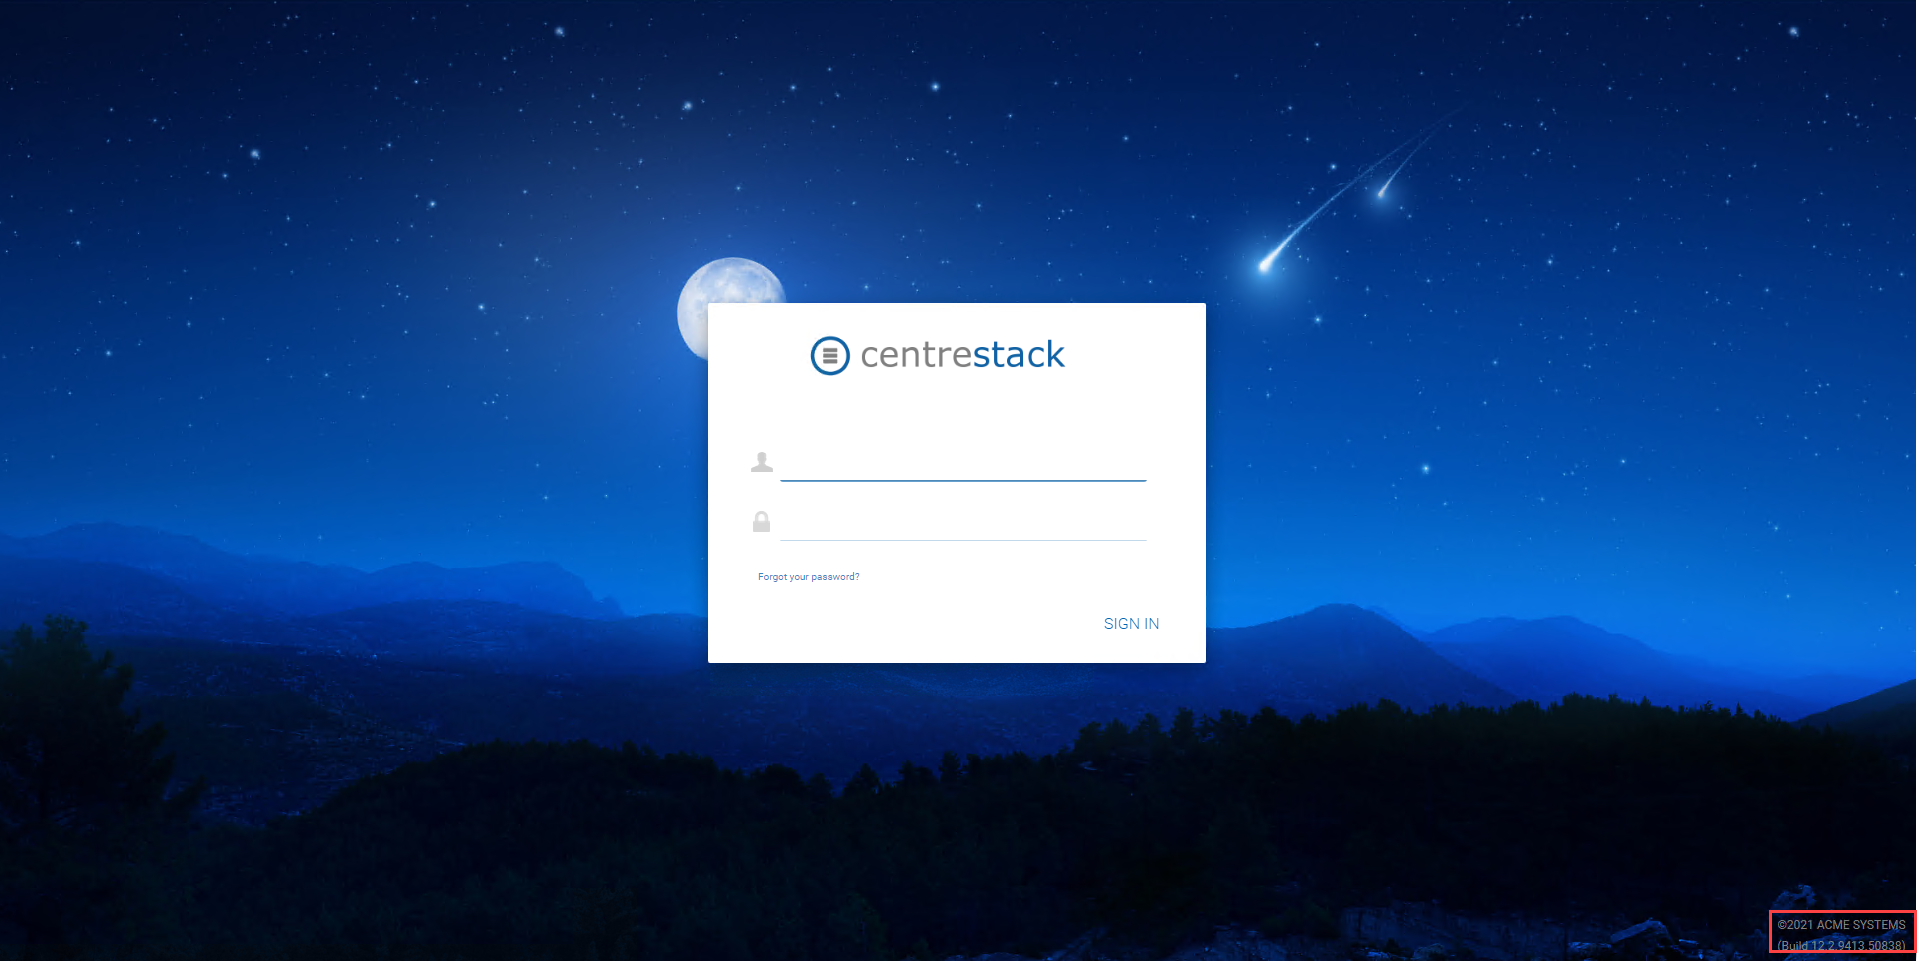
LOGIN SCREEN
Note
At the bottom of the Login screen, there is version information, which will be useful to see which version you have installed.
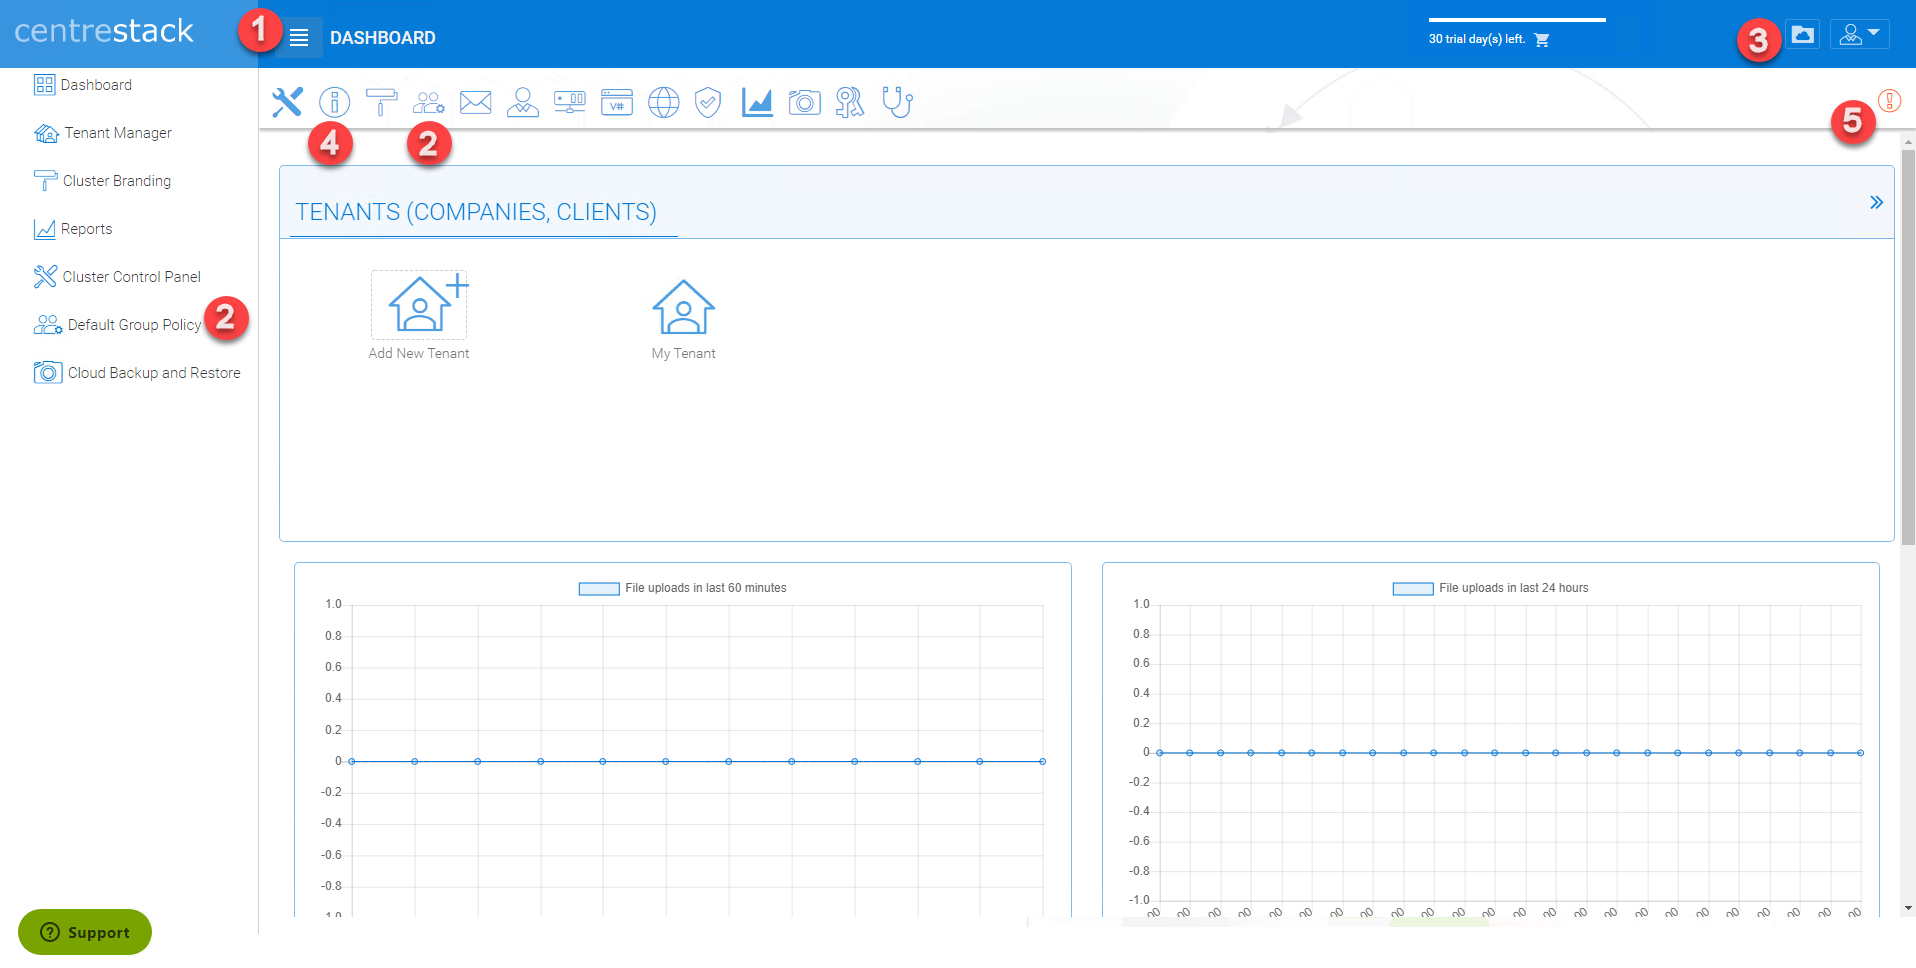
The following graphic describes the various icons and components of the Administrator Dashboard and its sub-sections. Please refer to it as you read this guide to determine how to access various features.
CLUSTER MANAGER DASHBOARD
After logging in, you will see the Cluster Manager Dashboard. The small “hamburger” ☰ menu icon (1) in the top left corner of this portal page will toggle the reveal of the left-side menu.
Some of the features can be accessed in several ways; for instance, you can see the Default Group Policy icon (2) in both the left-side menu and the Cluster Control Panel on the right side (or top side) of the Dashboard.
By clicking the folder icon (3) In the top right of the interface you can toggle between the File Browser and Cluster Manager views. The File Browser (My Files) view of the interface gives you access to your shared and unshared folders. This is also where you can create folders and upload files and folders for access. When the cluster administrator clicks the folder icon to get into the files and folder’s view, the files and folders belong to the default tenant.
Note
the cluster administrator will not be able to access files and folders that are not in the scope of the default tenant. To access files and folders that belong to a specific tenant, the web portal login has to be that of the tenant. So basically the cluster administrator can do administration work for a tenant that is under management. However, it is not easy for the cluster administrator to see the files and folders for that specific tenant until he/she gets the permission and the login credentials.
The Cluster Manager (aka., Dashboard) allows you to manage Tenants, Cluster Branding, Reports, Cluster Control Panel, and Group Policies. If you need to know the version and cluster ID information for your Cluster Manager installation, this can be accessed by clicking the “i” (4). The following image represents the Cluster Info pop-up window.

CLUSTER INFO
In the center of the Dashboard screen, you can access your Tenants (Companies, Clients) and system reports.
Note
At a high level, the CentreStack web browser management interface allows you to manage clients (Tenants) and the overall system performance and statistics reports.
EXTERNAL DNS WARNING
At the top left corner of the cluster dashboard (5), if you see a warning icon, it is the external dns warning indicating the external dns name is not setup yet.
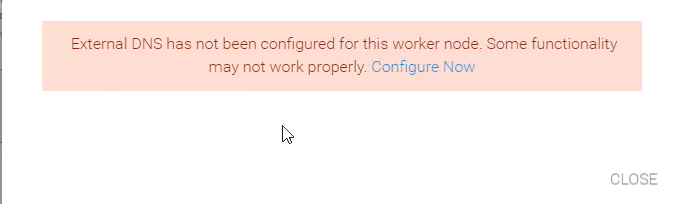
External DNS (External URL) is a very important property. It is used in directing how outside remote clients connect to the Cluster Server. It is also used in various email templates. If this property is not properly configured, the email template may be using IP address or NETBIOS name as the URL link.
To configure this setting, you must have a DNS name and SSL certificate setup; therefore, you can postpone the configuration of your DNS until you are ready.
Related tasks
- Configure the DNS registration to point a DNS name to the public static IP address of the Cluster Server.
- Configure the IIS “Default Web Site” to bind to an SSL certificate.
Tenant Manager
Cluster Manager > Tenant Manager
Note
A tenant is usually mapped to a client of yours, a company, or a division of a company.
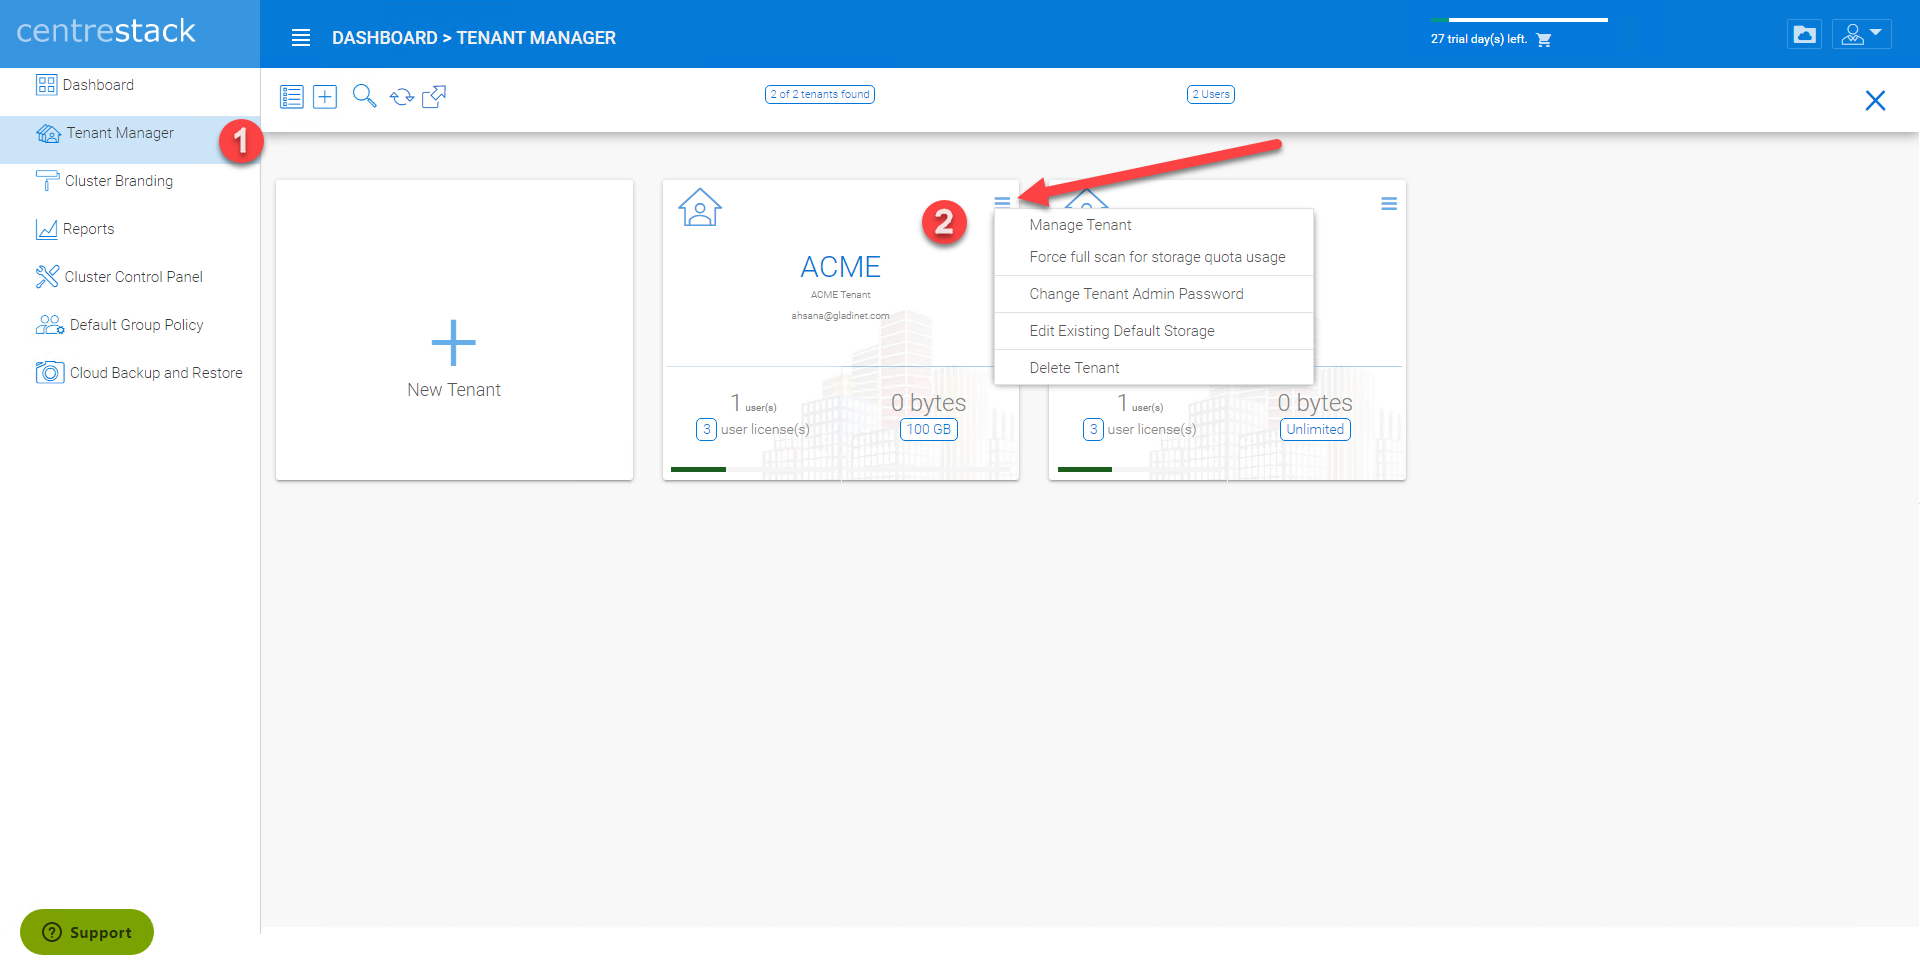
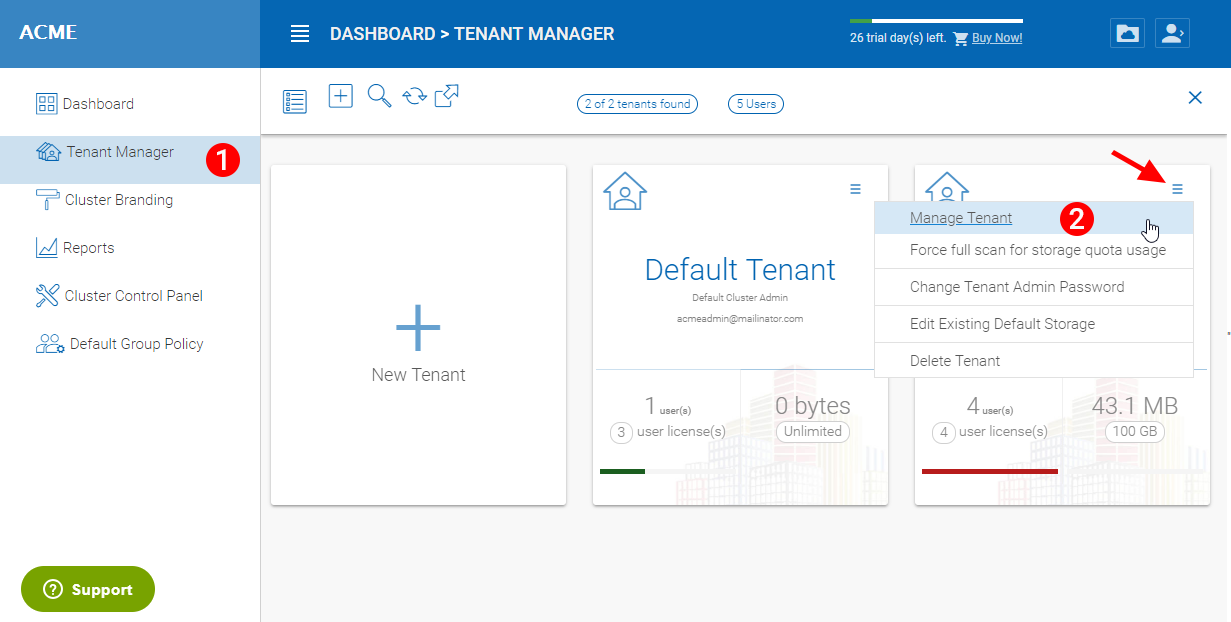
The Cluster Server is multi-tenant capable, but can also be used for a single Tenant. To add or manage your tenants, choose Tenant Manager (1) in your Dashboard.
TENANT MANAGER
You can also access other important settings from this context menu (2) (Each tenant block has a tenant specific context menu):
- Manage Tenant
- Force full scan for storage quota usage,
- Change Tenant Admin Password,
- Edit Existing Default Storage
- Delete Tenant
Manage Tenant
This will drill deeper into the per-tenant management page view. By clicking the “Manage Tenant” (2) option (see above image), the Cluster Admin sees the Tenant Dashboard as well as additional options to configure the Tenant settings.
Force full scan for storage quota usage
This will start a full scan of storage usage for the Tenant. As files are uploaded, modified or deleted during daily operation, the Tenant Quota is calculated. To ensure that the quota value shown for the tenant is accurate, it is important that you occasionally force a full scan of the tenant’s quota usage.
Change Tenant Admin Password
Provides a method for the Cluster Administrator to assist the Tenant Administrator with resetting passwords.
Edit Existing default storage
When a Tenant outgrows their allocation of storage space or needs to move to a different storage location, this setting allows the Cluster Administrator to change the storage location.
Tip
When changing a storage location for a Tenant; you typically manually copy the folder to the new location then re-configure the default storage location.
Warning
If you want to change the tenant’s default storage location, make sure you copy tenant’s file AS-IS from the source folder to its destination folder before you change the storage location here.
Delete Tenant
Deletes the tenant.
Note
For more details about the Tenant Management and all the configuration check …
Create a New Tenant
Cluster Manager > Tenant Manager
Click on the “Plus” sign in the New Tenant to start the creation of a new tenant.
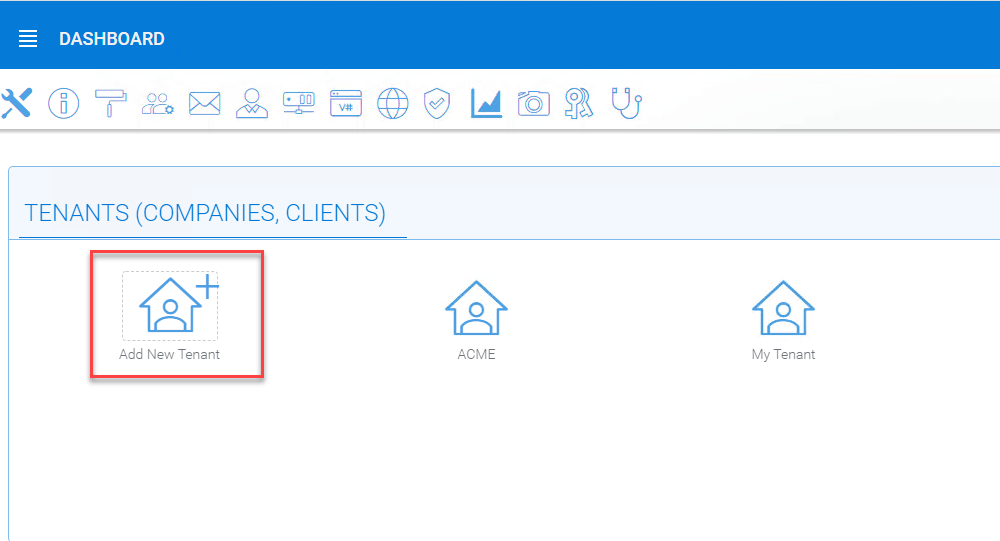
CREATING A NEW TENANT
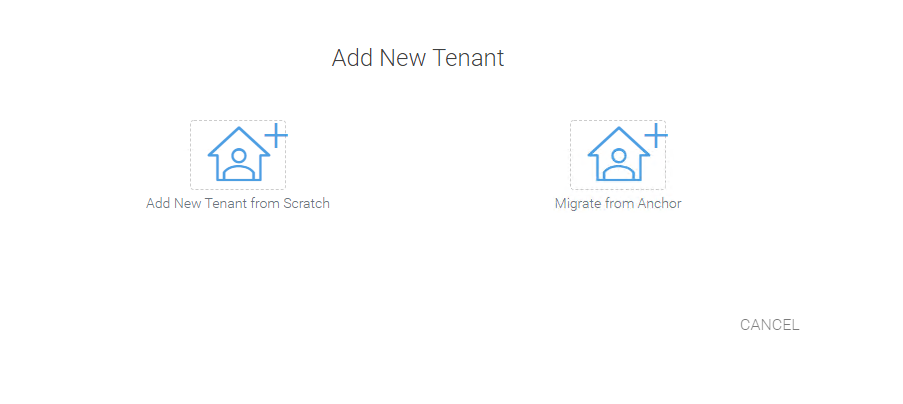
The first screen under “New Tenant” is asking for “Start from Scratch” or “Import and migrate data from Anchor”.
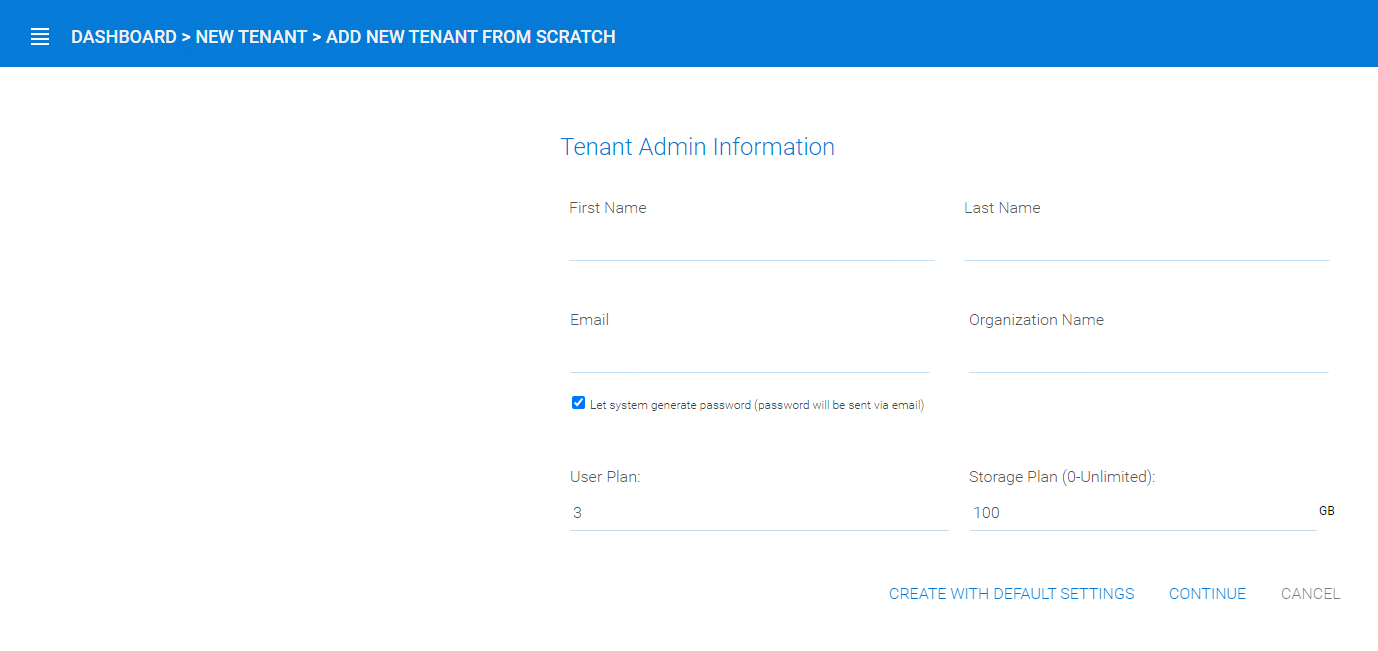
When you select “Add New Tenant from Scratch”, The next screen is asking for a few parameters related to who the tenant is.
TENANT MANAGER SETTINGS 1
“Create with Default Settings” will get it done and the tenant will be granted all default settings, including the storage location allocation.
“Continue” allows you to customize the settings and storage location.
If you pick “Continue”,
The second screen under “Add Tenant from Scratch” is asking for the division of work between the cluster administrator and the tenant administrator.

TENANT MANAGER SETTINGS 2
The third screen under “Add Tenant” is asking where the root storage for the tenant will be at.
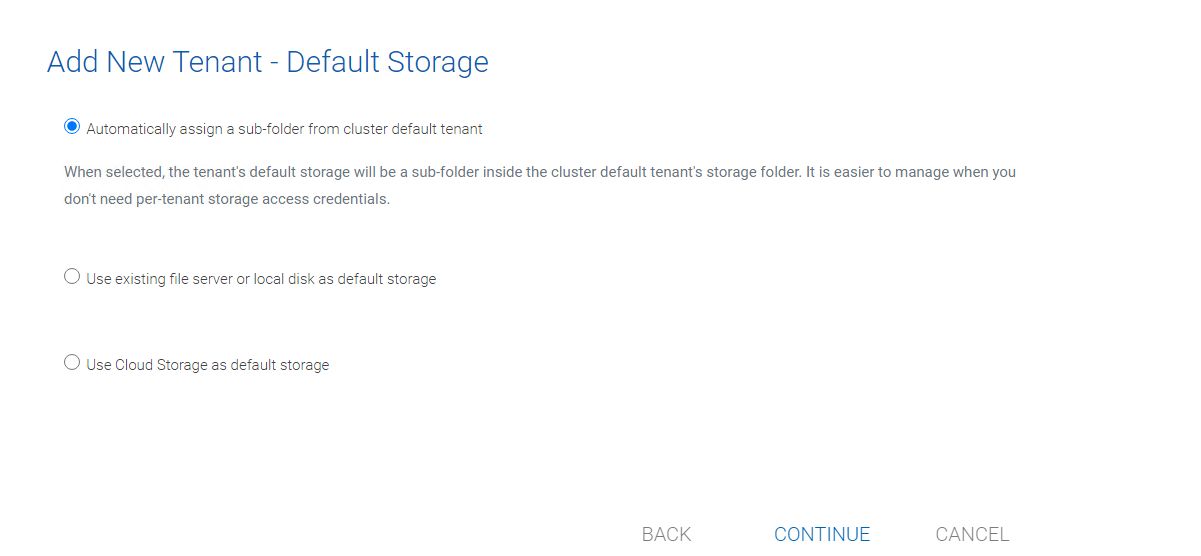
ADD TENANT STORAGE OPTIONS 1
Automatically assign a sub-folder from cluster default tenant
When selected, the tenant’s default storage will be a sub-folder inside the cluster default tenant’s storage folder. It is easier to manage when you don’t need per-tenant storage access credentials. This is the easiest option because if every tenant is allocated a sub-folder from the default tenant, then the default tenant storage location is a single place to take care of all of your storage needs. The storage location is sandboxed away from the default tenant so even though from a physical location’s perspective, it is a sub folder of the default tenant, but the default tenant will not be able to see the folder from CentreStack.
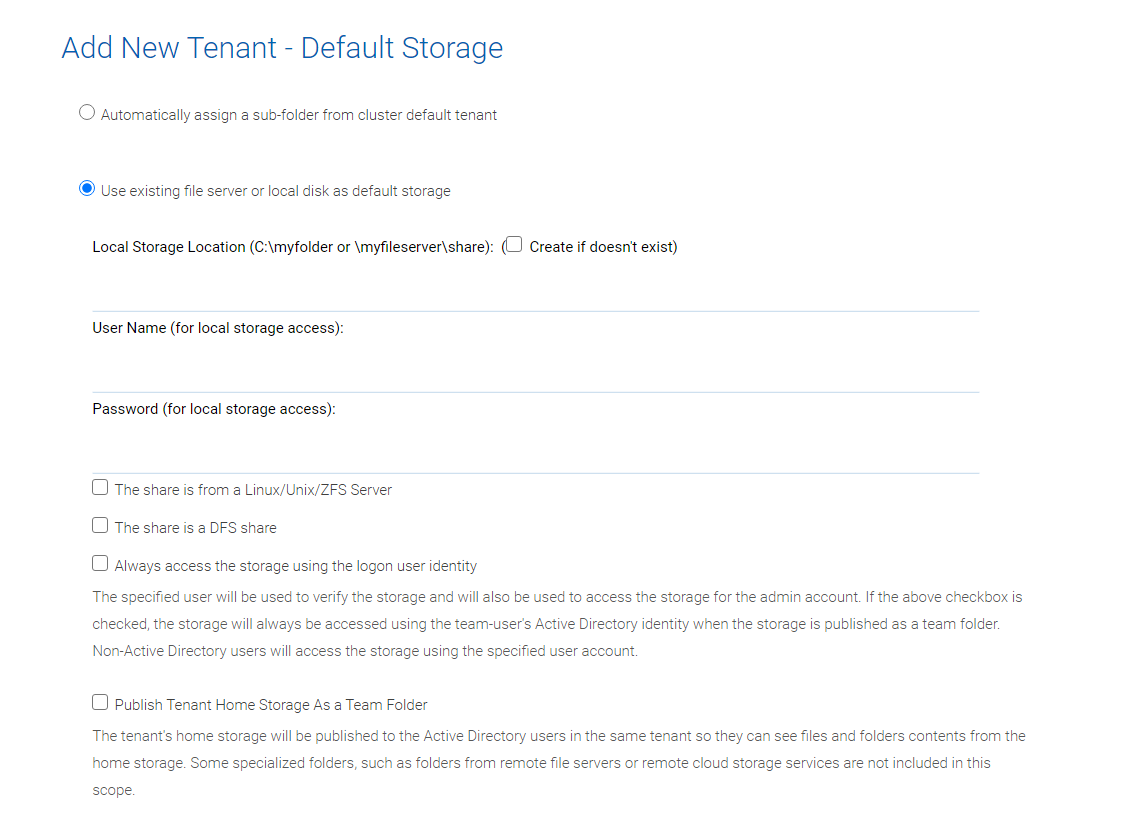
Use existing file server or local disk as default storage
Using this option, you can connect the tenant’s root folder to a file server network share. If you want the tenant users to continue to share file server network share outside of CentreStack, it is recommended you use the “Import Network Share” feature in “Team Folder” instead of pointing the default storage to the file server share, because the Cluster Server will assume it has 100% of the control of the storage location.
ADD TENANT STORAGE OPTIONS 2
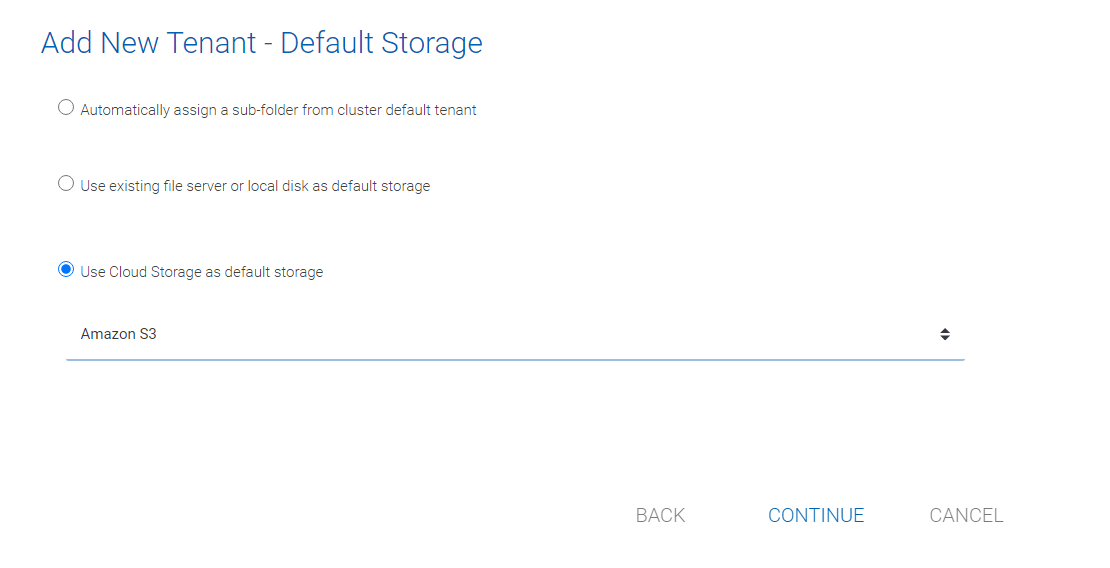
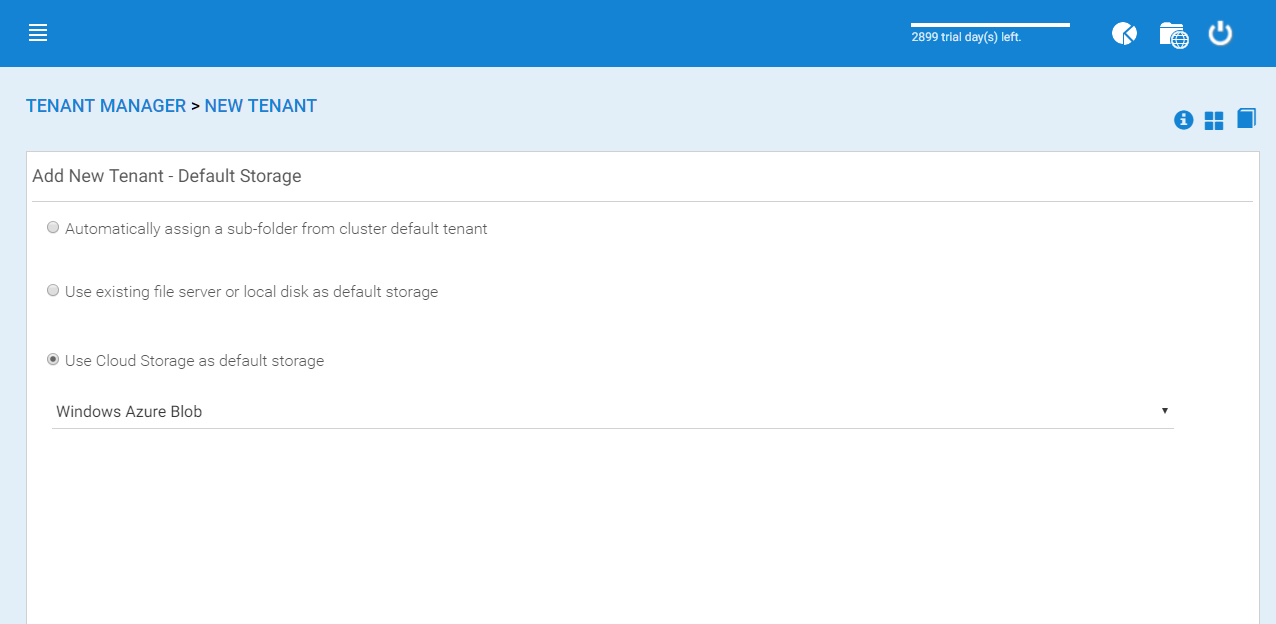
Use Cloud Storage as default storage
when using this option, you can connect the tenant’s root folder to Amazon S3, Windows Azure Blob, OpenStack storage as well as others.
CLOUD STORAGE SETTINGS
Using Amazon S3 bucket for tenant storage
Tenant Manager > {Create New Tenant} > Use Cloud Storage as Default Storage > Amazon S3
You can pick Amazon S3 as the target storage for the tenant if you want to.
AMAZON S3
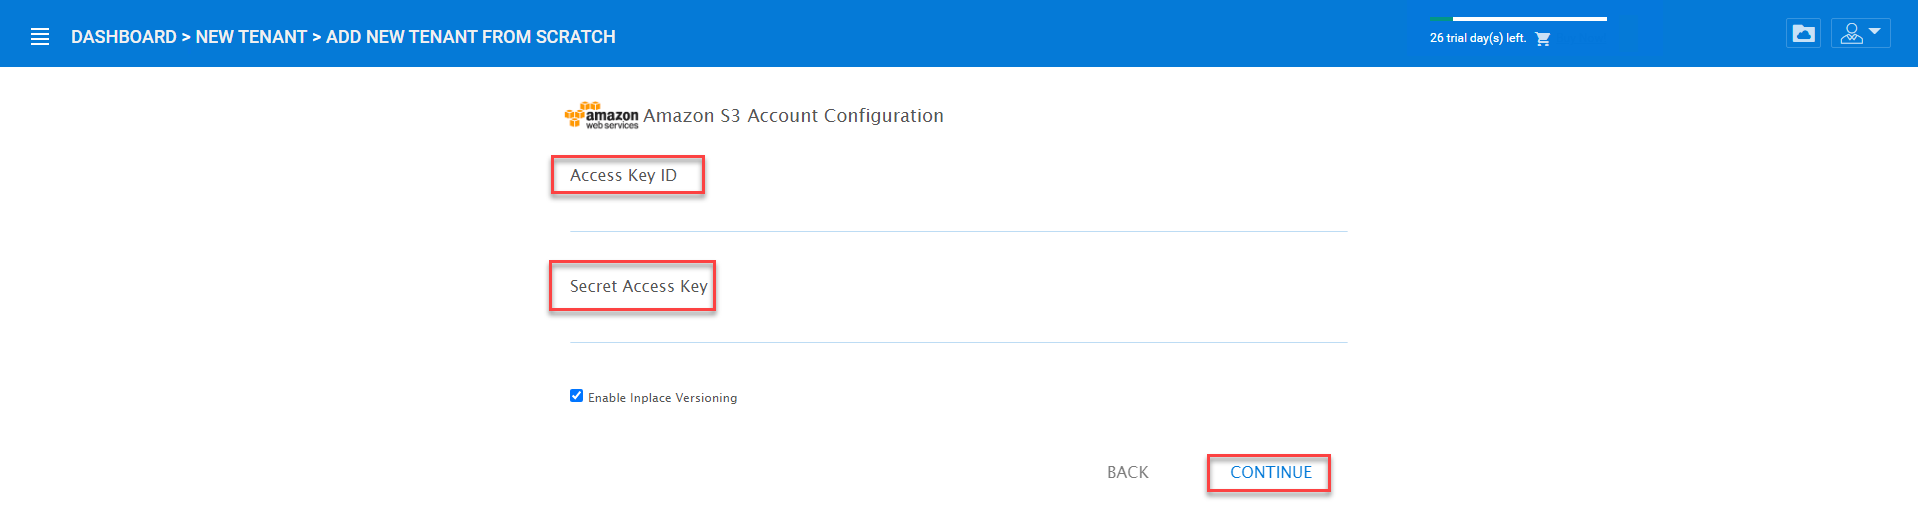
After you pick the Amazon S3, the first screen will be asking for Access Key and Secret Key.
You will need to log into your AWS console to get the access key and secret key. You can use master access key and secret key, by default the master key has default access to all buckets. You can also create an IAM user and use the key from a specific IAM user. However, by default, the IAM user is locked out of access to any bucket until bucket access policy is created and attached to the IAM user.
If you use IAM user, here is a sample S3 Bucket access policy to grant an IAM user to a specific bucket. As shown below, the policy gives an IAM user the ability to use bucket “user3onlybucket”
{
    "Version": "2012-10-17",
    "Statement": [
        {
            "Effect": "Allow",
            "Action": [
                "s3:GetBucketLocation",
                "s3:ListAllMyBuckets"
            ],
            "Resource": "arn:aws:s3:::*"
        },
        {
            "Effect": "Allow",
            "Action": [
                "s3:ListBucket"
            ],
            "Resource": [
                "arn:aws:s3:::*"
            ]
        },
        {
            "Effect": "Allow",
            "Action": [
                "s3:AbortMultipartUpload",
                "s3:DeleteObject",
                "s3:DeleteObjectVersion",
                "s3:GetObject",
                "s3:GetObjectAcl",
                "s3:GetObjectTagging",
                "s3:GetObjectTorrent",
                "s3:GetObjectVersion",
                "s3:GetObjectVersionAcl",
                "s3:GetObjectVersionTagging",
                "s3:GetObjectVersionTorrent",
                "s3:PutObject",
                "s3:PutObjectAcl",
                "s3:PutObjectTagging",
                "s3:PutObjectVersionAcl",
                "s3:PutObjectVersionTagging",
                "s3:ReplicateDelete",
                "s3:ReplicateObject",
                "s3:RestoreObject"
            ],
            "Resource": [
                "arn:aws:s3:::user3onlybucket/*"
            ]
        }
    ]
}
After it is all setup properly, you can use the IAM user’s access key id and secret access key to connect to the Amazon S3 bucket.
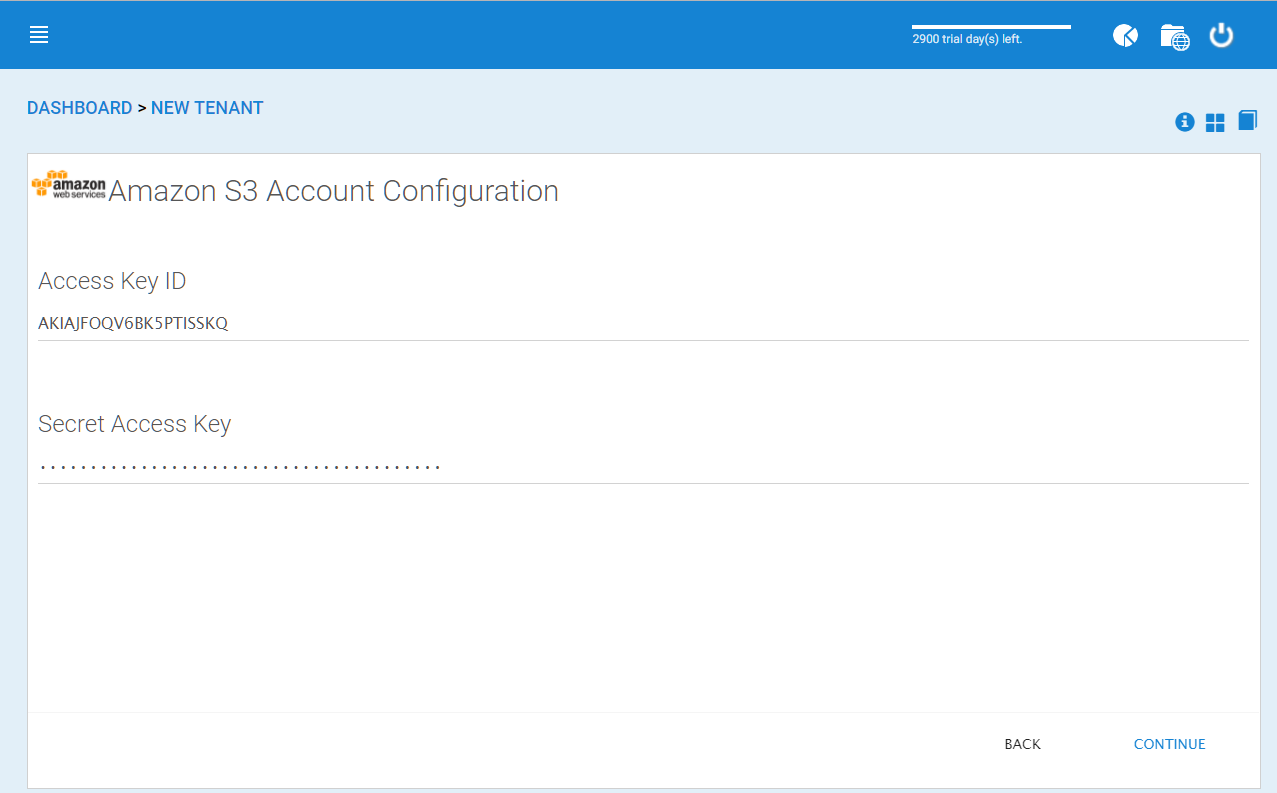
AMAZON S3 USER’S ACCESS KEY
When the correct access credentials are given, the next screen is to select a bucket from Amazon S3.

AMAZON S3 SLECTING A BUCKET
You can pre-create a bucket in Amazon S3 and then pick the bucket in the current page. After that, it will take a short while for the system to be ready for the new tenant created.
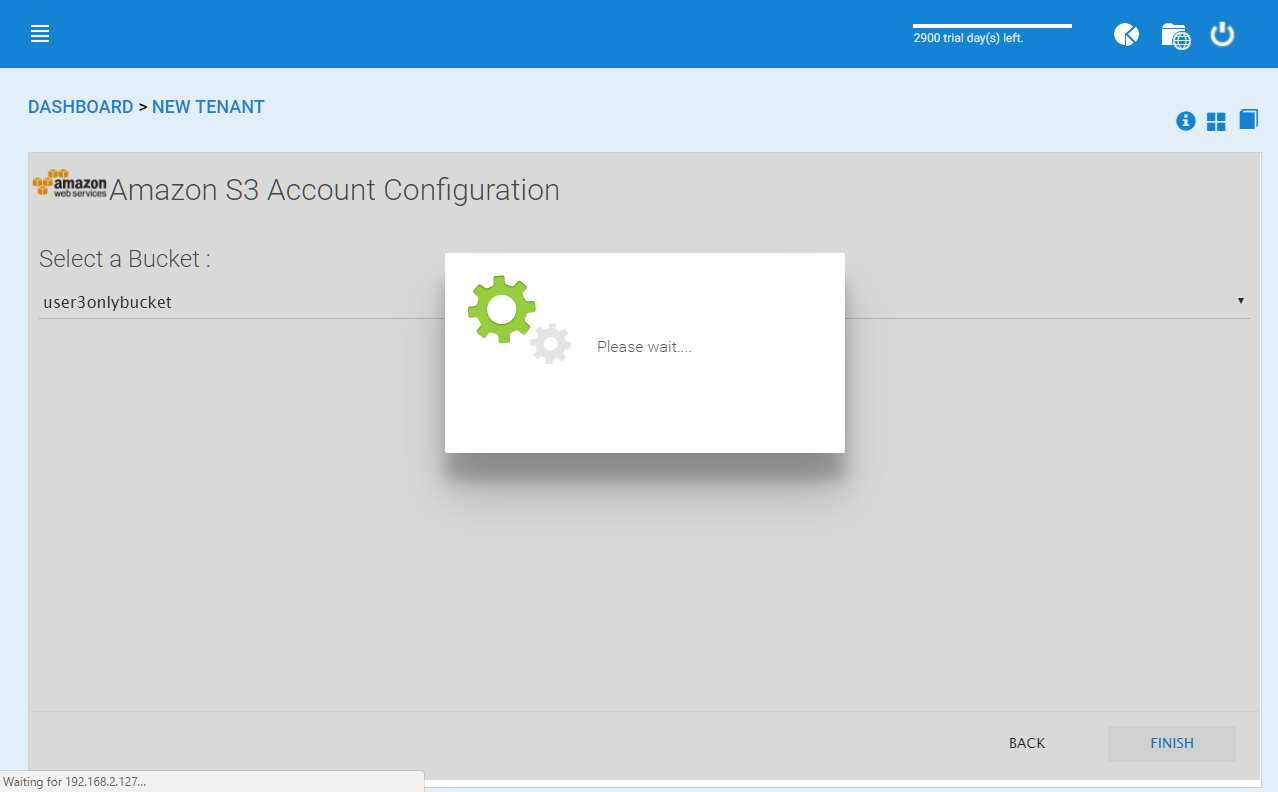
FINISHING AMAZON S3 CONFIGURATION
After the tenant is created, you will be looking at the dashboard of the tenant.
Using Windows Azure Blob Storage for tenant storage
In addition to Amazon S3 bucket, you can also use Windows Azure Blob Storage as the tenant’s back end storage.
Similar to the above Amazon S3 setup process, you can pick “Windows Azure Blob” as the option during the tenant creation process.
WINDOWS AZURE BLOB SETUP
The next screen will be asking for Blob URL and the Primary key.
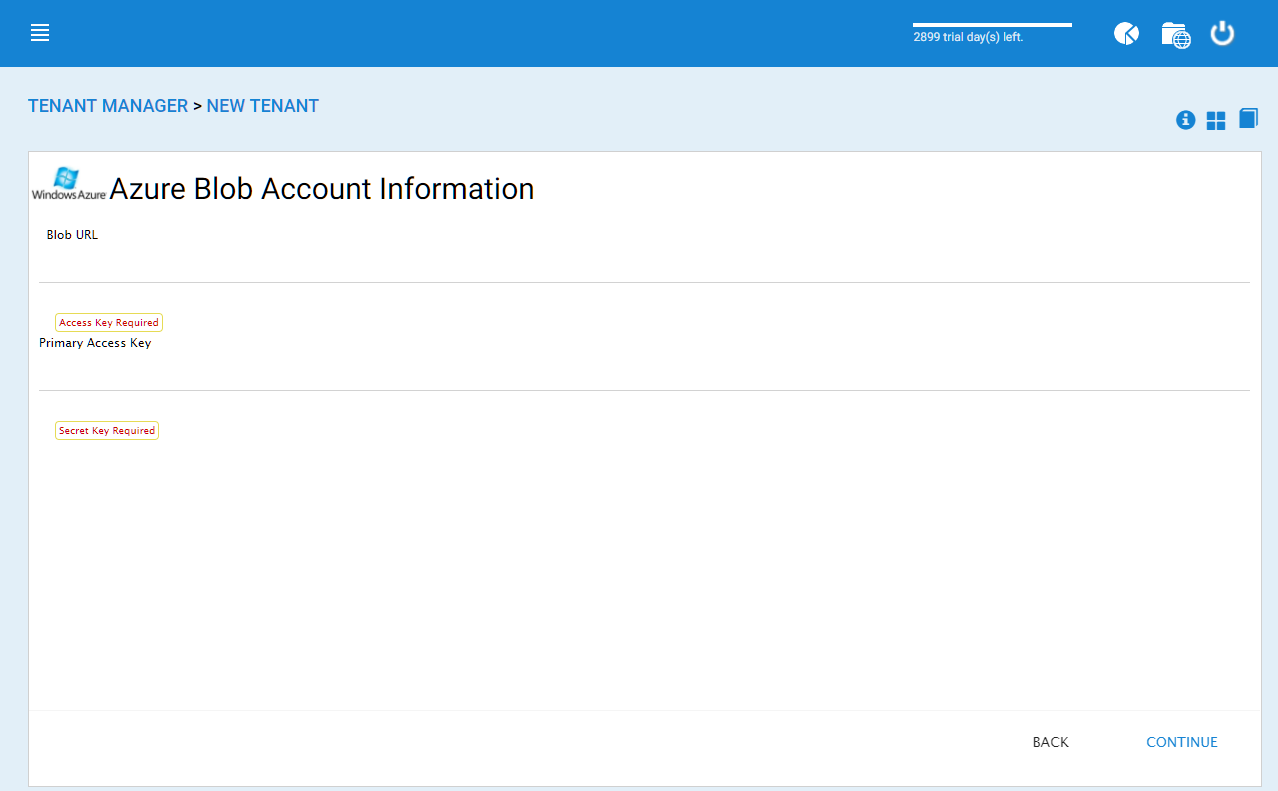
AZURE BLOB URL AND PRIMARY KEY
You can get this information from the Azure Portal.
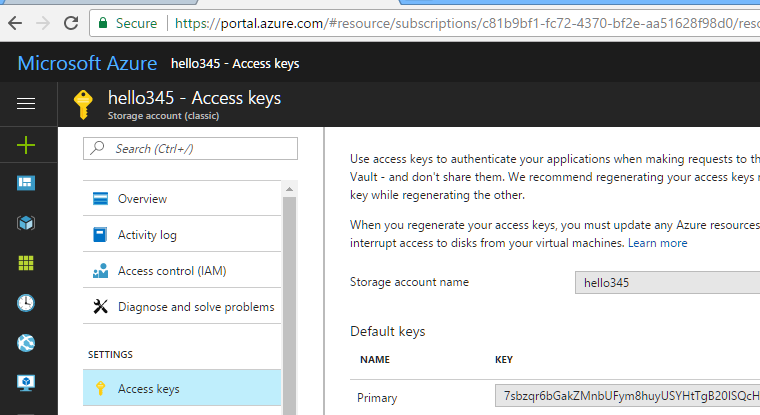
AZURE BLOB ACCESS KEYS
Here is a simple mapping between azure portal and the parameters it ask for.
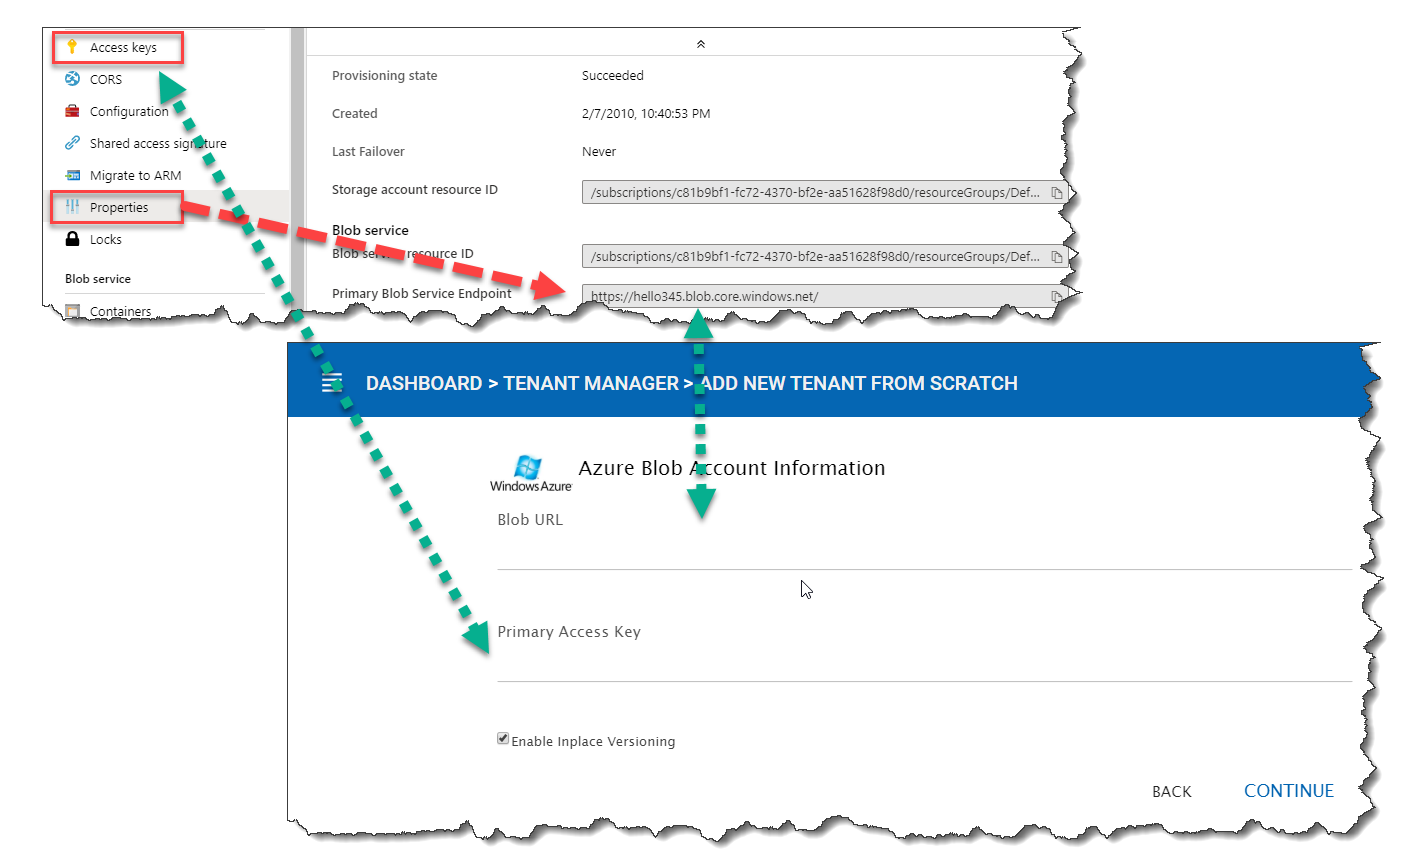
AZURE BLOB ACCOUNT SETTINGS
After you put in the account information, the next screen asks to pick a container to use.
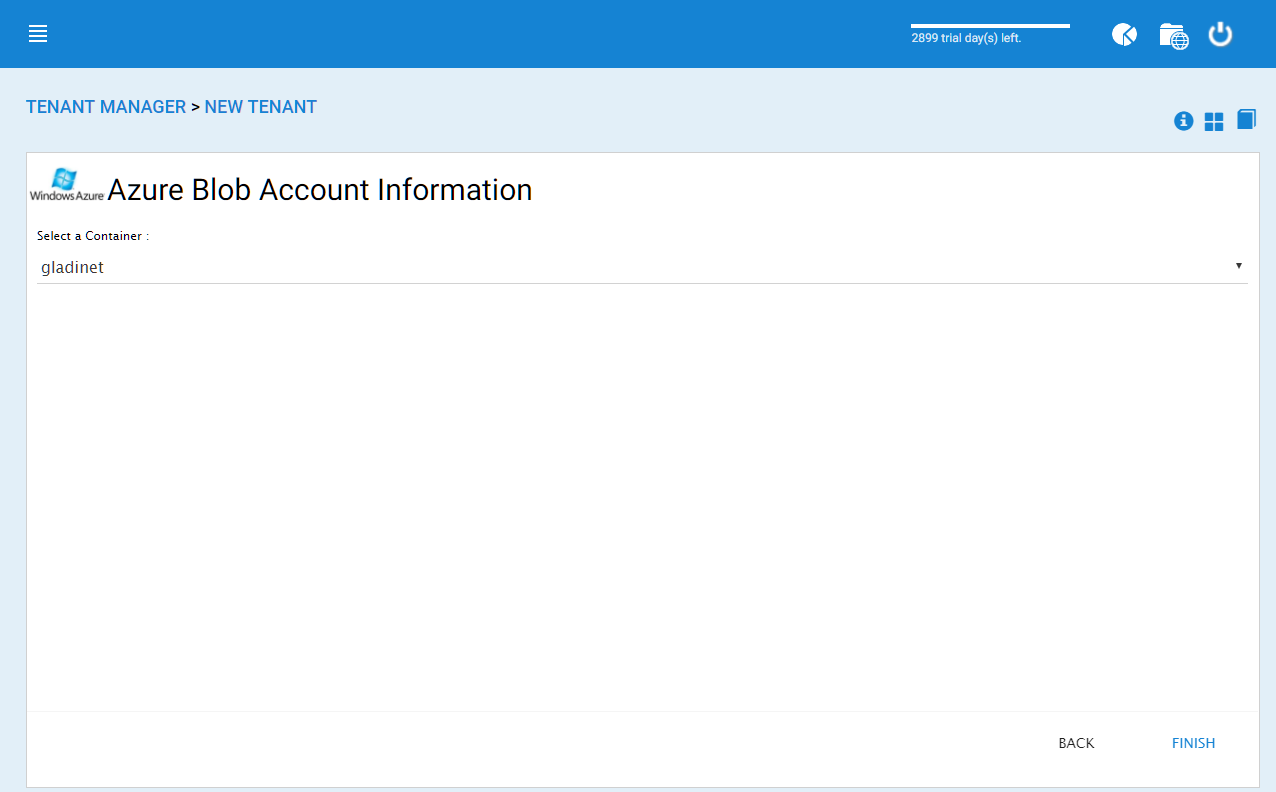
AZURE BLOB ACCOUNT INFORMATION
After the container information is all set, the tenant account will be created.
Cluster Branding
Cluster Manager > Cluster Branding
Cluster Branding is for changing the logo, bitmaps and other branding related information. There are two branding supports. One is self-service built-in branding, which is completely controlled by the “Cluster Branding” settings on the “Cluster Manager”. The other is full-branding service. Both rely on the “Cluster Branding” to change the look-and-feel of the web portal.
Built-in branding will work with white-label clients, which upon the first connection to the cluster, will download the branding related information and use the branding related information. As compared to full-branding service, the full branding clients will have artworks, logo bitmaps and related information burned into the client binaries.
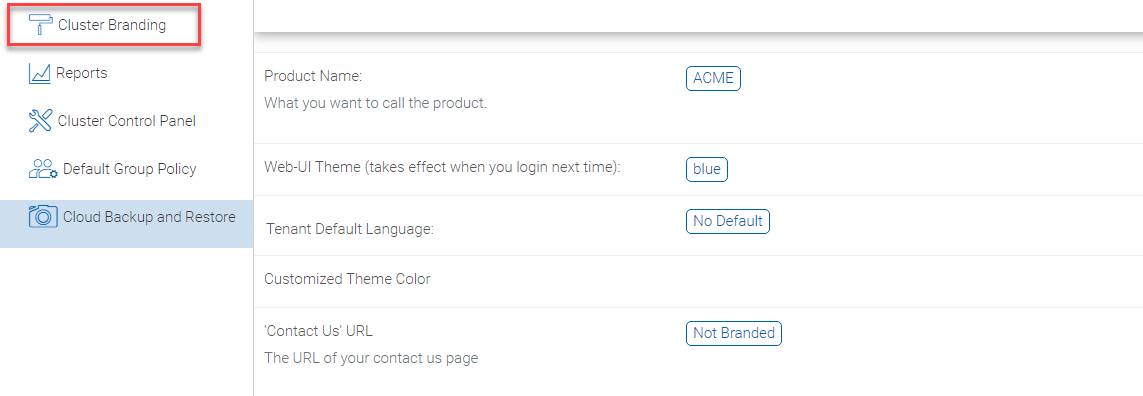
CLUSTER BRANDING
General
Cluster Manager > Cluster Branding > General
Under the general tab you can specify the name and other settings as specified below.
Product Name
This is where you will specify what you would like to call the product. This is the name that users will see when they login either in web portal or the client applications. To access branding settings click the branding icon (1) then “EDIT” (2) and then change the setting you want (3). Don’t forget to save your settings. You can also choose a color theme which you would like your users to see when they login to the portal. You can choose a color theme that is close to your company colors.
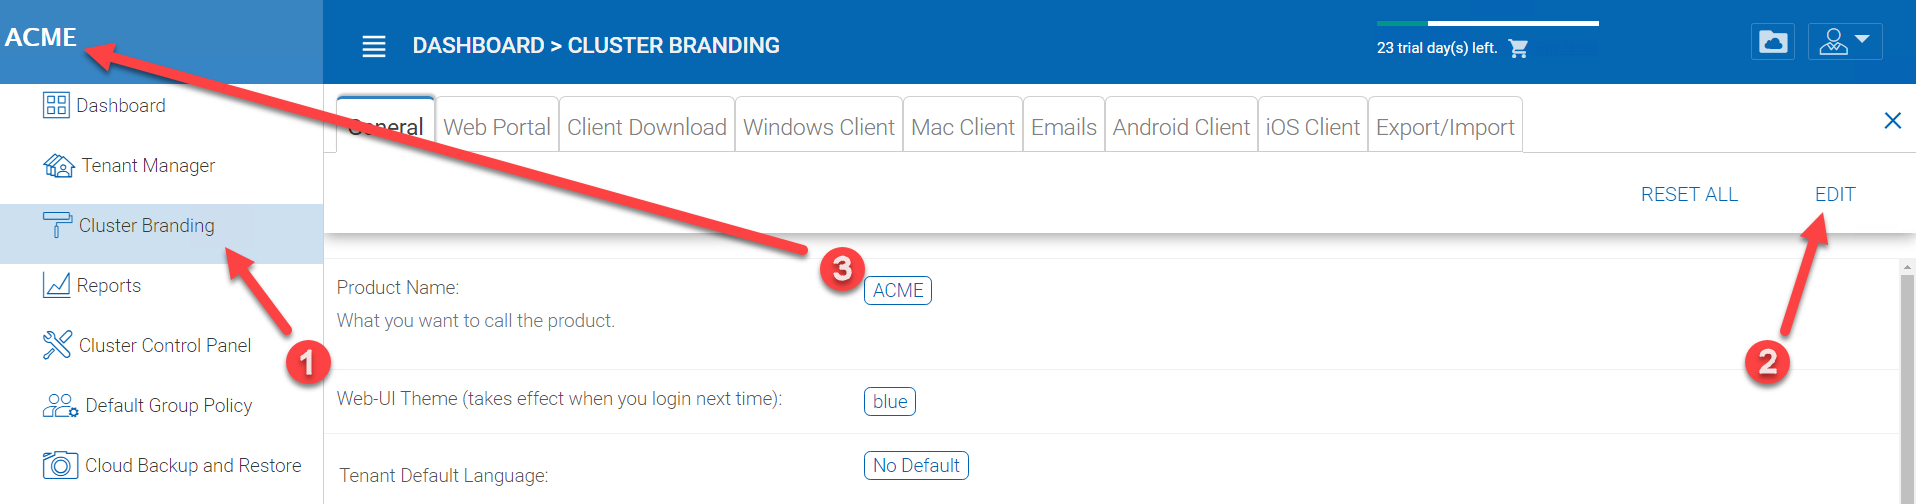
CLUSTER BRANDING
Feedback Email
Users’ feedback will be delivered to this email address.
FEEDBACK EMAIL
Home Page URL
This is the URL of your ‘Home Page’ page (1).
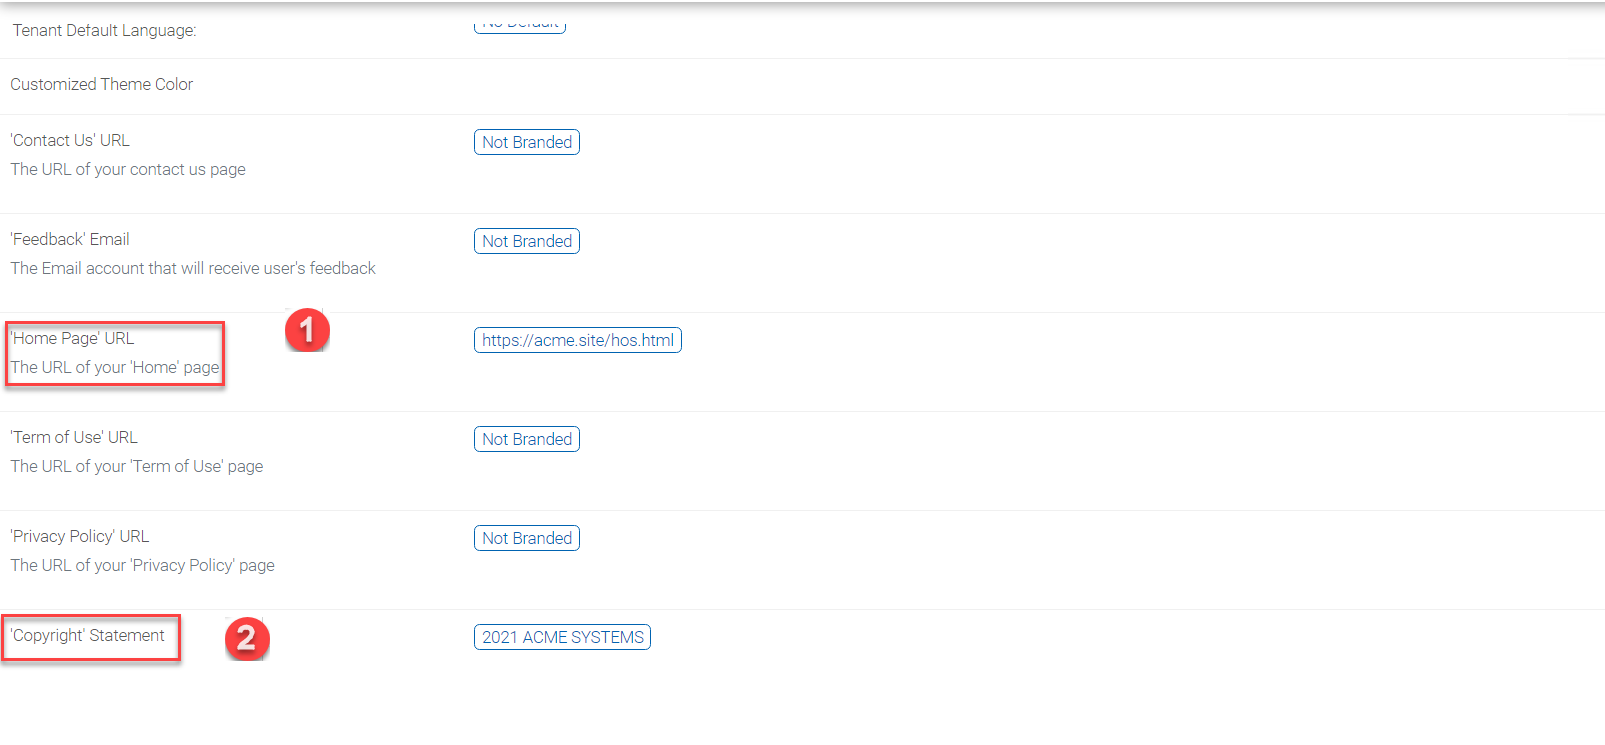
HOME PAGE URL AND COPYRIGHT STATEMENT
‘Copyright’ Statement
This is the contents of your ‘Copyright’ statement (2).
Web Portal
Cluster Manager > Cluster Branding > Web Portal
Note
In previous builds, the best way to get icons to work is by putting the icon files on the same server and reference the icons via a relative link.
For example, you can create a sub folder under the Install Folder of the Cluster Server, such as under root/imagetest folder. The dimensions for all icons for each setting under web portal should match what is displayed for each setting. The branding of the icons and images require the icons and images with the same width/height as specified or same aspect ratio if the resolution is higher.
In later builds, the icons used are what-you-see-is-what-you-get and you can upload those icon sets.

WEB PORTAL SETTINGS
Application Icon
From the Web portal (1) section of cluster branding, you can change the application icon (2). This is the image that is displayed next to the product name in the web portal.
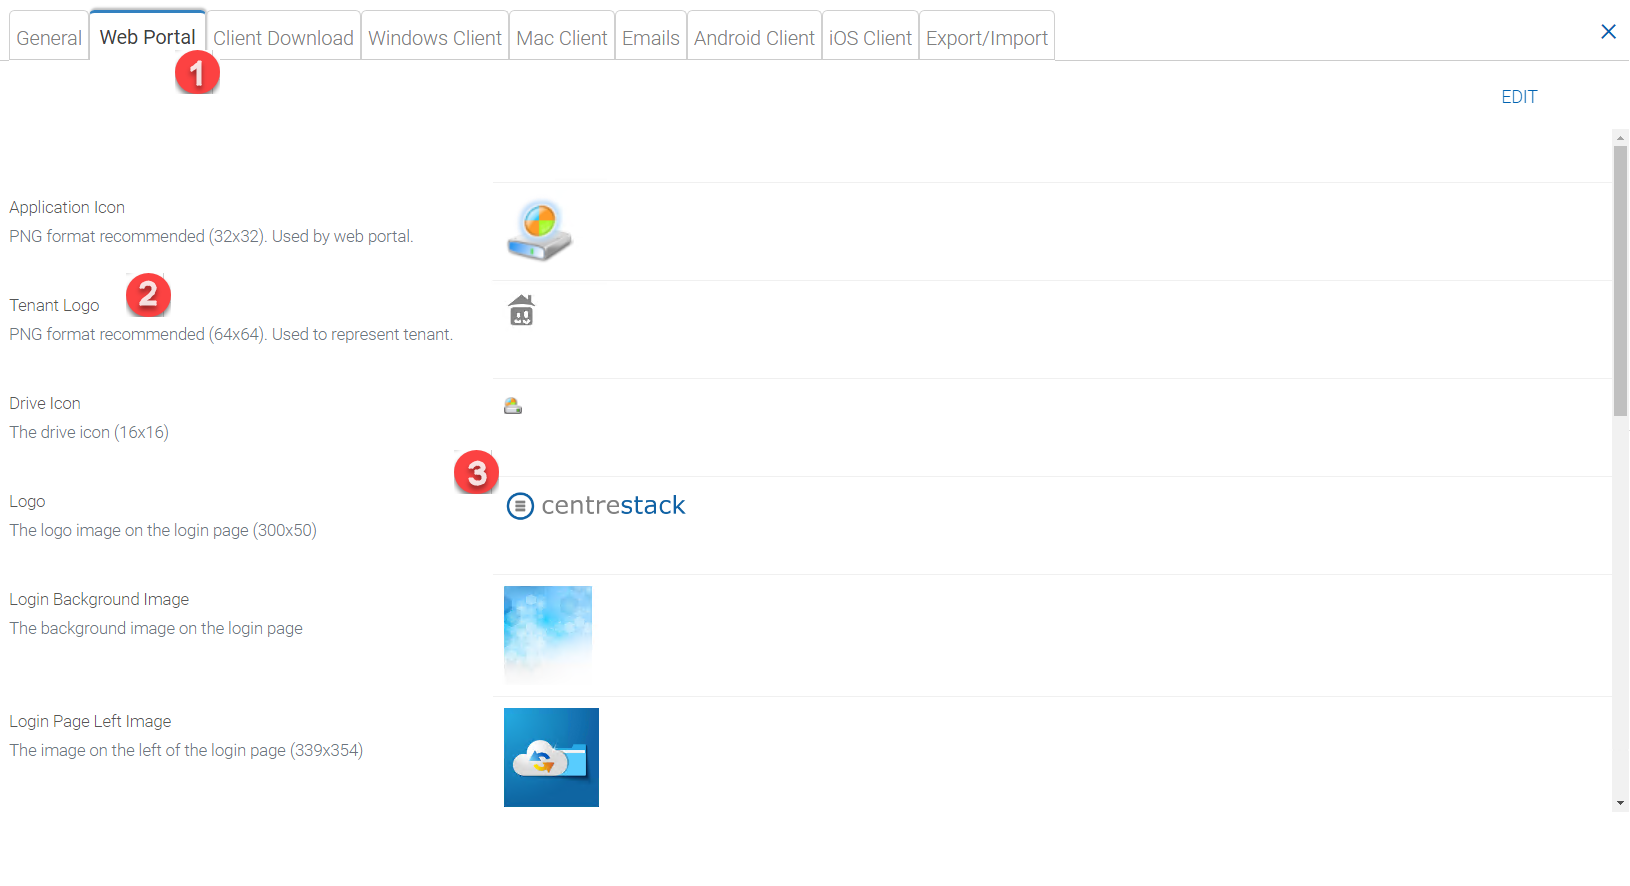
WEB PORTAL BRANDING
Tenant Logo (3)
This is where the logo that represents each tenant should be uploaded.
Drive Icon (4)
This is the icon that will be used for the cloud drive. For example in the web portal tree view.
Logo Url & Login Page Left Image (5)
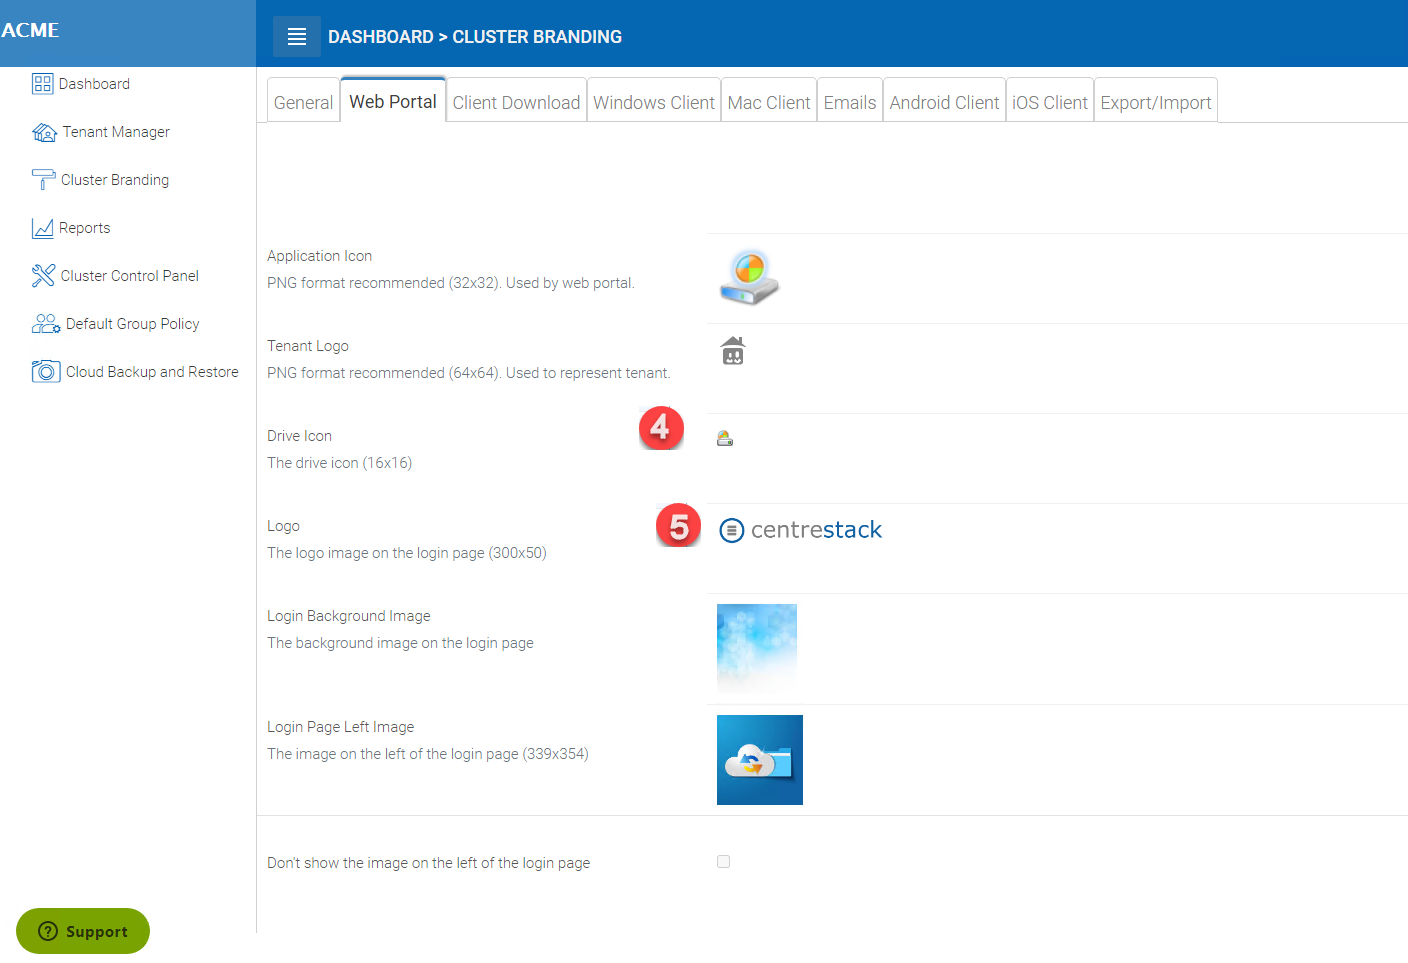
LOGIN PAGE ICON
Please follow the same steps for branding settings for ‘Login Background Image’, ‘File Share Stamp Icon’, ‘IOS Client App ID’, ‘Login Page Note’, ‘Change Password URL’, ‘Tutorial Page URL’.
Client Download
Cluster Manager > Cluster Branding > Client Download
You can choose not to show the download link for some clients here.
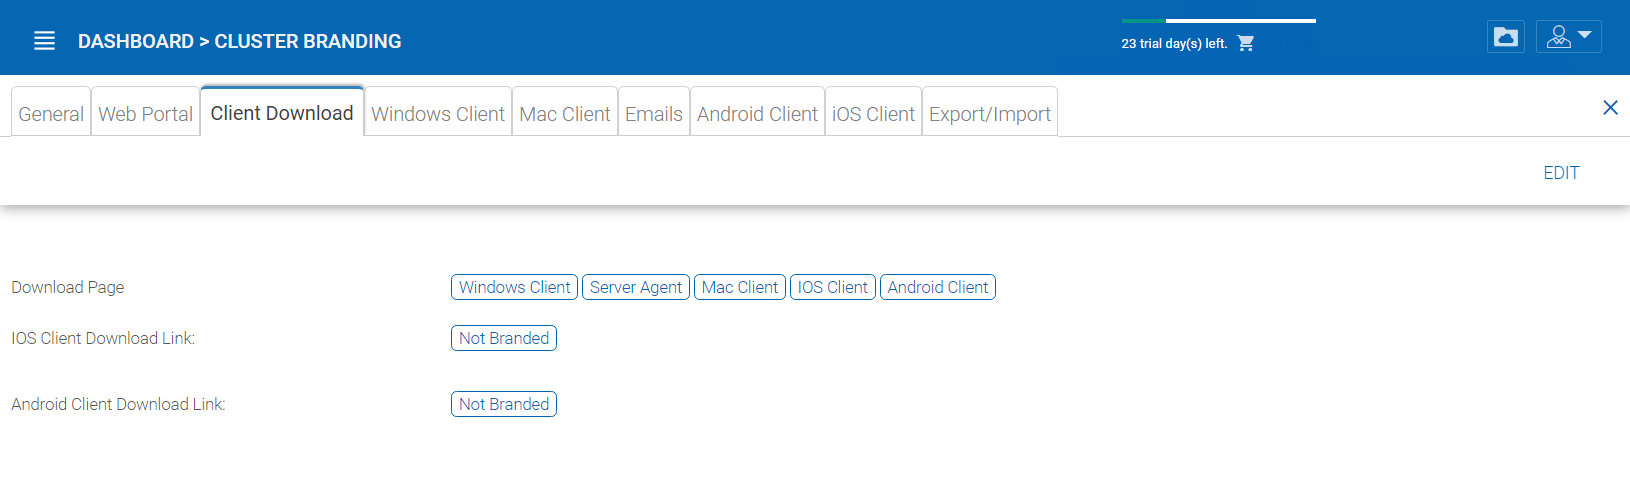
CLIENT DOWNLOAD SETTINGS
Mobile Clients Download Links
Once you brand your own iOS client and/or Android Client you can point the download link to your own AppStore and Google Play locations.
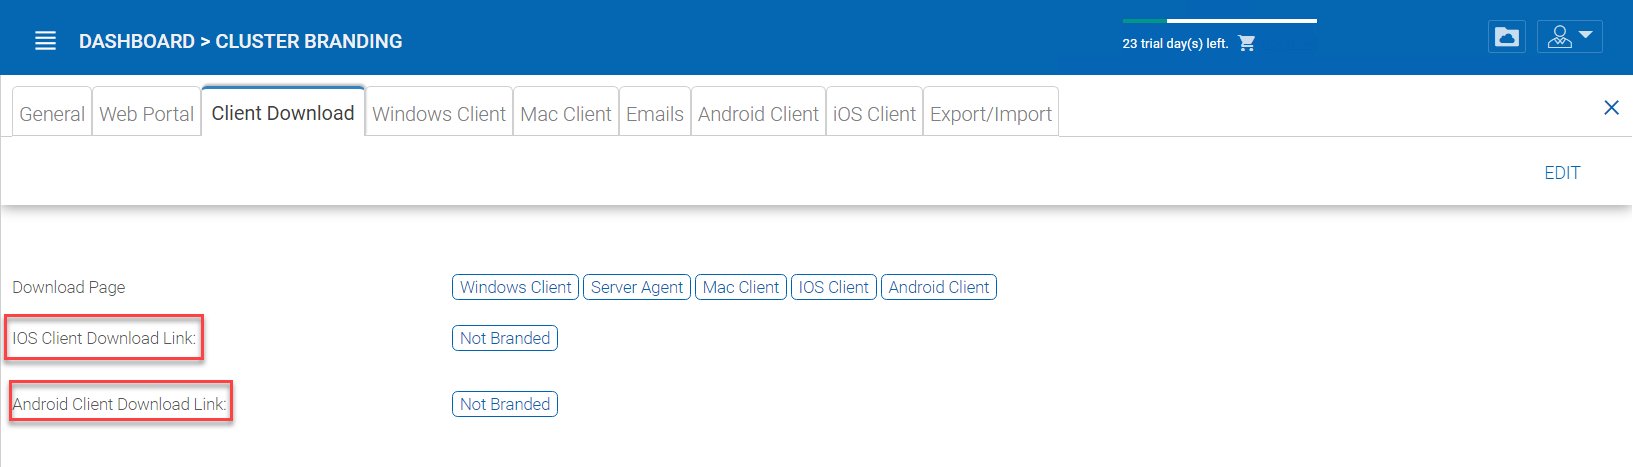
CLIENT DOWNLOAD LINKS SETTINGS
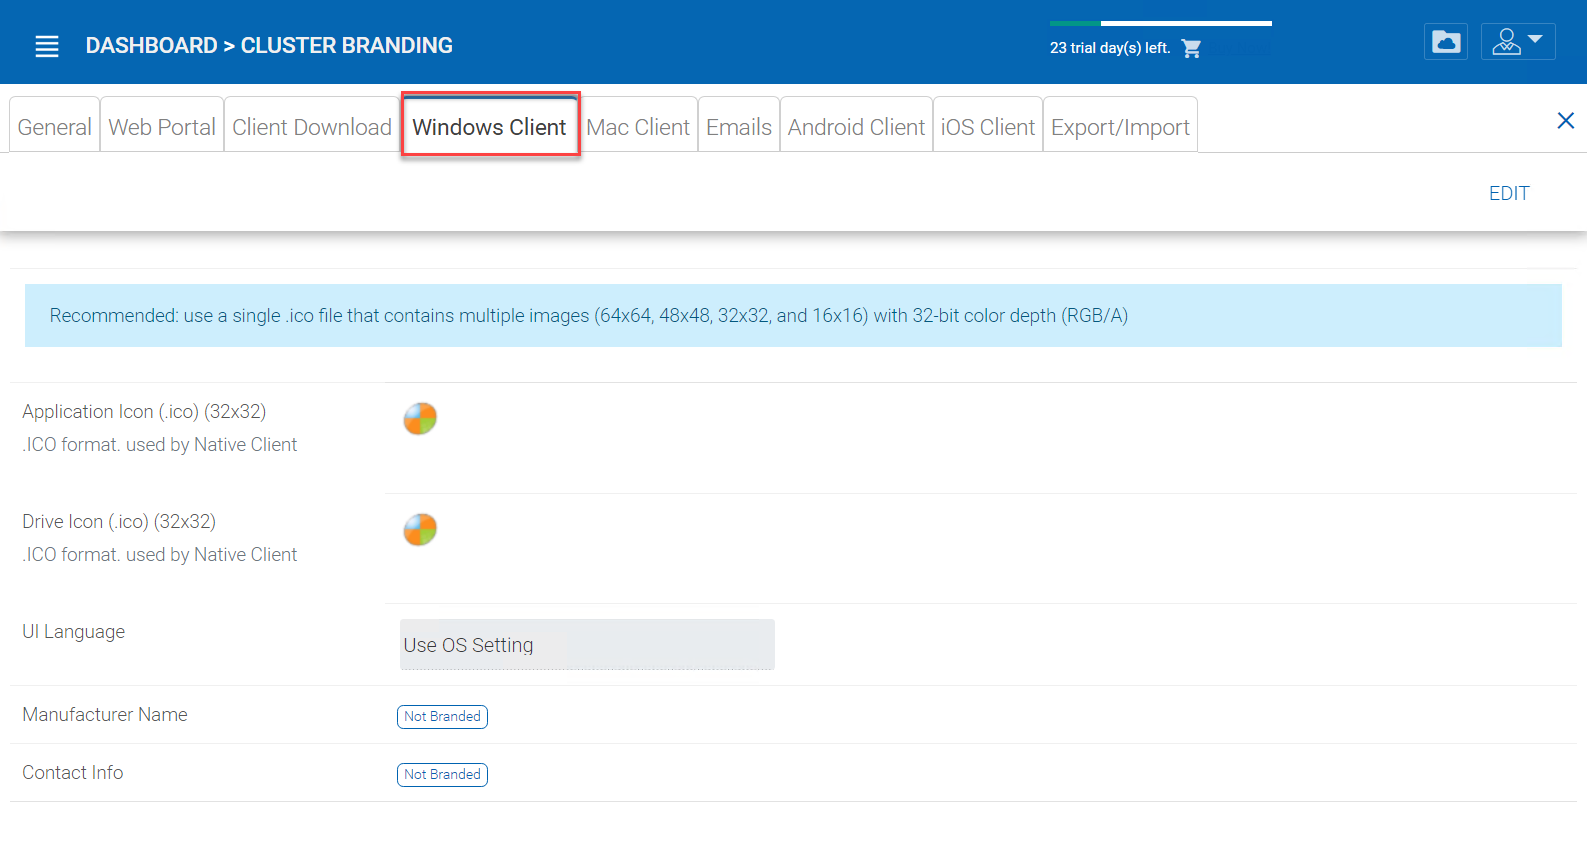
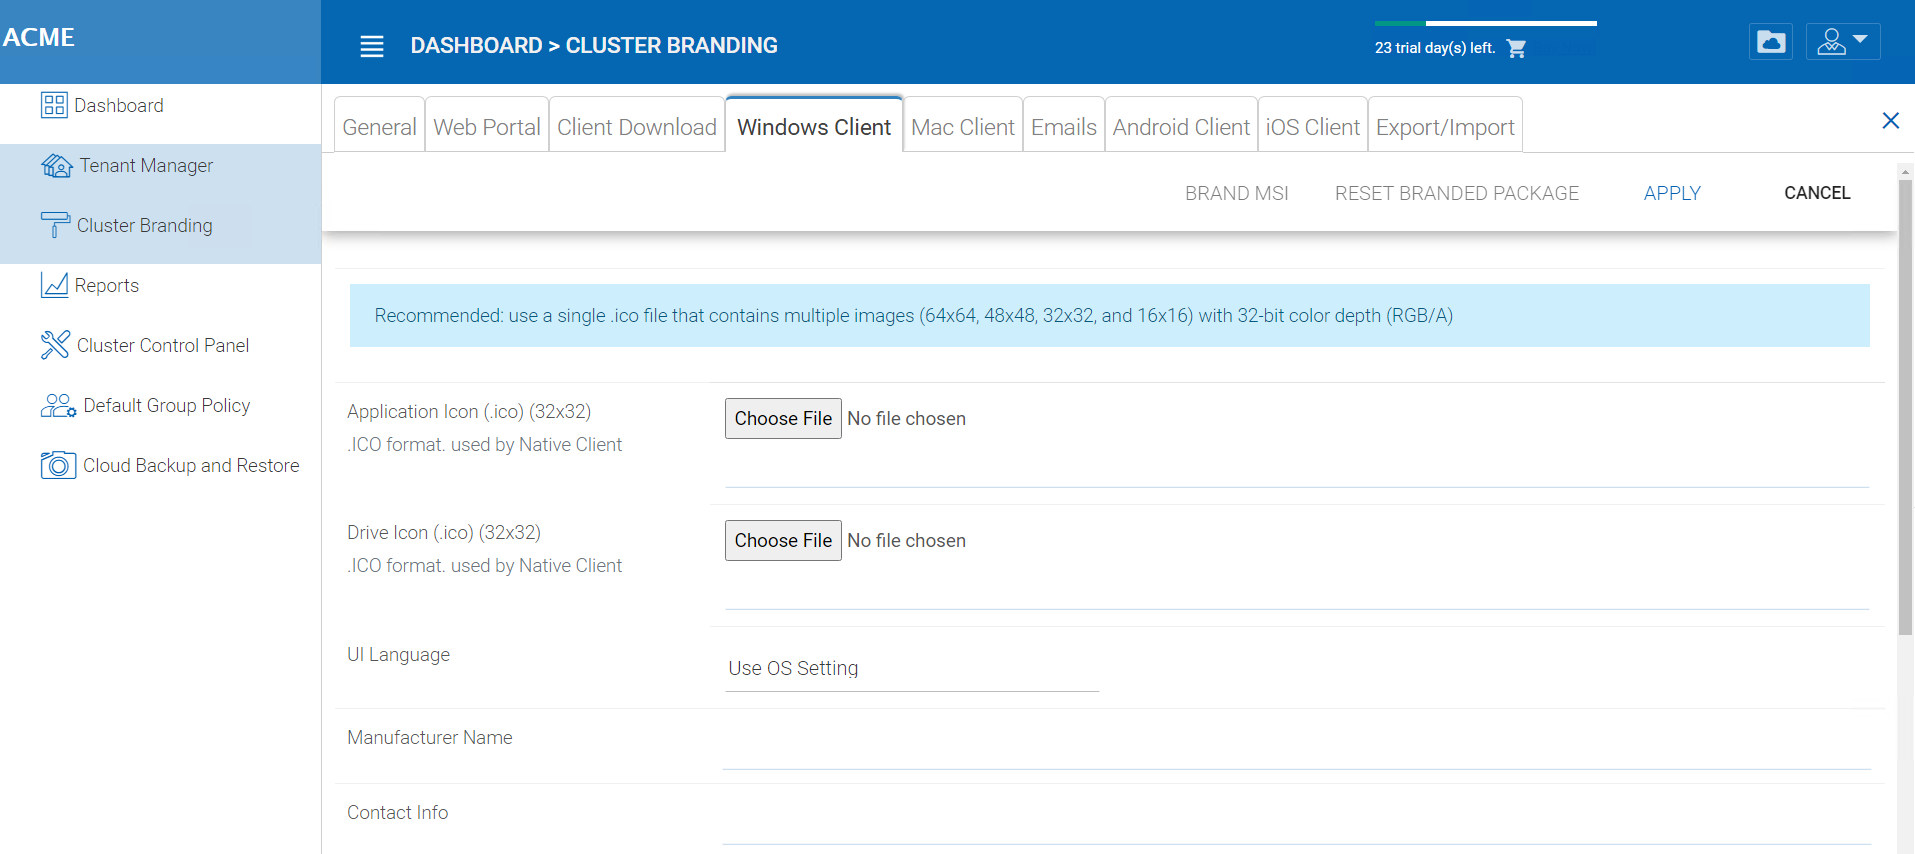
Windows Client
Cluster Manager > Cluster Branding > Windows Client
The application icon and drive icon URLs can be specified here. Also, you can put in your company name under ‘Manufacturer Name’ along with the ‘Contact Info’ email. You also have the option here to create your own branded MSI Windows client. You can also use your own code signing certificate in order to digitally sign the MSI package. The advantage of creating your own MSI client package is that when users download and install the Windows Client you provide, they will see your company name along with your branding during the client installation.
Windows client supports multiple languages. Some language packs are included and shipped with CentreStack. If you need to run the Windows client under a different language, you can set the UI Language there.
WINDOWS CLIENT BRANDING
Once you clicked the “Edit” button to edit the Windows Client branding information, you will be able to provide EULA (End User License Agreement) and Code Signing Certificate.
WINDOWS CLIENT BRANDING SETTINGS
EULA
This will be a RTF file format as input.
Code Signing Certificate
You can acquire a code signing certificate from your code signing certificate vendor. Most SSL vendor also provide code signing certificate. Make sure you use SHA 256 (SHA2) as your digital signing certificate hash algorithm.
If your Code Signing certificate is already installed you can also use the option -
Sign using cert in certificate store
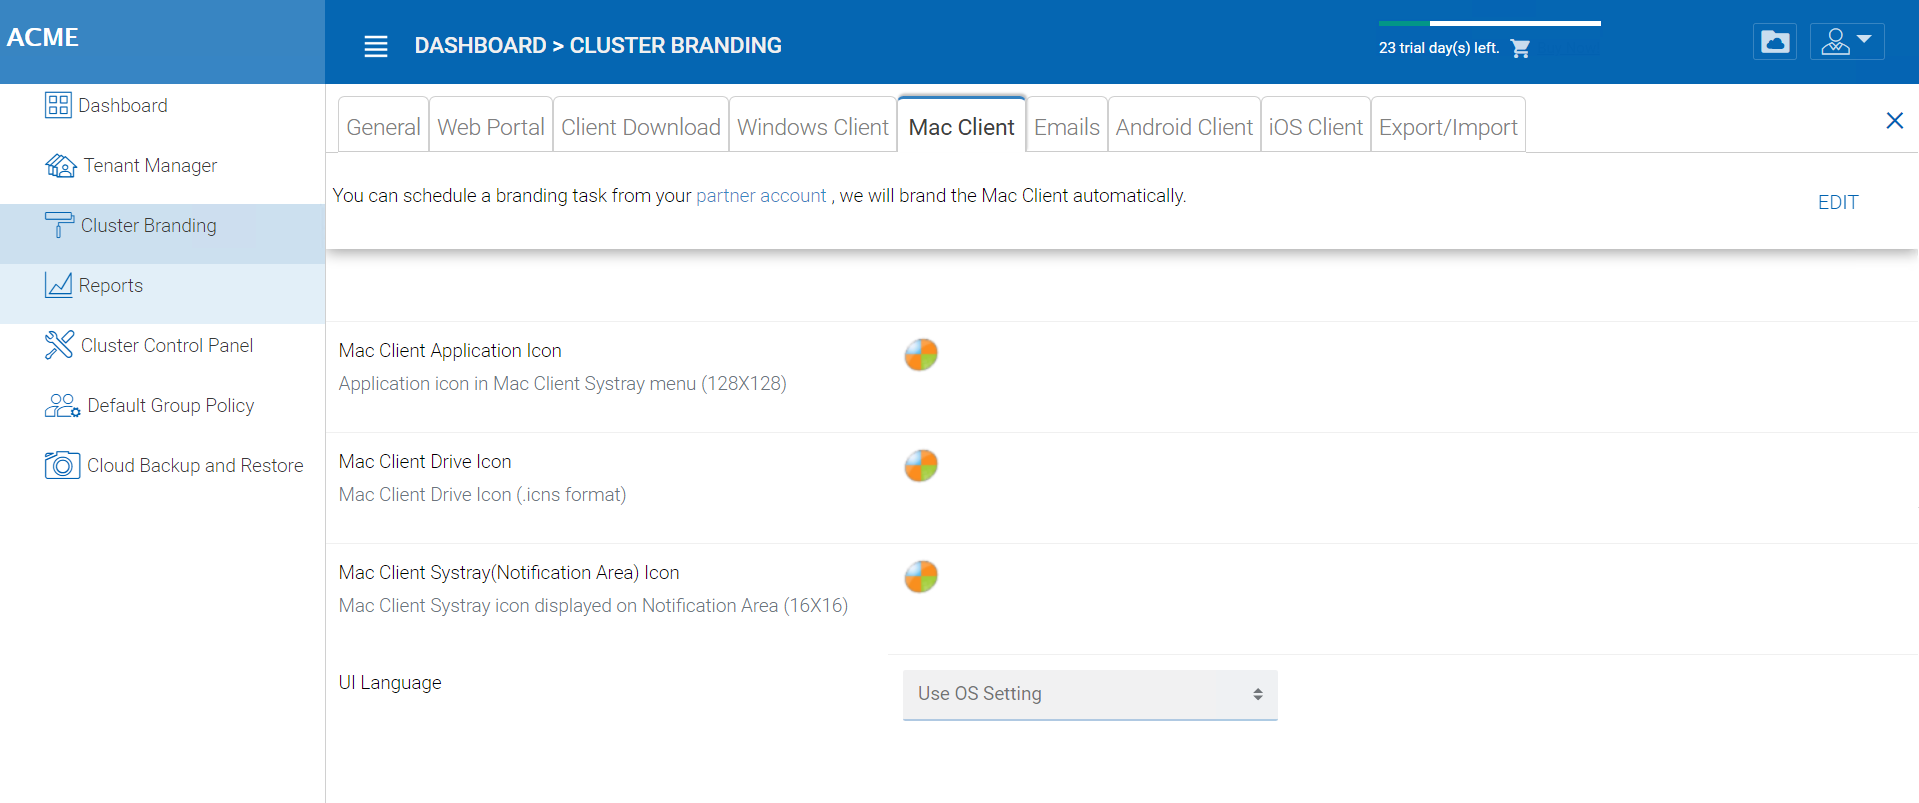
Mac Client
You can configure the MAC client and MAC client installation package branding under here.
Client Branding
MAC CLIENT BRANDING
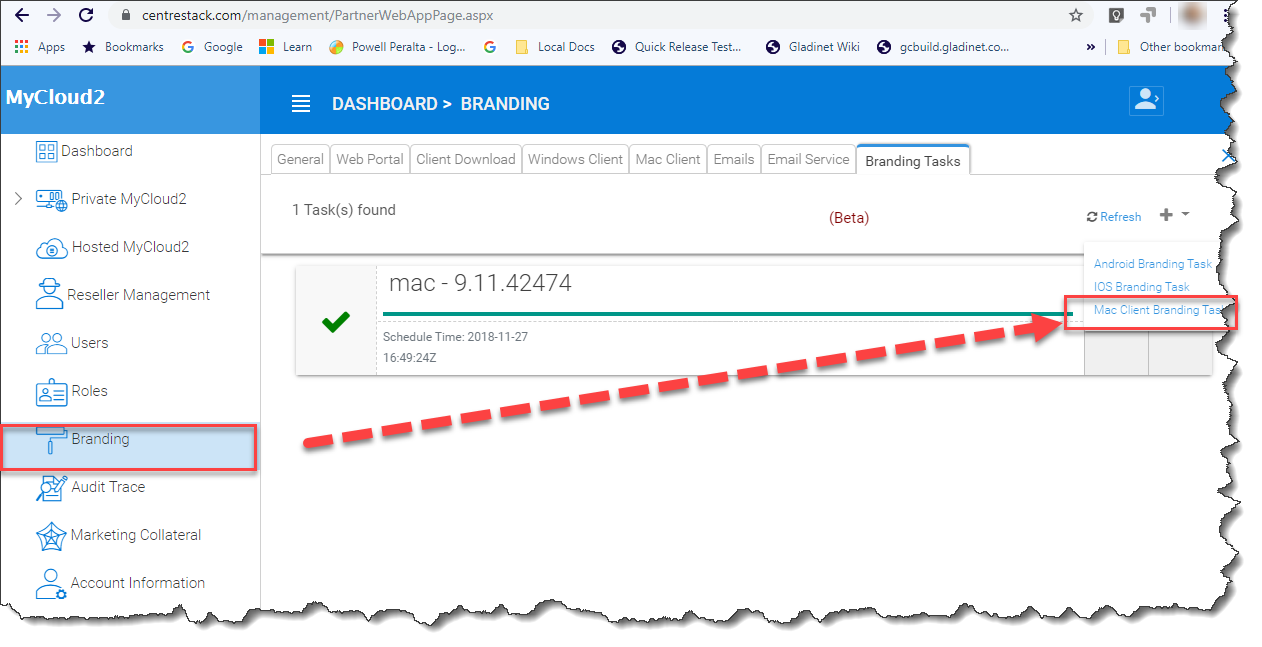
Installation Package Branding
You can brand the Mac software agent package as well. You will need to go to https://www.centrestack.com/, login as a partner and go to the “Branding” section to create a branding task. The task will be fulfilled and completed and a Mac software agent package will be available for download once the branding task completes. It may take a couple of days for the task to finish.
MAC CLIENT BRANDING IN PARTNER PORTAL
Note
Mac software package branding is different from the Windows software package branding because the Mac software package branding will need to be done on a Mac machine. So the task will be created on the partner portal but will be completed asynchronously on a Mac machine.
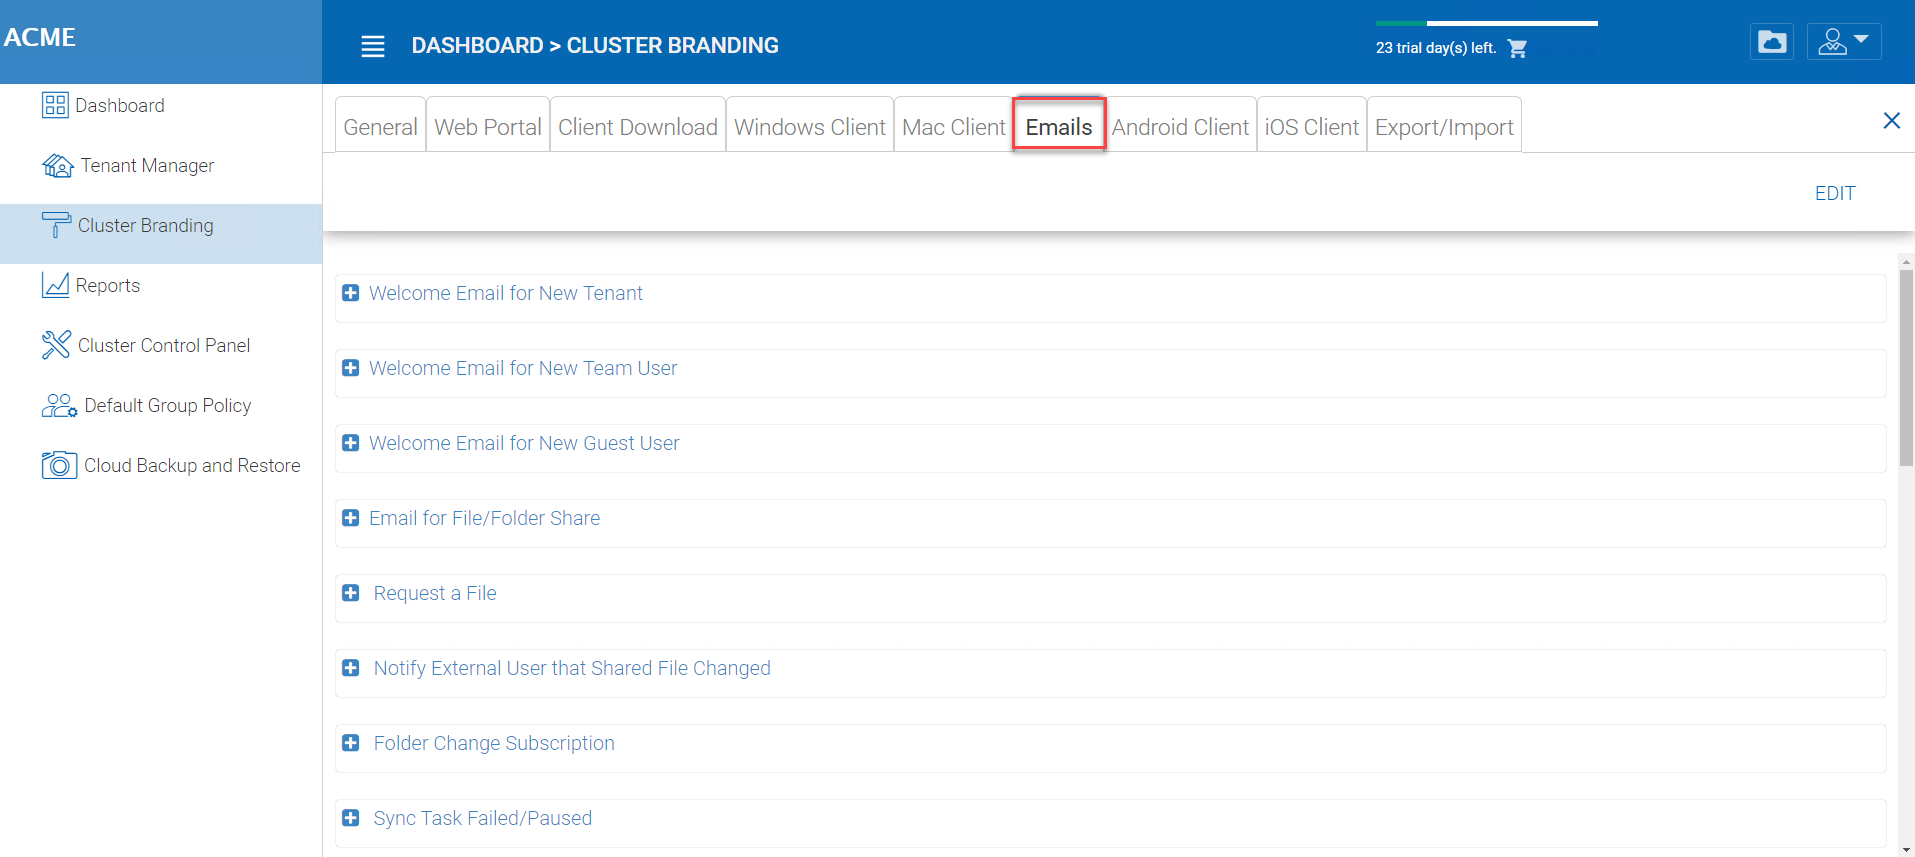
Emails
There are many places in the Cluster Manager that need to contact the users via email. So the “Emails” tab is used to set up the email templates used for contacting users via email.
Welcome Email for New Tenant
This is the email sent to the new tenant when the tenant is created. The email is sent to the tenant administrator.
Welcome Email for New Team User
The team user is a regular user in a tenant. This is the email template that is sent to the user when the user account is created.
Welcome Email for New Guest User
Guest user is a regular user in a tenant that doesn’t have a home directory associated. So the guest user can only operate within shared files and folders from other regular users. This is the email template that is sent to the guest user when the guest user’s account was provisioned.
Email for File/Folder Share
This is the email sent to a user when the user is about to receive file/folder shares.
Request a File
This is the email sent to a user when the user is about to receive an invitation to upload a file.
Notify external user that shared file changed
When a shared file/folder changed, this is the email that is sent to the user who receives file/folder shares.
Admin Reset User Password Email
This is the email that sent to a user when the user’s password is reset.
User Reset Password Email
This is the email that sent to a user when the user resets the password for himself/herself.
New Sign-in Action Email
This is the email notification sent to the user when the user logins from a specific machine.
Settings
This is to set the reply email address. Typically the email is sent with the SMTP service set. However, if the reply address is different, you can set it here.
EMAIL SETTINGS
Android Client
Note
Branding the android client can now be automated from your partner portal (http://www.centrestack.com). Please goto http://www.centrestack.com to brand the Android client.
The branding of Android client and iOS client is done from www.centrestack.com, instead of from your own server.
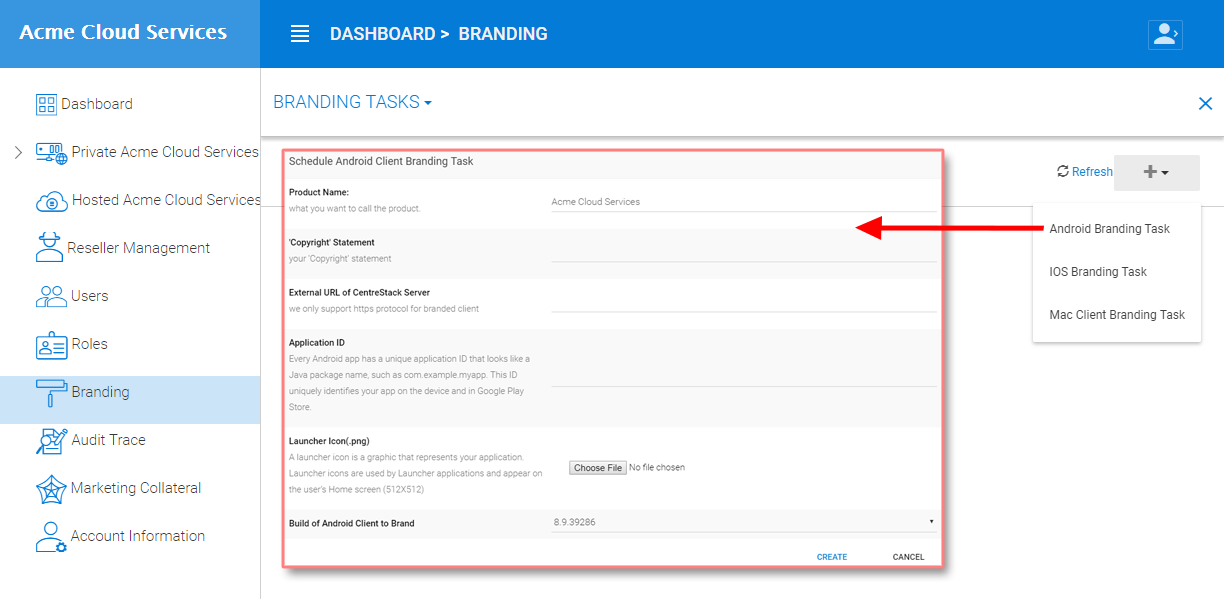
ANDROID CLIENT BRANDING
iOS Client
Note
Branding of iOS client can now be automated from partner portal (http://www.centrestack.com).
The information here in this section is preserved for legacy reference. Please goto http://www.centrestack.com to brand iOS client.
As shown in the above picture, you can generate branding task and request for Android branding and iOS branding.
Export/Import
You can either export the branding settings to another cluster or you can import branding settings from another cluster in this cluster under this setting.
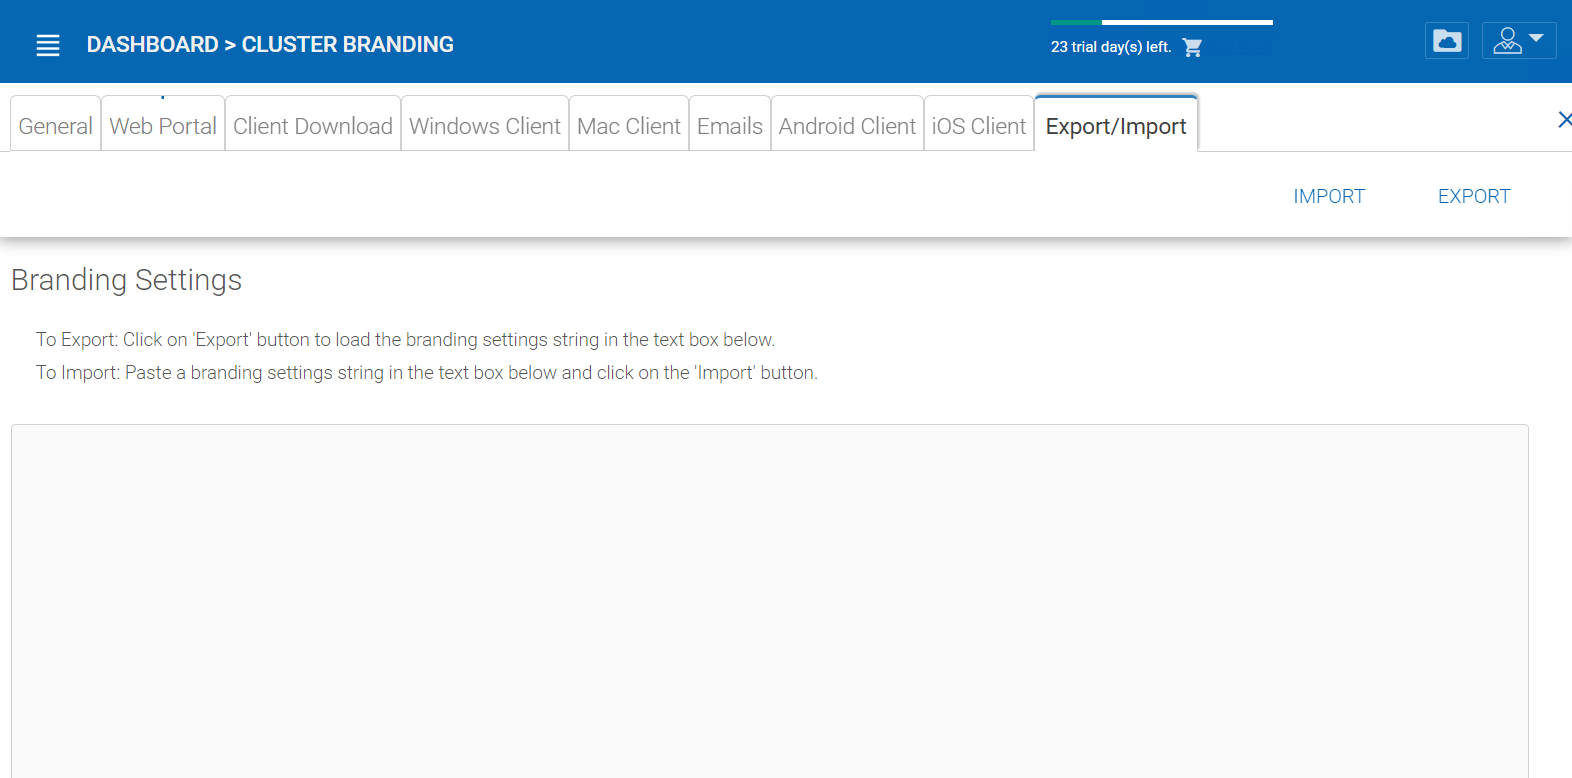
EXPORT/IMPORT SETTINGS
Reports
Cluster Manager > Reports
Upload Report
Upload report tab shows you graphs for all the uploads that have taken place in the last sixty minutes, 24 hours, 30 days and a whole week.
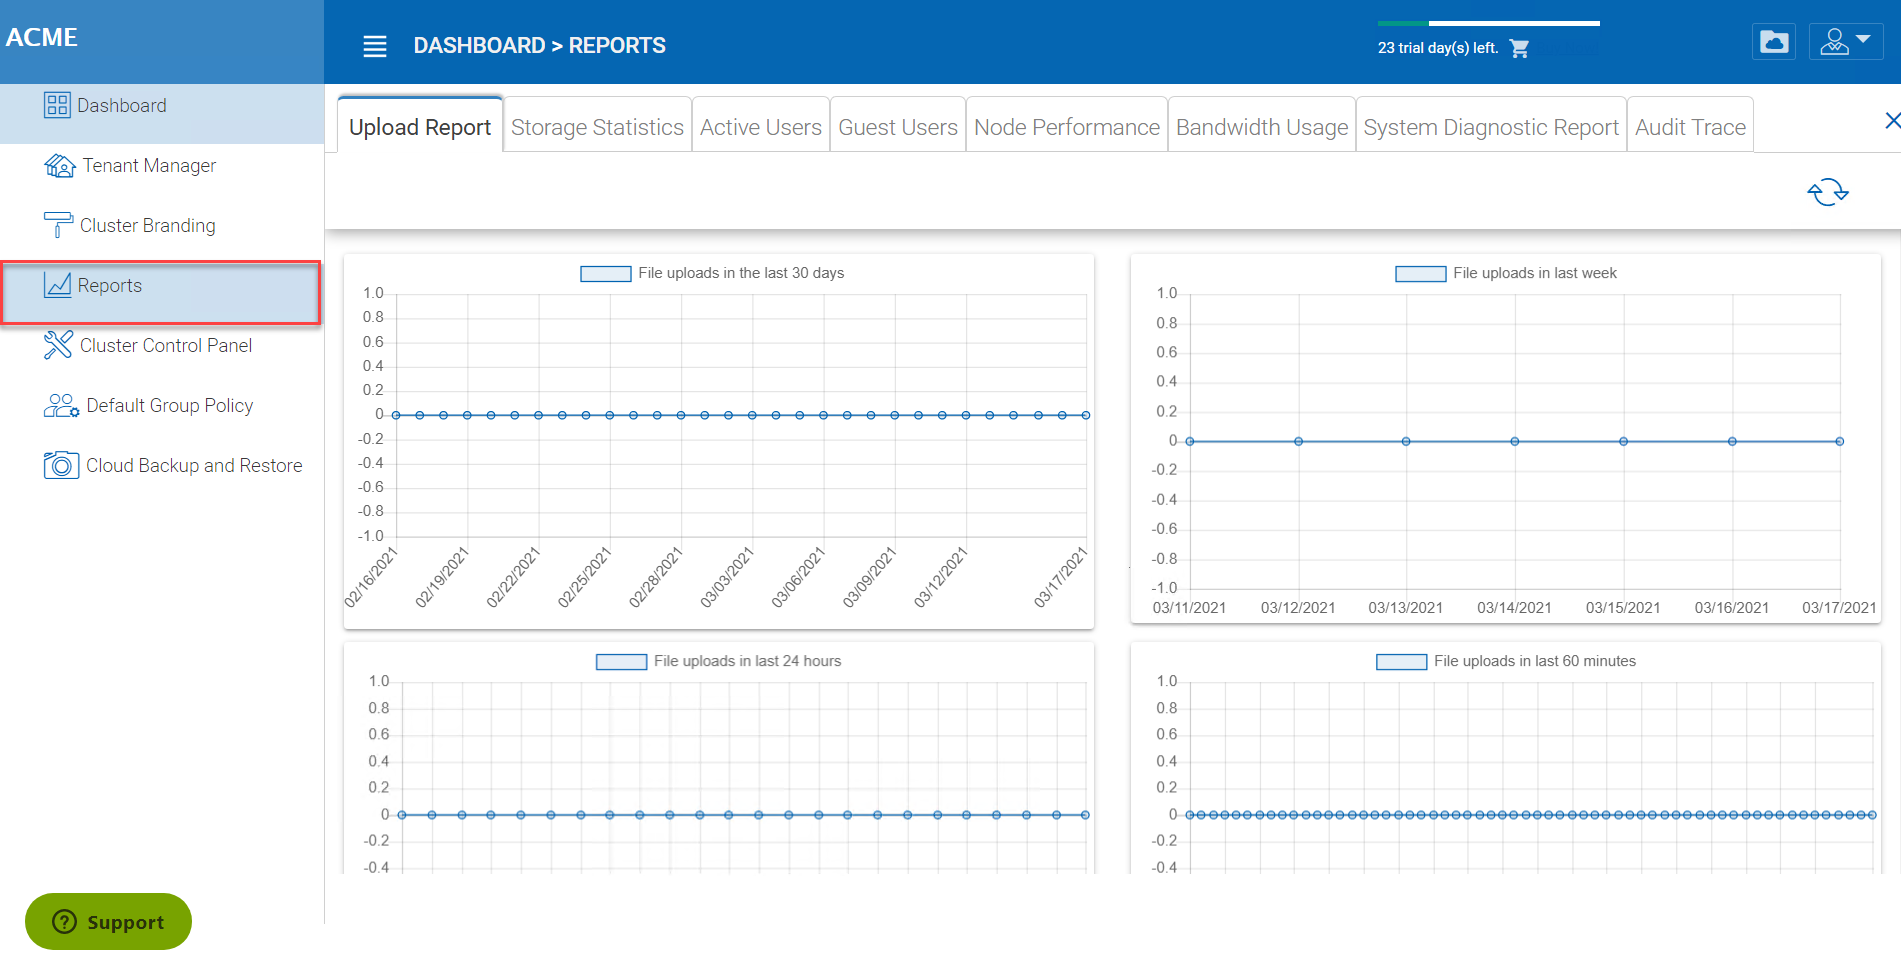
UPLOAD REPORT
Storage Statistics
Under storage statistics, you can see a quick overview of the overall storage statistics, size distribution file type distribution pie charts, and users who have used the most storage so far.
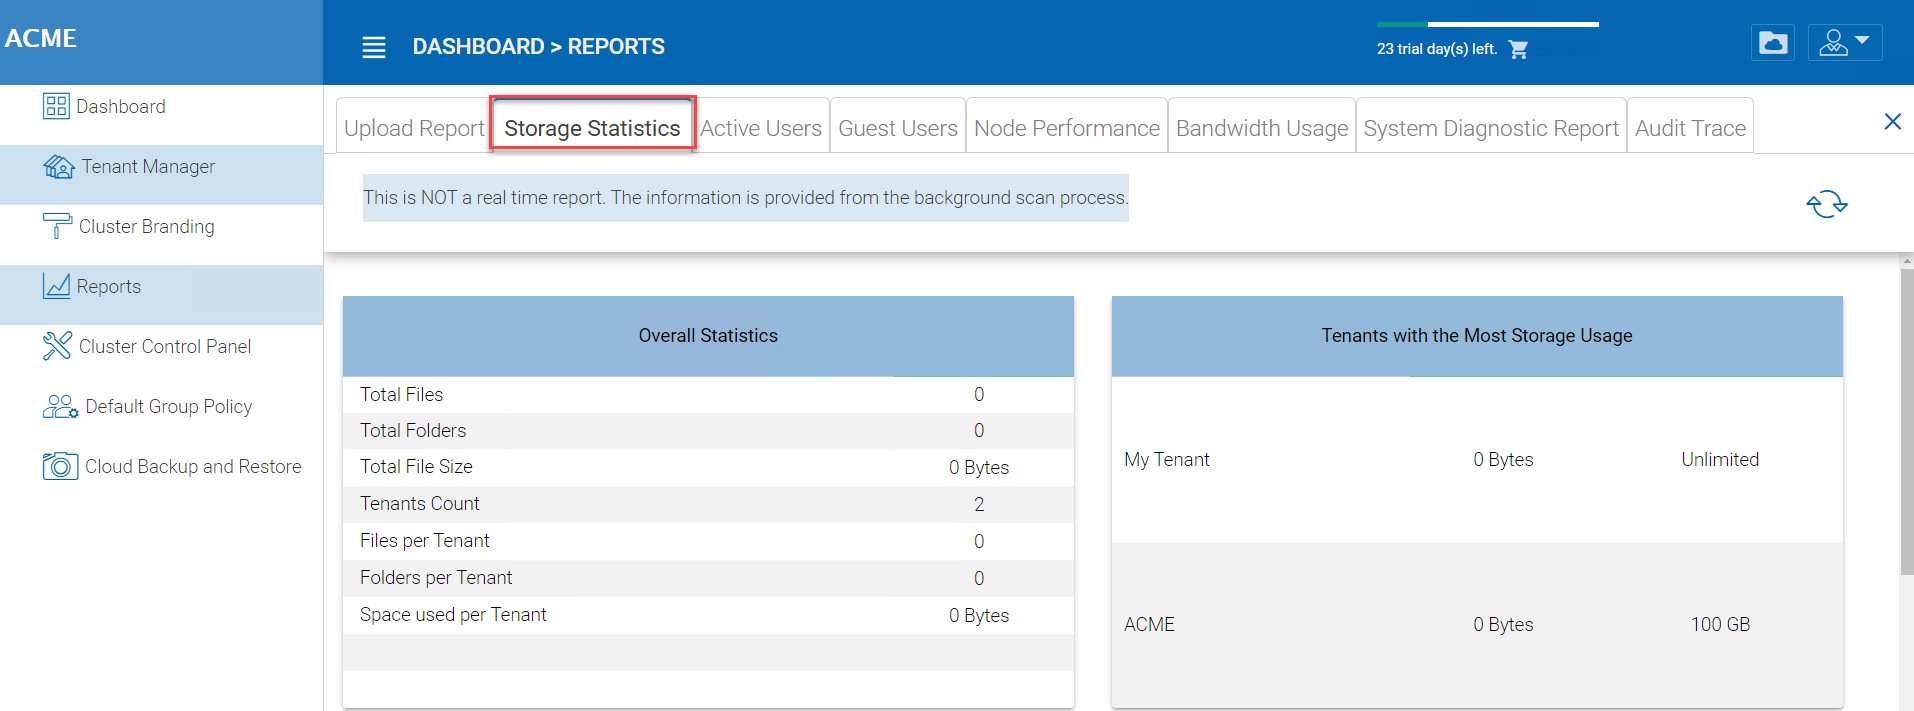
STORAGE STATISTICS REPORT
Active Users
Active users reports the activity of users on the web portal. The active users report doesn’t include users from windows client or other native clients because those users are more persistent (always there). To access this report, you can click on the active users section in the panel near the top of the screen.

ACTIVE USERS REPORT
Guest Users
Other reports are also available such as Guest Users, which are users that don’t have a home directory but are invited to participate on some shared folders and shared files.
Node Performance
You can use the Node Performance to check out the worker node health and the database health.

NODE PERFORMANCE REPORT
Last Reported
You want to see this field has small numbers such as 6 seconds, 10 seconds. If you see sometime like 3 hours ago, that means the node is not reporting the health.
Total Requests Processed
You want to see this number as big as possible. This number is cumulative since the service was last re-started. So the bigger the number, the more stable the service is. Also when you have multiple worker nodes, you want to see the Total Requests distributed evenly among the worker nodes.
Request Executing
You want to see this number as small as possible. This means the number of requests that are concurrently executing on the server. In general a number smaller than 100 is normal. Bigger than 100 is abnormal. Anything bigger than 20 will require investigation.
Last Request Time
You want to see this number as small as possible. This means the number of milliseconds for the last request. In general, numbers smaller than 3000 or 5000 are normal, which translates to below 3-5 seconds.
Pending Change Notification
For the files and folders that are changed, there is change notification written to the database. In general, you want to see the pending queue as short as possible.
Active Node Request
These are the clients out there contacting the server. Usually it is just for reporting purposes.
Pending Change Polling
These are the clients out there polling to see whether there are files and folders that have been changed. Usually the smaller the better.
Active Clients
For reporting purpose.
Pending Dir Request(H)
The pending directory listing calls from the remote clients to the Cluster Server. This is the high priority queue.
Pending Dir Request(L)
The pending directory listing calls from the remote clients to the Cluster Server. This is the low priority queue.Note
If you don’t see the node performance report, check the Internal URL setting of each worker node.
Under reports you can look at the upload graphs and storage statistics.
Bandwidth Usage
This shows the overall bandwidth usage statistics as well as more granular tenant and user level statistics.

BANDWIDTH USAGE REPORT
System Diagnostic Report
Click the Start Scanning button to generate system diagnostic report.
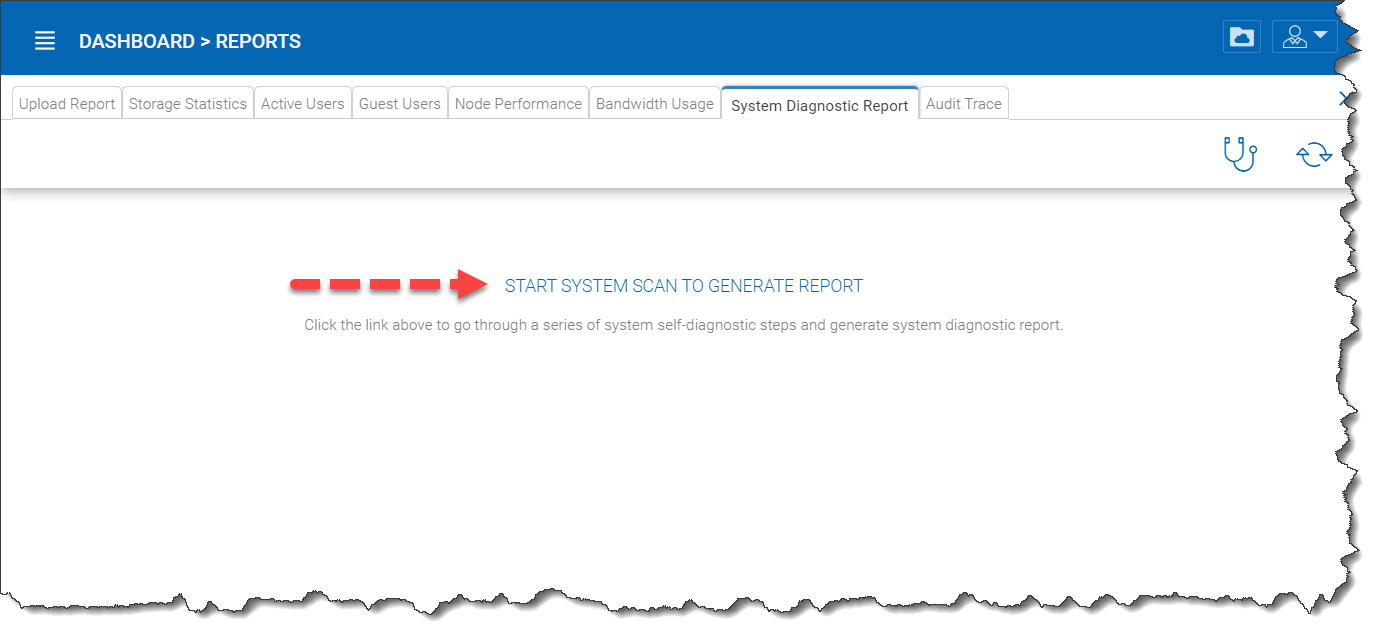
GENERATE REPORT
A sample system diagnostic report is shown below.
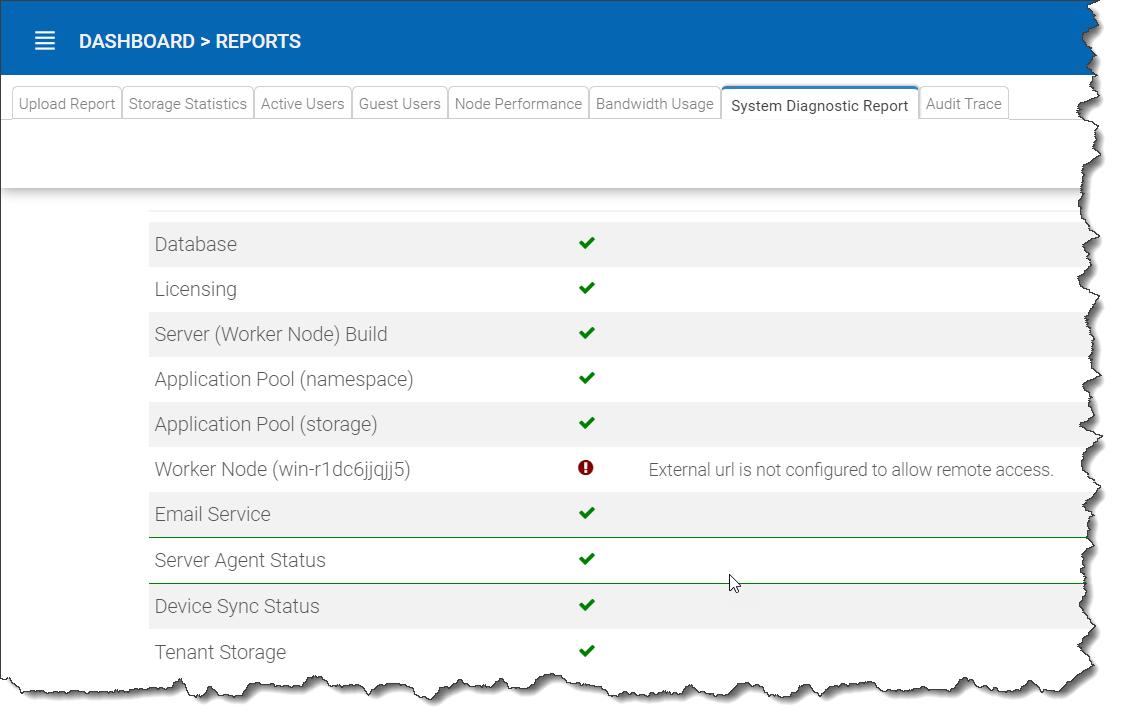
SYSTEM DIAGNOSTIC REPORT
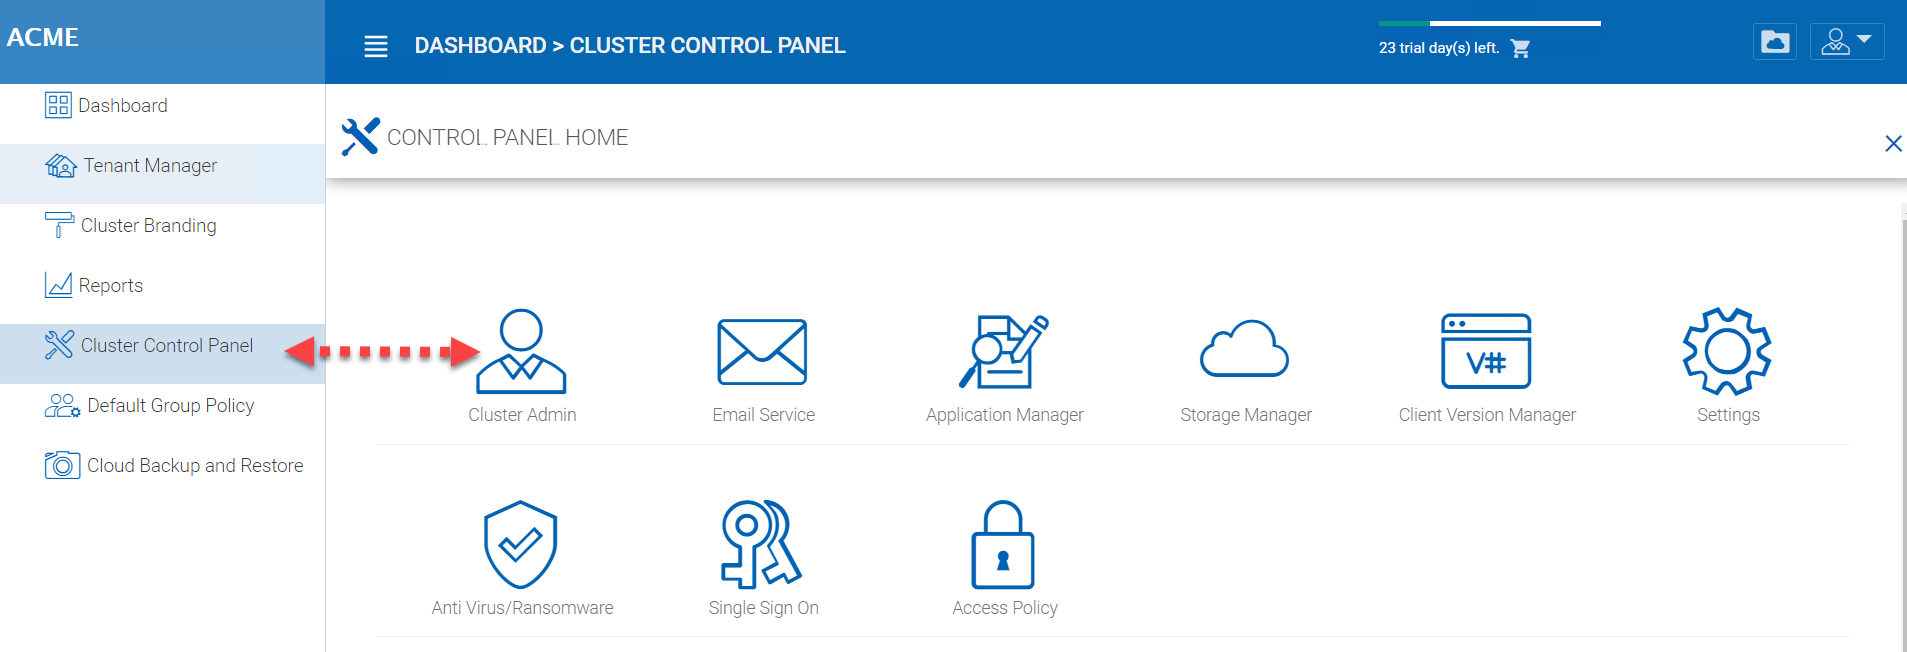
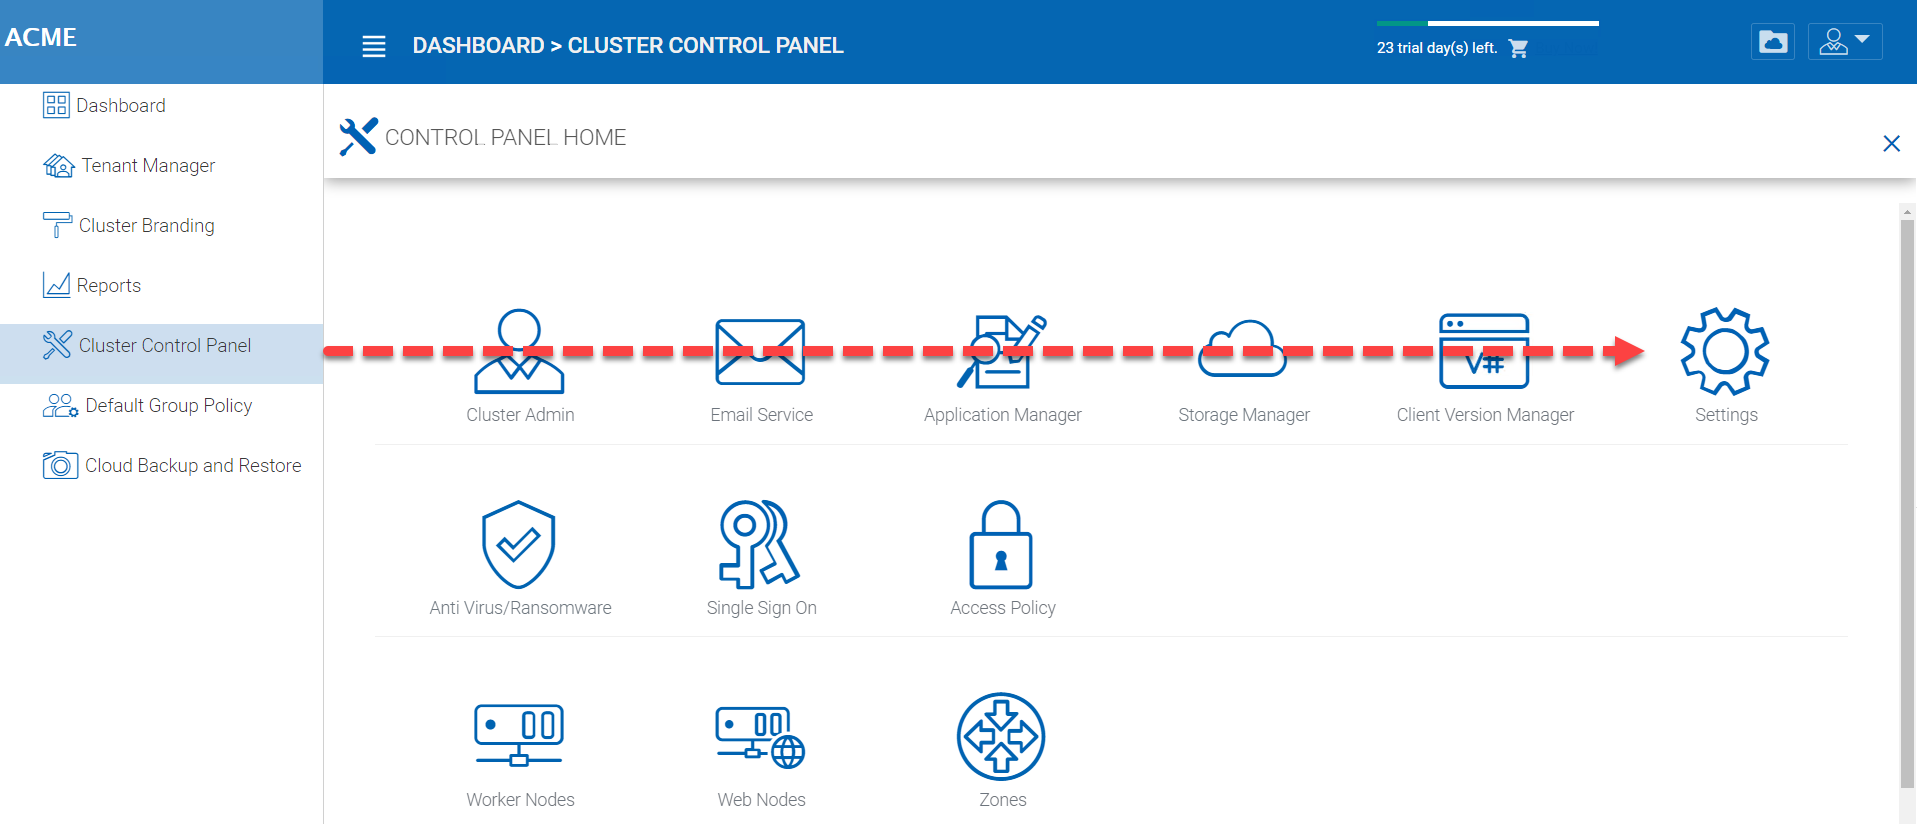
Cluster Control Panel
Cluster Admin
Cluster Manager > Cluster Control Panel > Cluster Admin
Cluster Admin section is to change the properties of the default administrator and also to add additional people to be the cluster administrators. Access the Cluster Admin in the panel on the right of your Tenant Dashboard or from the Cluster Control Panel view.
CLUSTER ADMIN SETTINGS
Email Service
Cluster Manager > Cluster Control Panel > Email Service
There are many places in the CentreStack solution that the user needs to be contacted by Email. The Email service is used to set up the SMTP email service to send out the emails.
By default, it works out of box using the default email service with the Cluster Server’s customer support email address as the sender.
It is recommended that the SMTP service be setup to use your own SMTP service to send out emails.
In the Authenticate User field, if your SMTP service doesn’t require authentication, you can put dummy email in the field.
Note
For example, if your email service is on Office 365,
- :SMTP Server Address
smtp.office365.com- :Use SSL
True- :SMTP Server Port
587

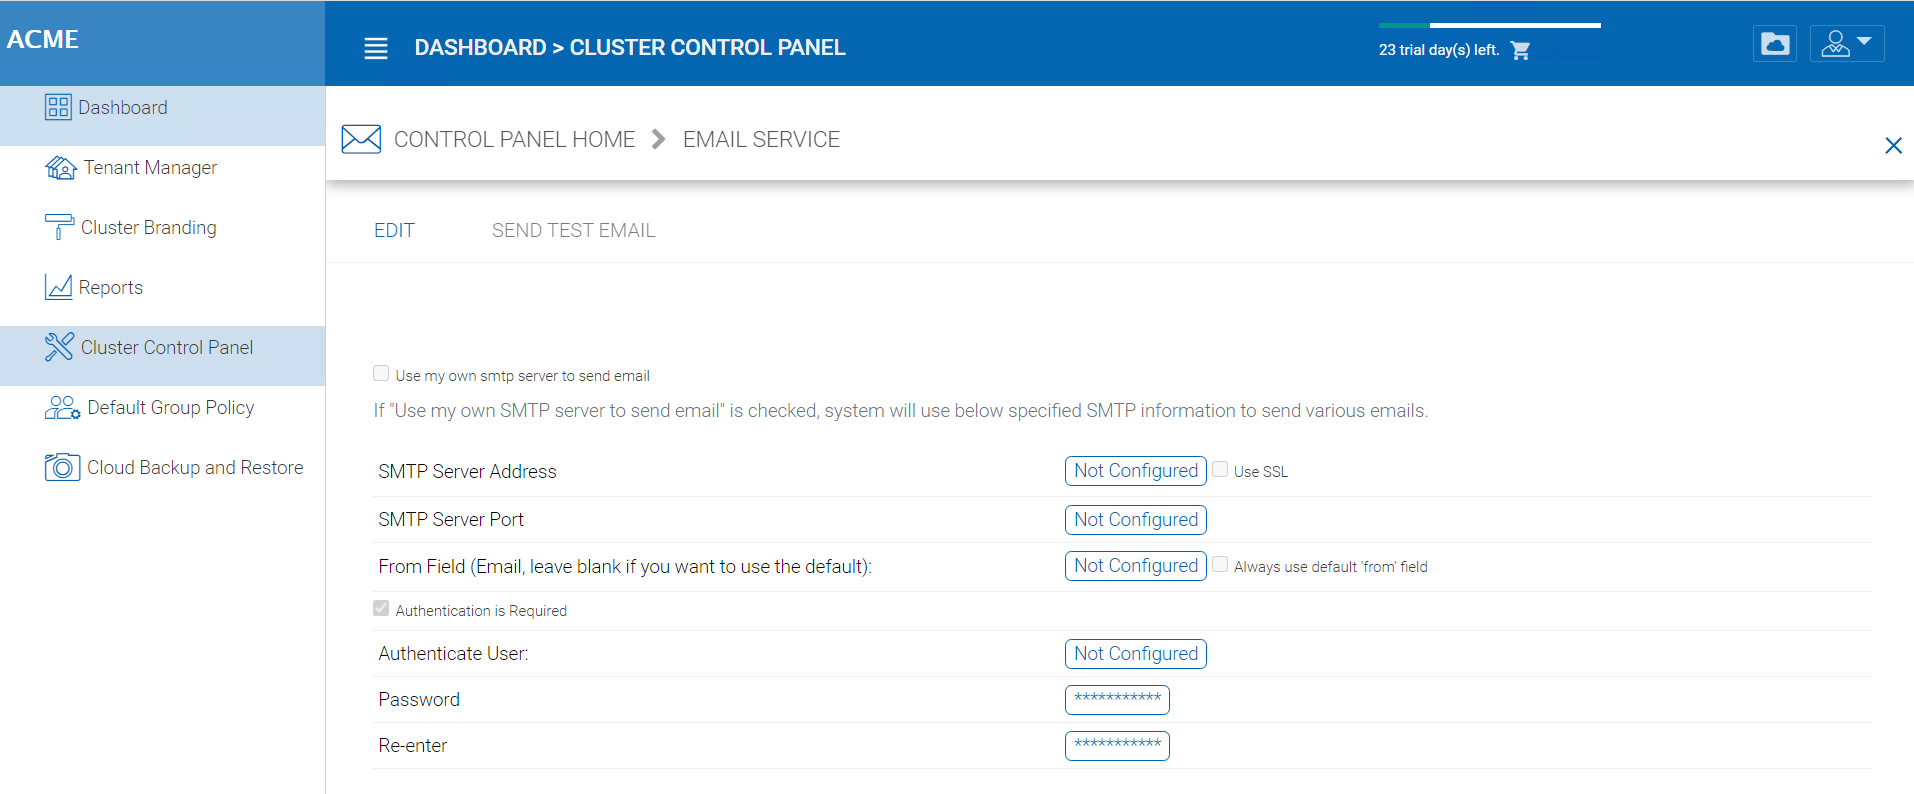
EMAIL SERVICE SETTINGS
Application Manager
Cluster Manager > Cluster Control Panel > Application Manager
You can also configure Web Apps under ‘Application Manager’ tab in Cluster Settings. This will enable the users to edit documents using the web apps. The applications here only apply to web portal based editing.
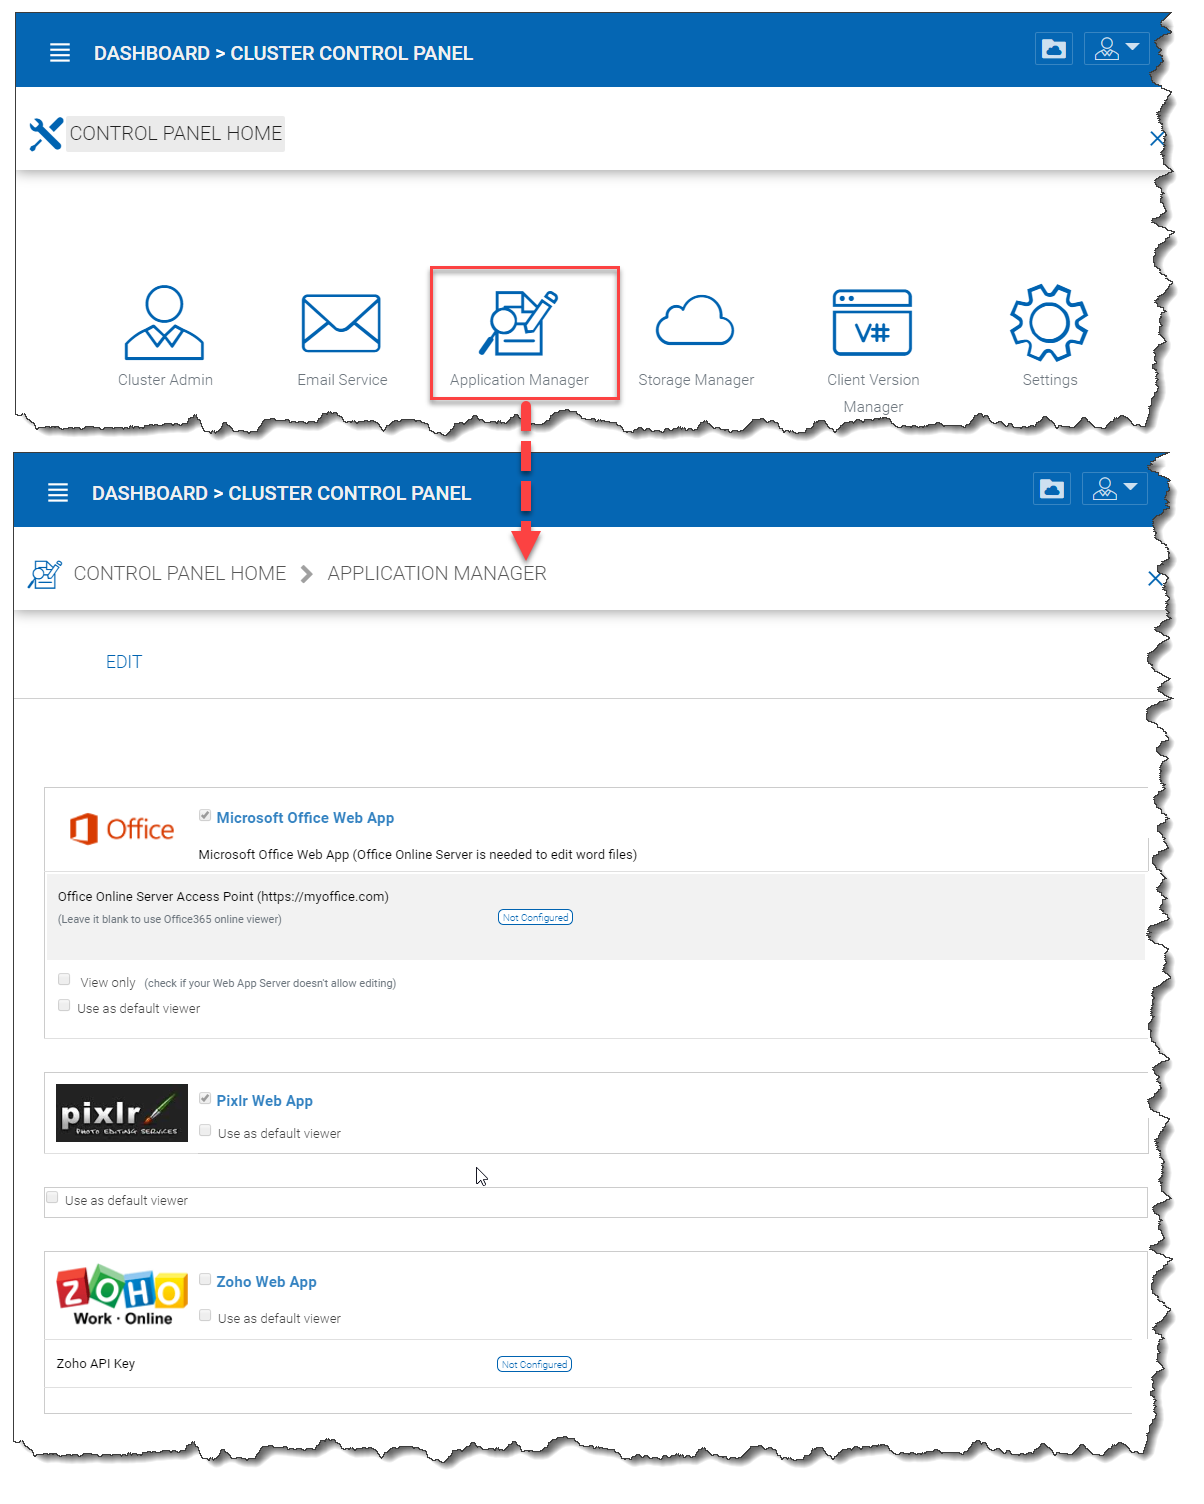
APPLICATION MANAGER SETTINGS
Once an application is enabled, you will be able to see the context menu entry from the web based file and folder manager view.
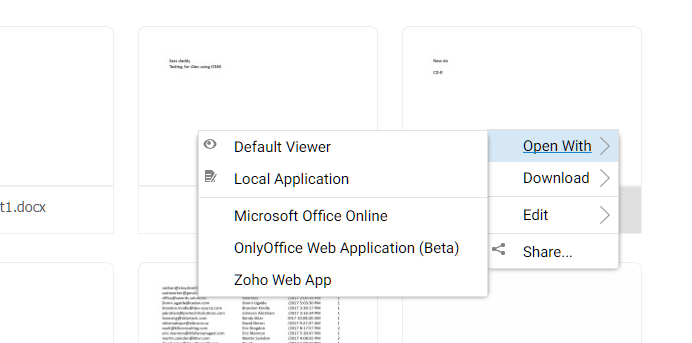
APPLICATION CONTEXT MENU
Storage Manager
Google Drive and OneDrive Integration (Storage Manager)
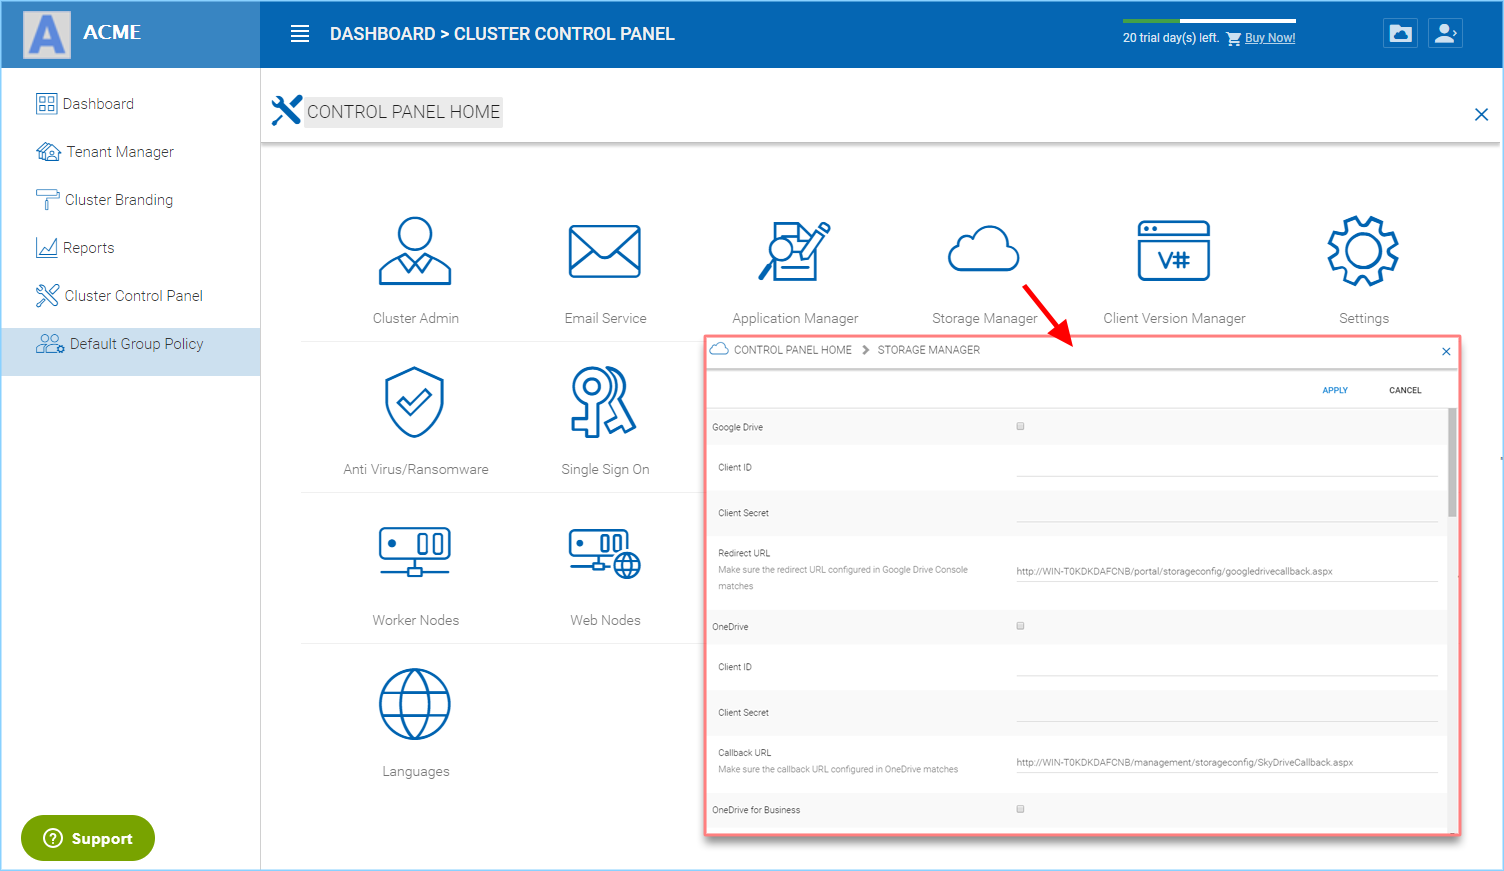
CLOUD STORAGE MANAGER
OneDrive for Business Integration
In order to complete the OneDrive for Business Integration, you will first need to login to your company’s Office 365 portal.
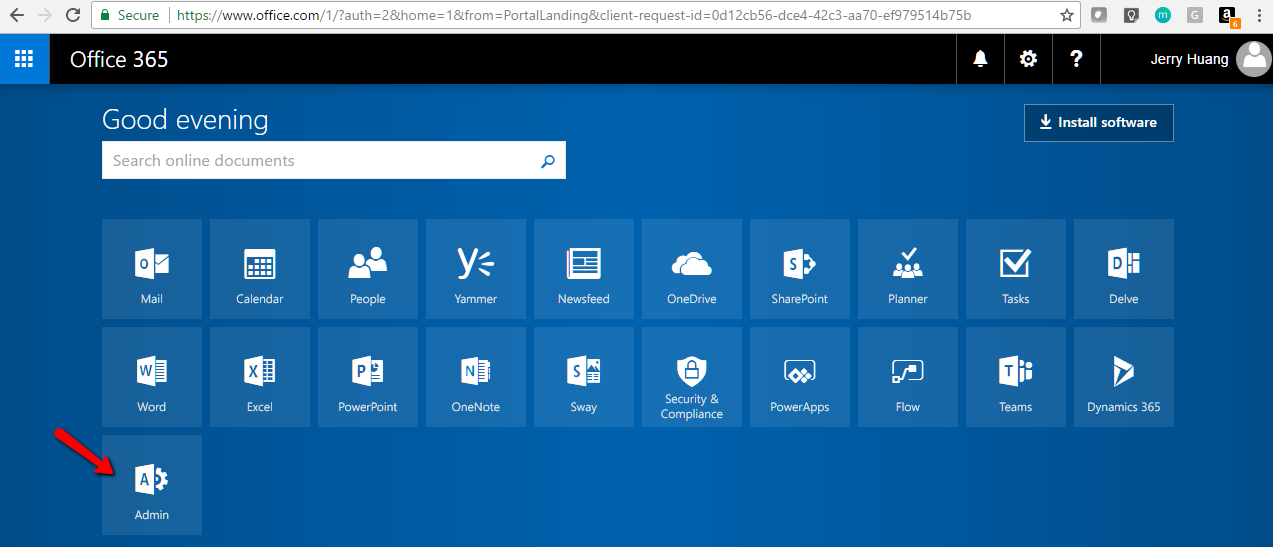
MICROSOFT ONEDRIVE BUSINESS INTEGRATION
After that, click on the Admin tile and then on to the “Azure AD” section.
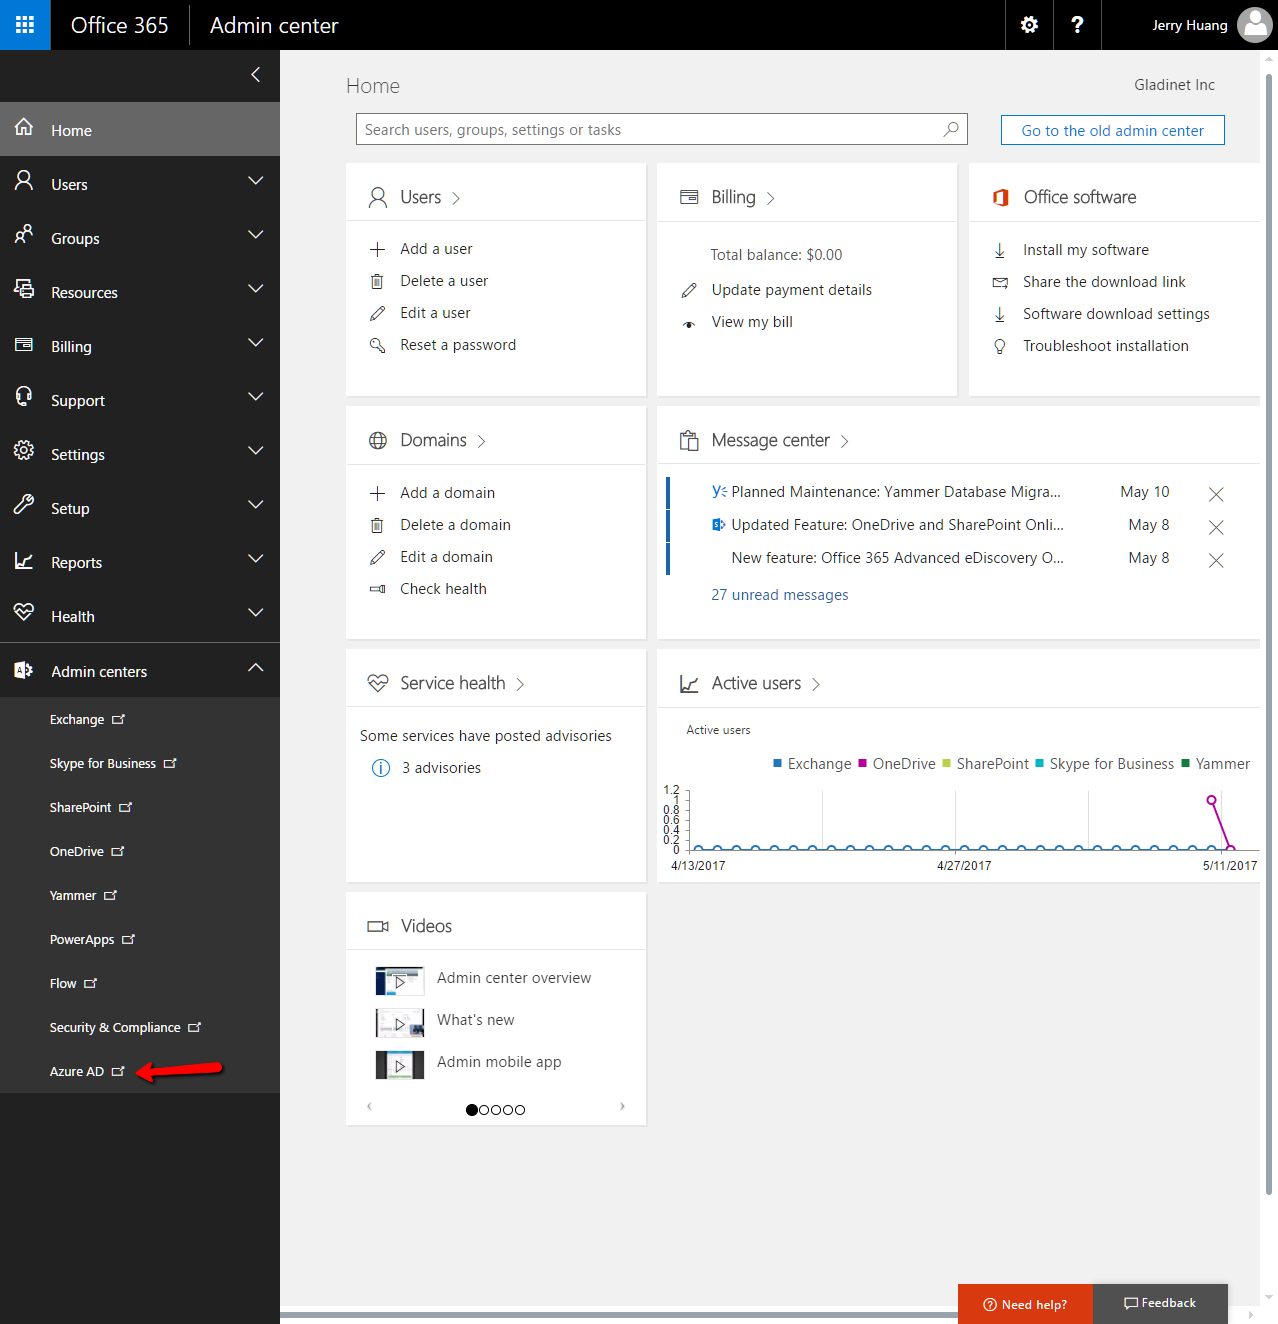
AZURE AD SETTINGS
After that go to the Applications section of the company Azure AD web portal.
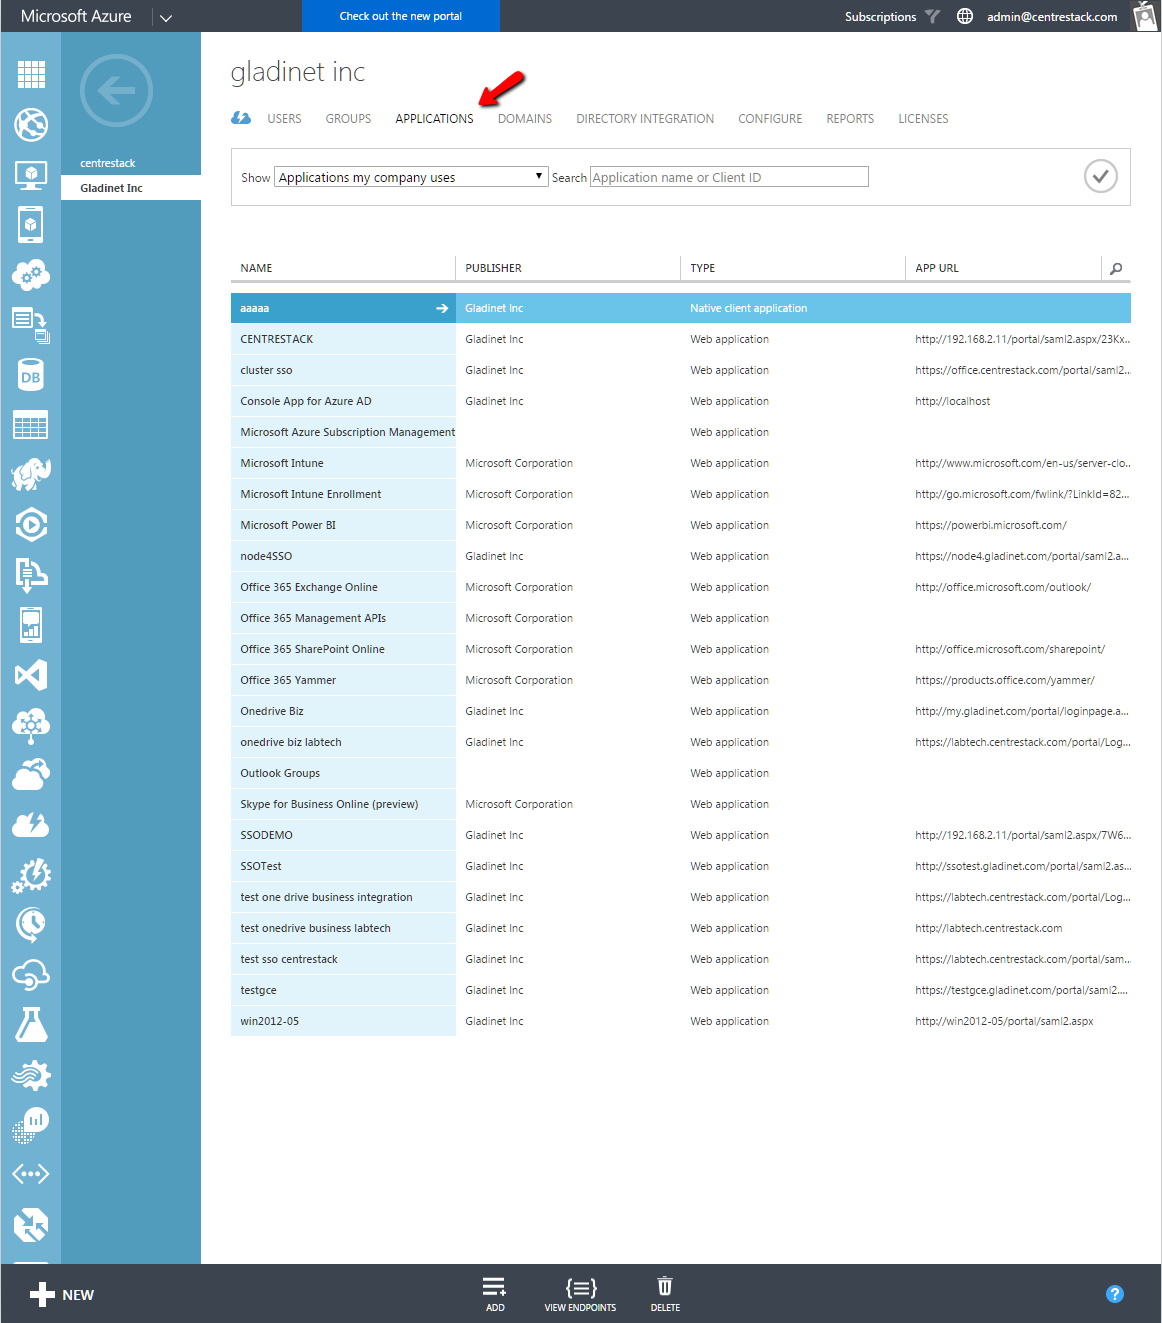
AZURE APPLICATIONS SETTINGS
Add a “Web Application”
Sign On URL:
This can be set to the LoginPage.aspx for your Cluster Server.
Client ID:
This will be generated by Azure AD and you will need to copy it back to the configuration page of the Cluster Server.
App ID URI:
This can be the same as the Sign On URL
Reply URL:
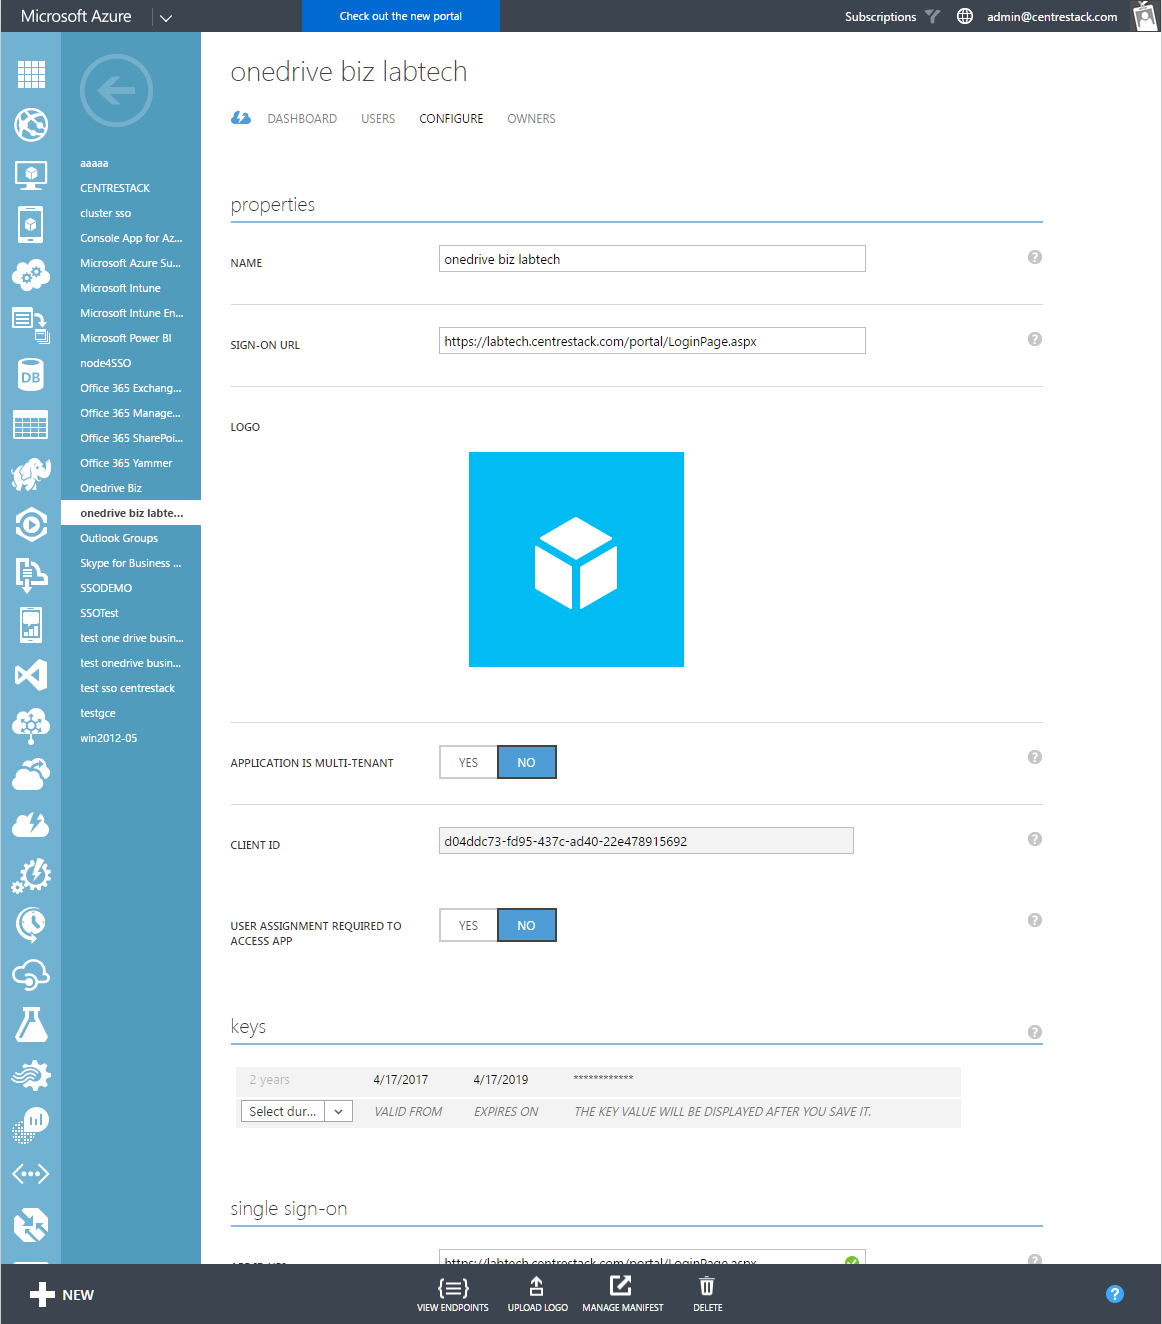
ONEDRIVE BIZ LABTECH SETTINGS
You will need to grant permissions according to the following pictures.
Office 365 SharePoint Online:

OFFICE 365 SHAREPOINT PERMISSIONS 1
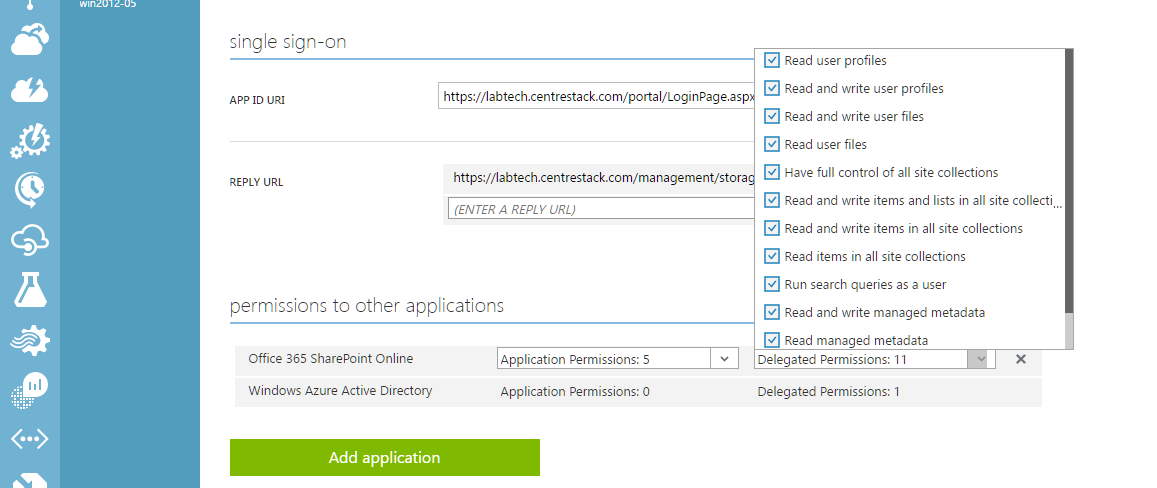
OFFICE 365 SHAREPOINT PERMISSIONS 2
Windows Azure Active Directory:
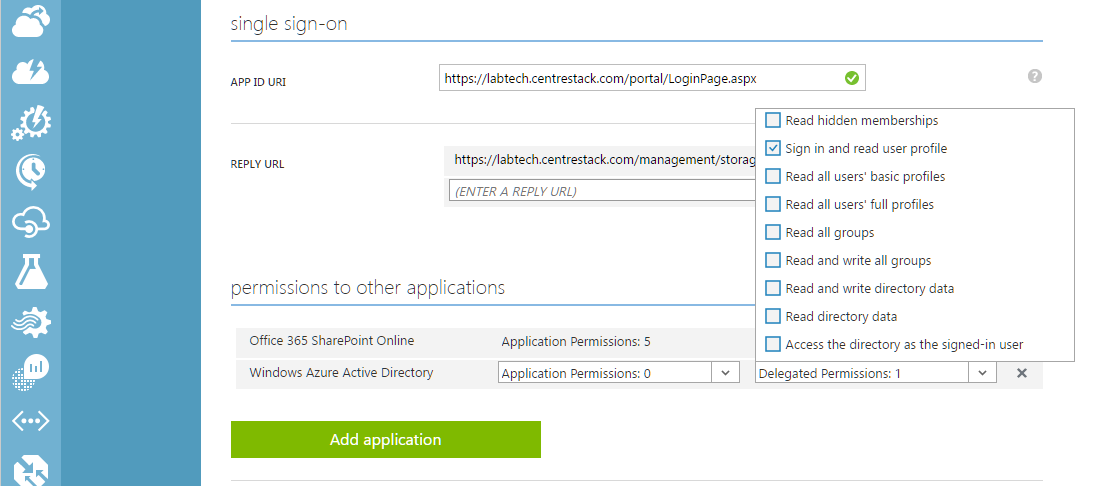
AZURE ACTIVE DIRECTORY SETTINGS
Client Version Manager
Cluster Manager > Cluster Control Panel > Client Version Manager
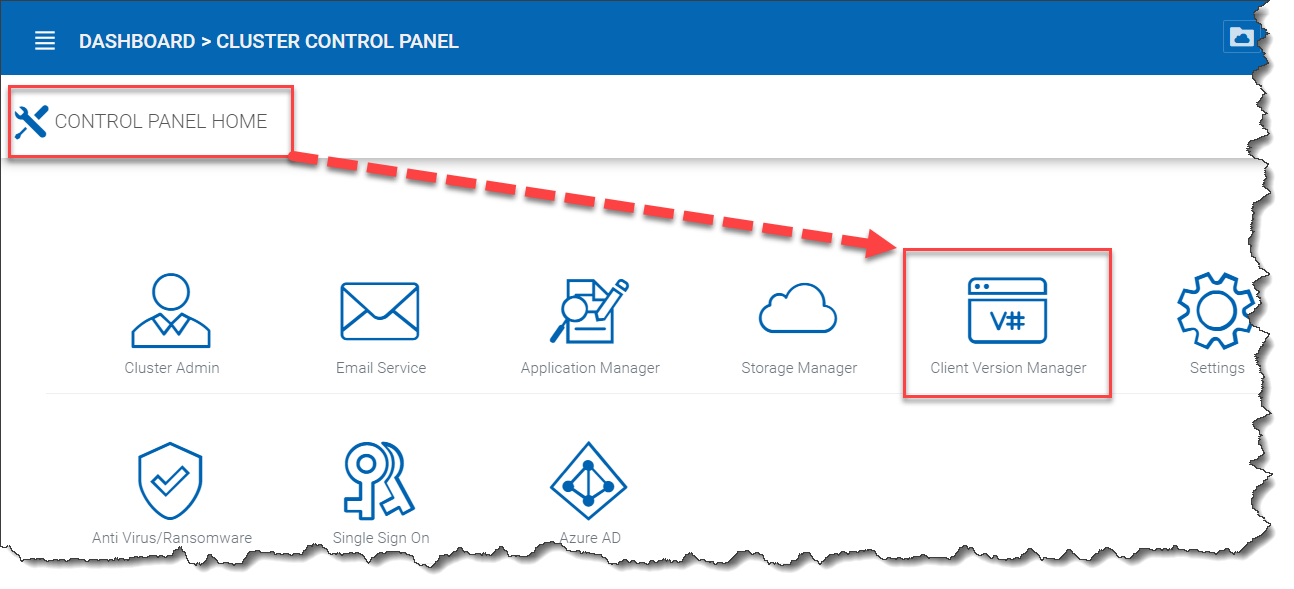
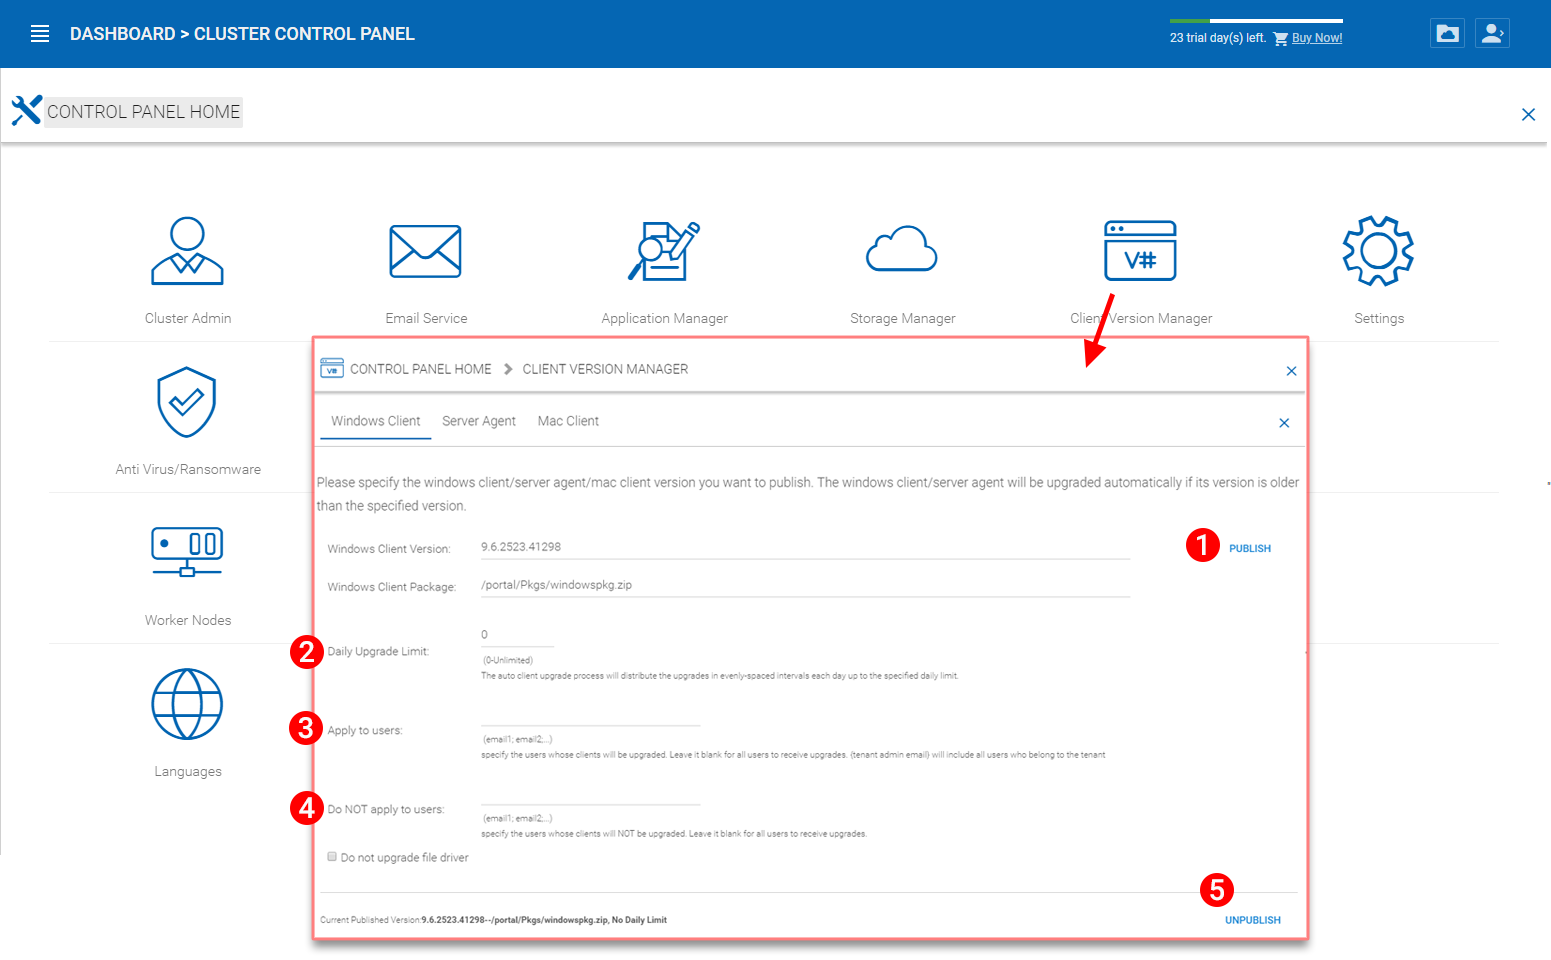
CLIENT VERSION MANAGER
For Windows Client, Mac Client and Windows Server Agent, there is an auto client update feature. Each upgrade package contains
the updated clients. By clicking on the Publish button [see (1) below], the newer package can be published to clients out there.
Every new Cluster Server upgrade contains the newer Windows client, Windows Server Agent and Mac Client. The Cluster users via manual download can get the clients that are included in the Cluster Server. However, for existing users with previously installed clients, those older clients will not auto upgrade until the newer client packages are published.
(2) Daily Upgrade Limit
This is a per-worker node setting. For example, if you have 2 worker nodes, and set the daily upgrade limit to 100, maximum 200 clients will be upgraded per day.
(3) Apply to Users
This typically is used for testing prior to pushing the client out.
(4) Do Not Apply to Users
This typically is used for testing prior to pushing the client out and to exclude certain users.
WINDOWS CLIENT VERSION SETTINGS
Note
The windows client out there has a process running as a background windows service. The service will periodically check for a newer upgrade in about 1-2 hour intervals. Once a newer client package is published and discovered, the newer package will be downloaded. However, if the client is still actively running, the replacement and upgrade will not happen until the client application is stopped and restarted. This usually happens when the user logs off their Windows or restarts their desktop altogether.
If the Windows client software is actively running, the user may be seeing a message popup from the system tray area asking the user if they want to restart the client software and to receive the newer version.
Once a client is published for client auto upgrade, you can use Unpublish (5) to stop the client auto upgrade.
Server Agent
Windows Server Agent can be separately published for auto upgrade.
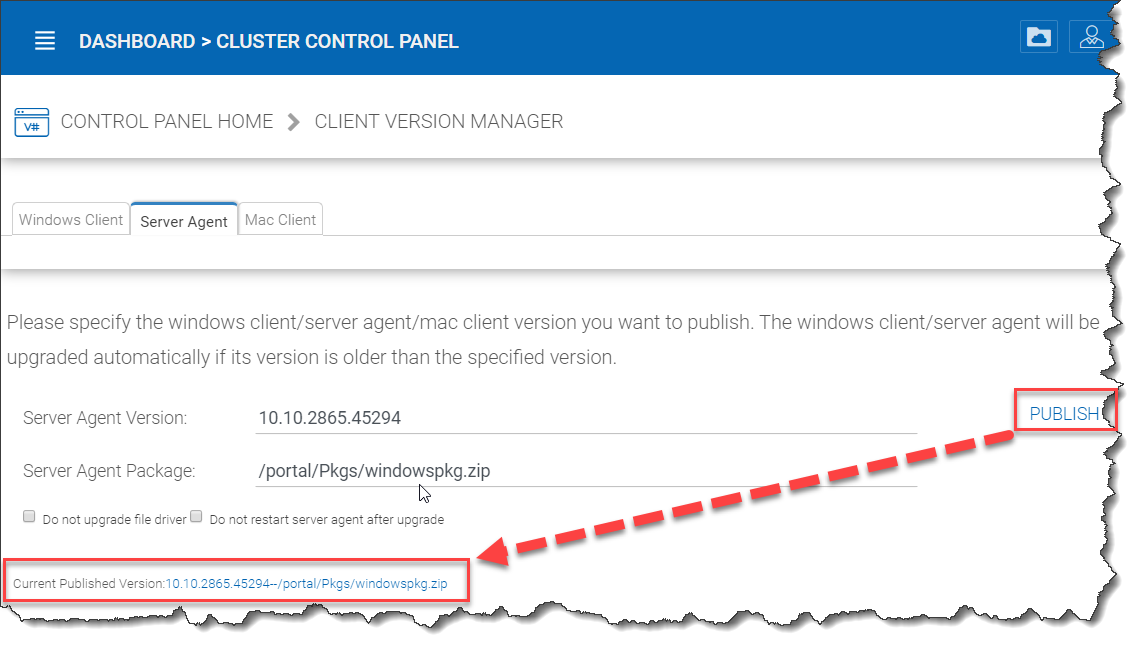
SERVER AGENT AUTO UPGRADE
Mac Client
Mac client can be separately published for auto upgrade.
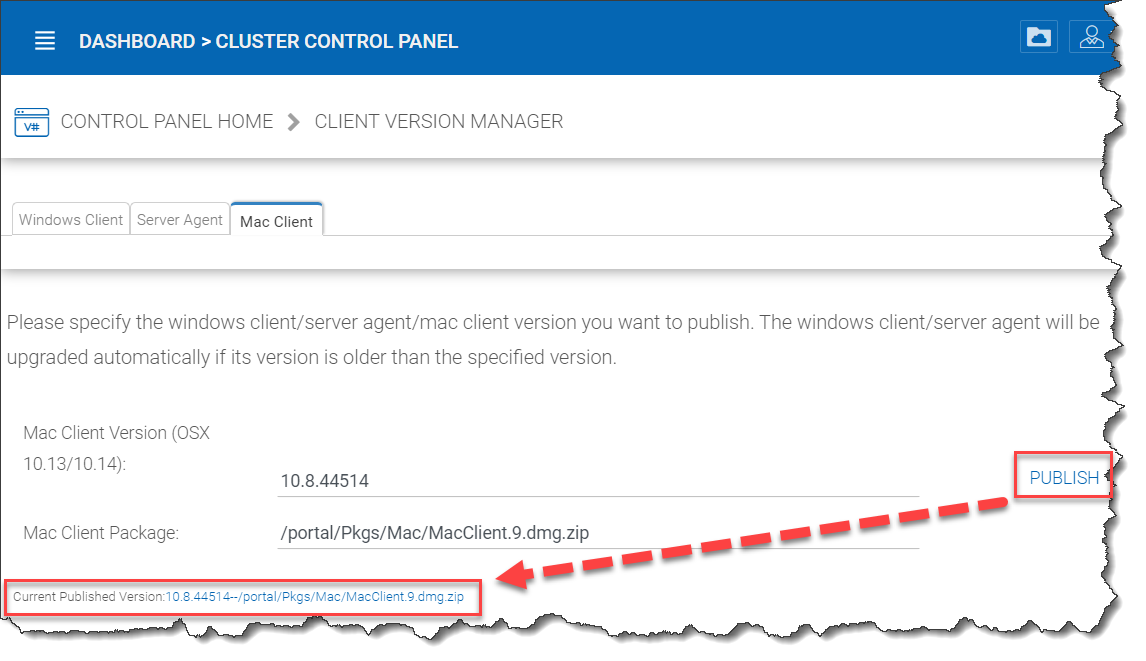
MAC CLIENT AUTO UPGRADE
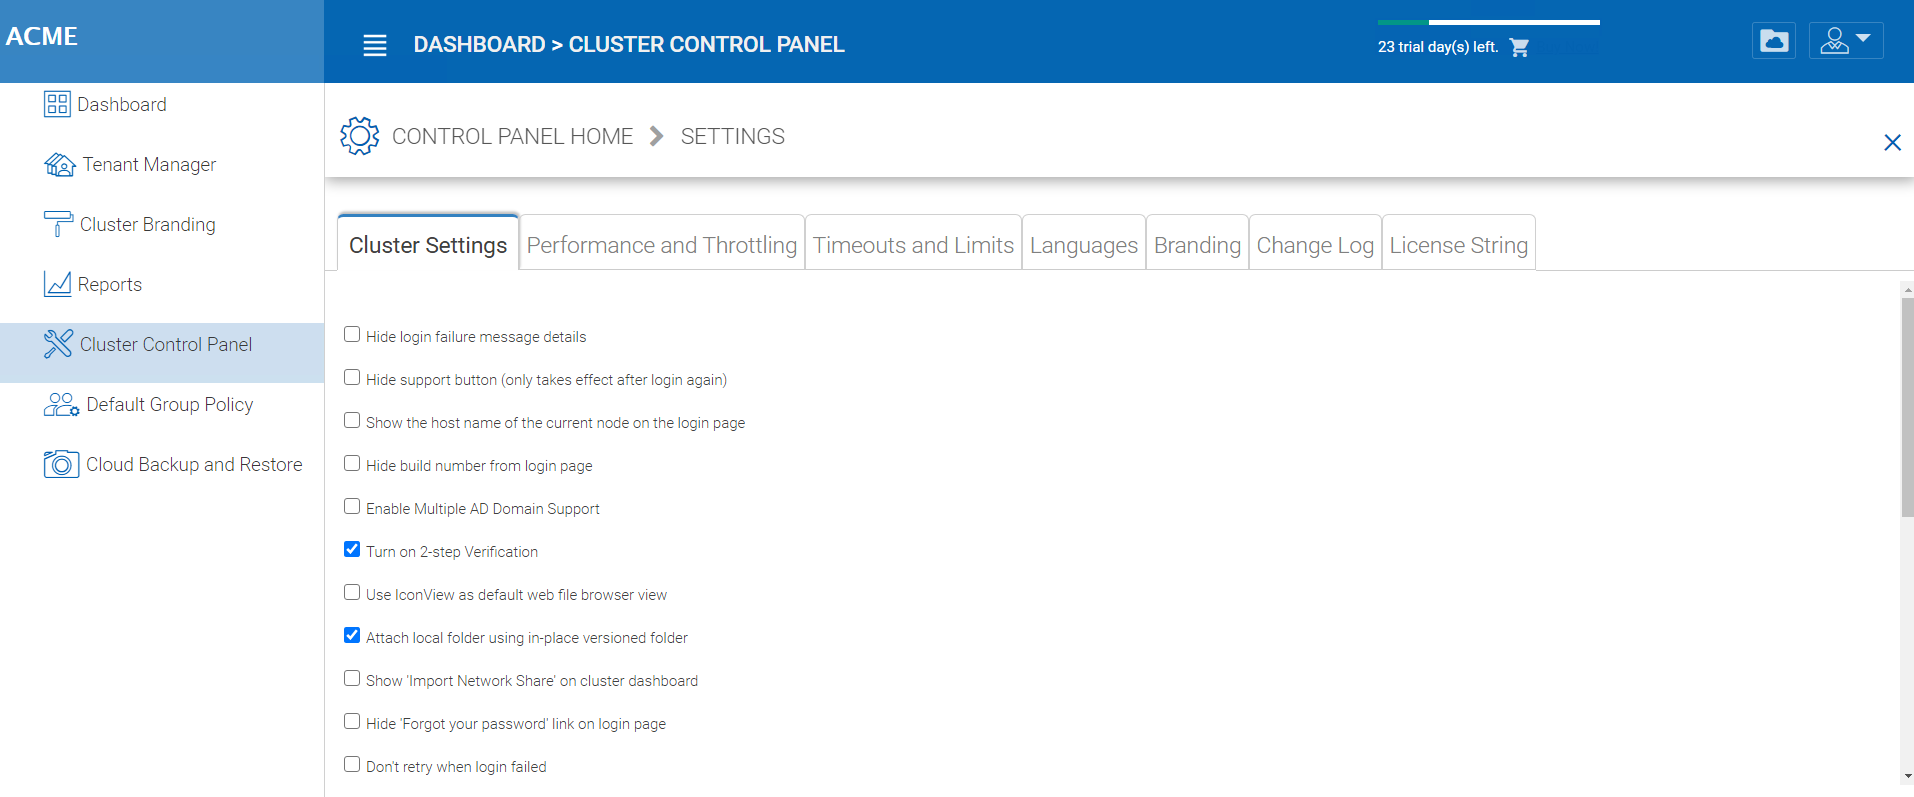
Settings
Cluster Manager > Cluster Control Panel > Settings
Under cluster settings, you can configure auto-client update, web applications, and other settings like 2-Step Verification, multiple domain support, etc..
CLUSTER SETTINGS
Cluster Settings
Cluster Manager > Cluster Control Panel > Settings > Cluster Settings
CLUSTER SETTINGS PERMISSIONS
Hide Login Failure Message
When checked, the login failed message will be replaced by a very generic “Login Failed” message. When un-checked, it may return a more meaningful login error, such as user-not-found, authentication-error and so on. This is a security feature if you don’t want to give out too much information for hackers to guess a reason for authentication failure.
Hide support button
This hides the floating support icon.
Hide build number from login page
This controls the build number on the web portal login page.
Enable Content Management Policies – Reserved
Show file dashboard by default
Hide ‘Forgot your password’ link on login
Most often it is used when Active Directory integration is set. The user will need to do a forget-and-change password the normal Active Directory way instead of the way CentreStack provides. In this case, it is recommend to hide the “Forgot your password” link.
Don’t retry when login failed
Most often it is used when the Active Directory user has low failed-count on lock-out policy. When the user’s password is wrong, a few retries can lock out the user’s Active Directory account. The retry feature can be used when there is no Active Directory lock out or when the lock out count is high.
Show ‘purge storage option’ when delete user
By default, when a user is deleted, the user’s home directory storage content is not touched for later use or review. If it is desired to delete the user’s content when the user is deleted, this can show the purge option.
Enable Multiple AD Domain Support
In the multi-tenant environment, you can always link one Active Directory to a tenant. However, in some cases, a single tenant may have multiple un-related Active Directories. In this case, Enable Multiple AD Domain support will be useful.
When you have multiple Active Directory from multiple forests in a specific tenant, you can turn on this option. The Cluster Server software is capable of automatically searching for domains in one single forest.
However, for multiple forests, the software will allow you to manually enter the root of each domain when this option is enabled.
Note
The AD support here is related to using LDAP for Active Directory connectivity.
If you are using “Server Agent” to connect to multiple Active Directories in proxy modes, you don’t need to turn it on here.
Note
If I turned it on, where to see the change?
You will see the difference in the per-tenant Active Directory setting page. Instead of a single AD setup, you will see a table that allows you to add multiple rows, with each row represents a single Active Directory LDAP connection.
Turn on 2-step Verification
The Cluster Server supports Google Authenticator, Amazon Virtual MFA soft token for 2-step verification. When this setting is turned on, users will see the option to configure 2-step verification in their web portal.
Don’t send email notification to user when purge deleted content
When the user delete files, they are not actually deleted immediately. The purge is asynchronous and scheduled at a later time. This setting controls the notification.
Don’t send email notification to admin when purge deleted content
When the user deletes files, They are not actually deleted immediately. The purge is asynchronous and scheduled at a later time. This setting controls the notification to the administrator.
Use ‘Icon View’ as default web file browser view
Icon view is set when this setting is enabled. (The opposite is ListView)
Use Ghost Script to generate PDF preview
There are two ways in the system to generate PDF preview. This setting will force the system to use one way or the other. For example, force it to use Ghostscript to generate PDF preview.
Preview pdf files with browser builtin viewer
When selected, the PDF file will be rendered in the web browser on the web browser side. Otherwise, it is rendered on the server side first and shown to the end user in browser.
Retrieve avatar from third party service (i.e. Google)
This is a usability feature that users’s picture can be queried from Google.
Hide file extension in web file browser
This setting will hide the file extension.
Disable Windows Client Auto-Logon
This is a security feature. The result is every time the windows client is done running, the next time the user tries to login, it will not remember the login token and the user will have to re-type the credential to get in.
Use short url
Use shorter URL for web links generated for file/folder sharing.
Allow personal data tagging
Attach local folder using in place versioned folder
When synchronize folders from remote PC/Mac to CentreStack, using in place versioned folder will make the folder keep the same folder structure as the folder that is being uploaded. Otherwise CentreStack manage the folder content on the server side in its own ways.
Only allow access performance information from local host
only allow accessing performance data from http://localhost and not from external URL.
Show ‘Import Network Share’ on cluster dashboard
Web Browser Session Timeout (minutes, 0 - never timeout)
This is the web browser session time out value. Default is set to 15 minutes. For default cluster administrator, we recommend increase this value to a bigger number so it is easier for web based management work not to time-out too soon.
Native Client Token Timeout (days)
For Windows client and Mac client, this defines the token time to live.
Distributed Lock Idle Timeout (minutes, 0 - never timeout)
This setting is related to automatic file locking. When a file is automatically locked, the machine that has the file locked will need to maintain a healthy heart beat with the Cluster Server. If the machine is offline (idle) and can’t report back to the Cluster Server for a period of time, the lock that was automatically grabbed will need to be released.
If this is not desired, the user can always use manual “Check Out” to lock a file and that will not be subject to the timeout.
Open third party web application in new window when the height of the web browser is less than
This is a usability feature. When using third party web application to edit documents in Cluster Server web browser file and folder view, if the web browser height is too short, the third party web application may not function properly.
Max Device Count(Concurrent Device Count) for Each User (0-Unlimited)
This is the number of concurrent devices connected to the Cluster Server for each user. The default is not limited.
Performance and Throttling
Cluster Manager > Cluster Settings > Settings > Performance and Throttling

PERFORMANCE THROTTLING
Don’t show file icon preview if file size is larger than(KB, 0-No icon preview)
This is used to control iconview thumbnail generation in the web browser files and folders view. The generation of thumbnail takes CPU power from the Cluster Server. For big files, the generation of thumbnail may negatively affect the system performance. So it is recommended to cap the feature to a certain image size.
Cluster Wide Upload Bandwidth Limit(Per Worker Node, KB/Sec, 0-No Limit)
This is to limit upload bandwidth.
Cluster Wide Download Bandwidth Limit(Per Worker Node, KB/Sec)
This is to limit download bandwidth.
Size limit for folder download (MB, 0-no limit)
This is to prevent user downloading a very big folder and using up all the Cluster Server resources.
Timeouts and Limits
Cluster Manager > Cluster Control Panel > Settings > Timeouts and Limits
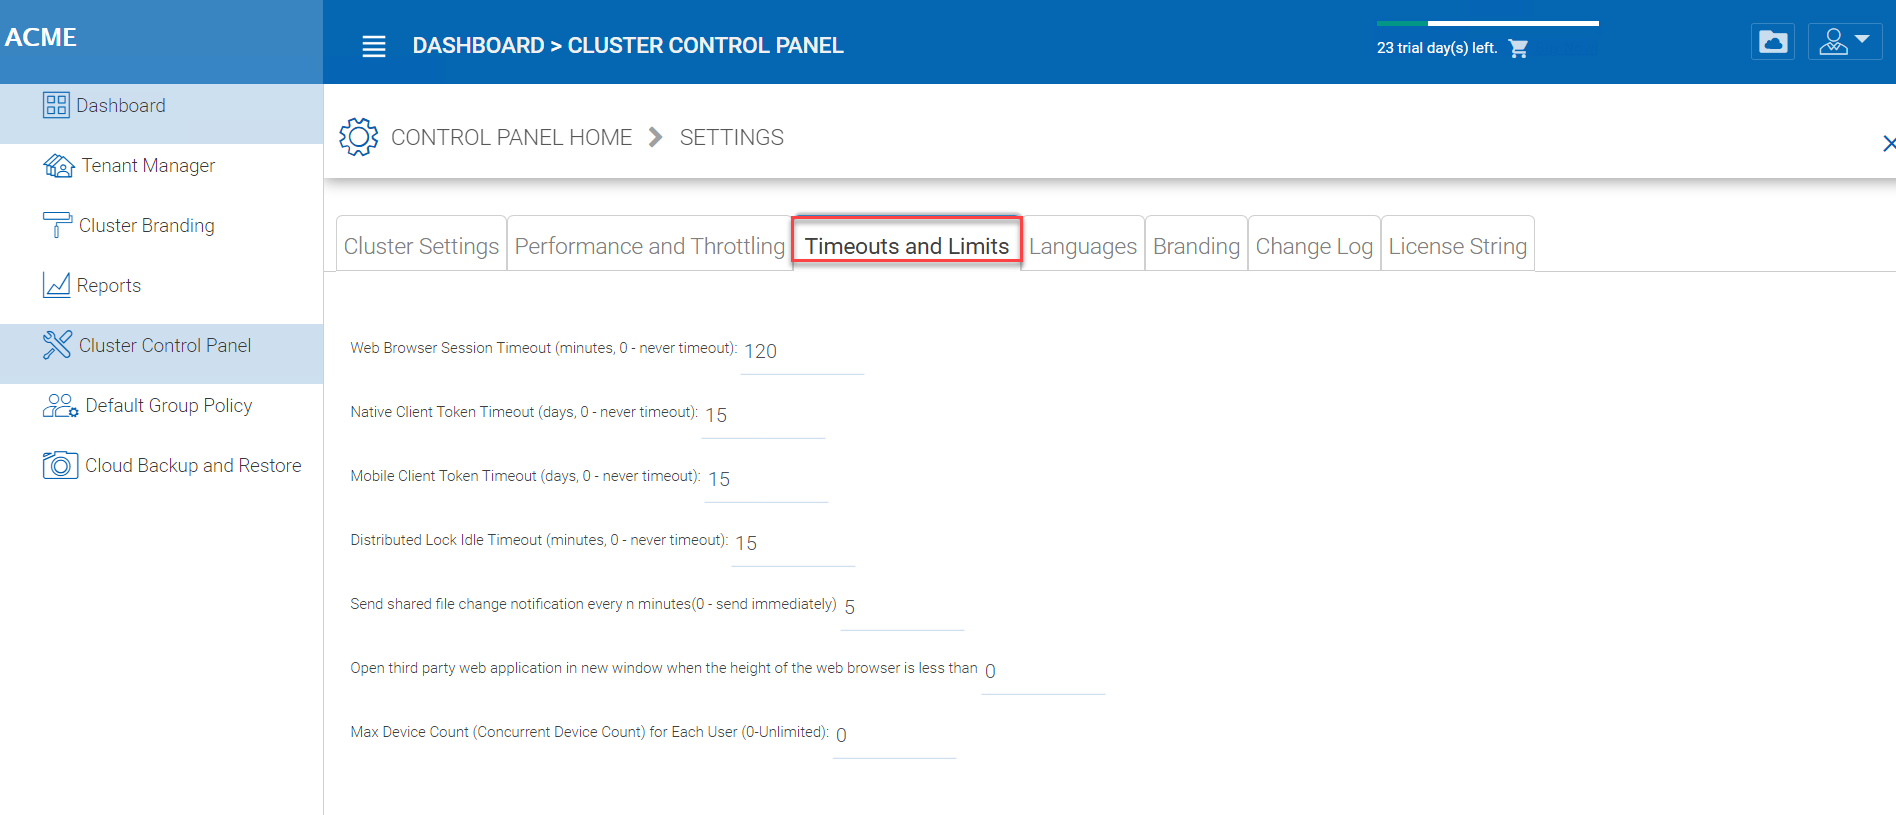
TIMEOUTS AND LIMITS
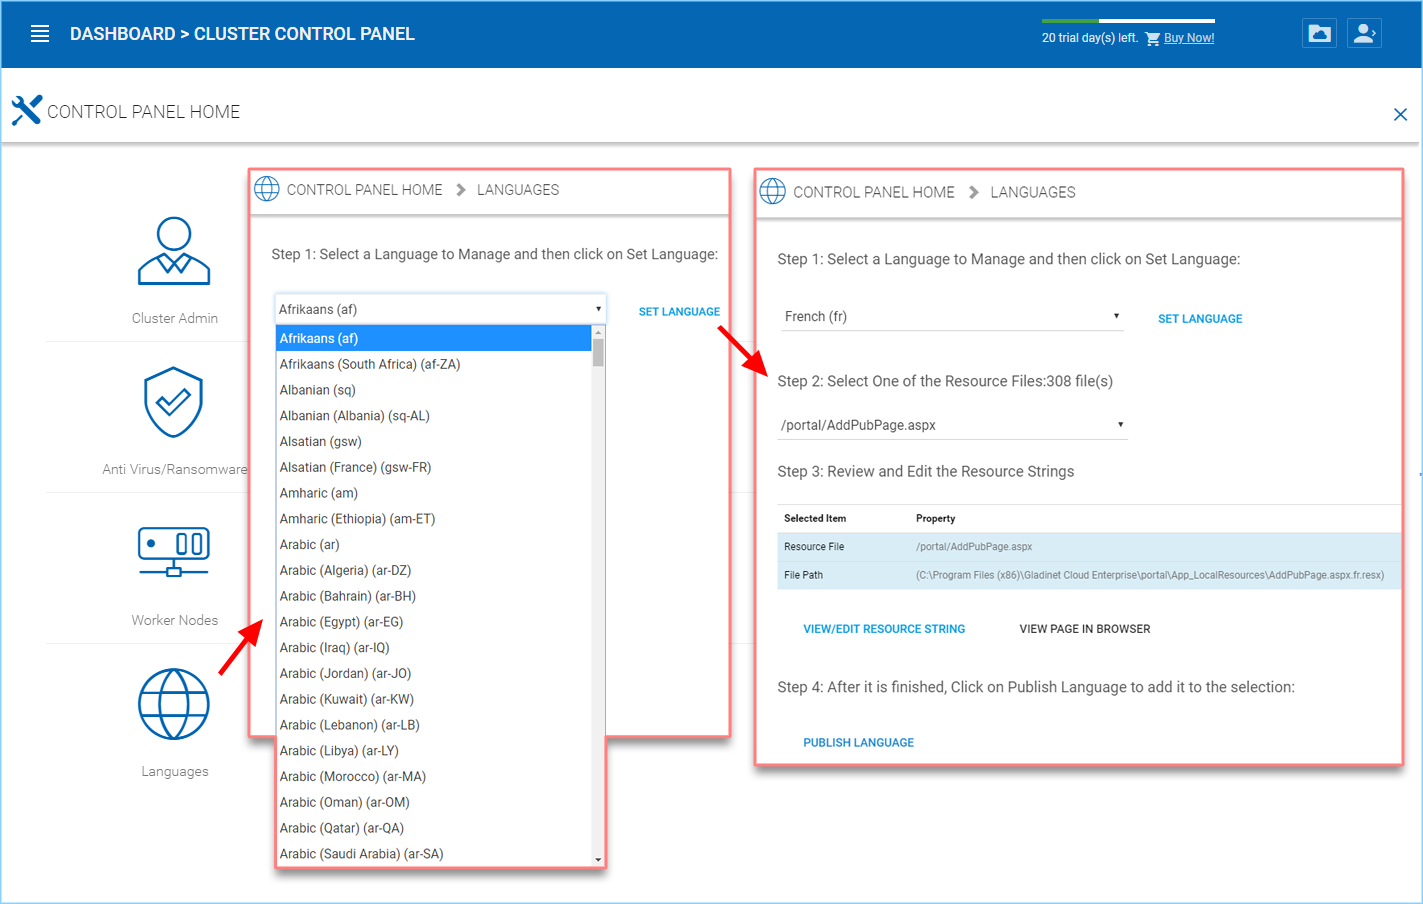
Languages
Cluster Manager > Cluster Control Panel > Settings > Languages
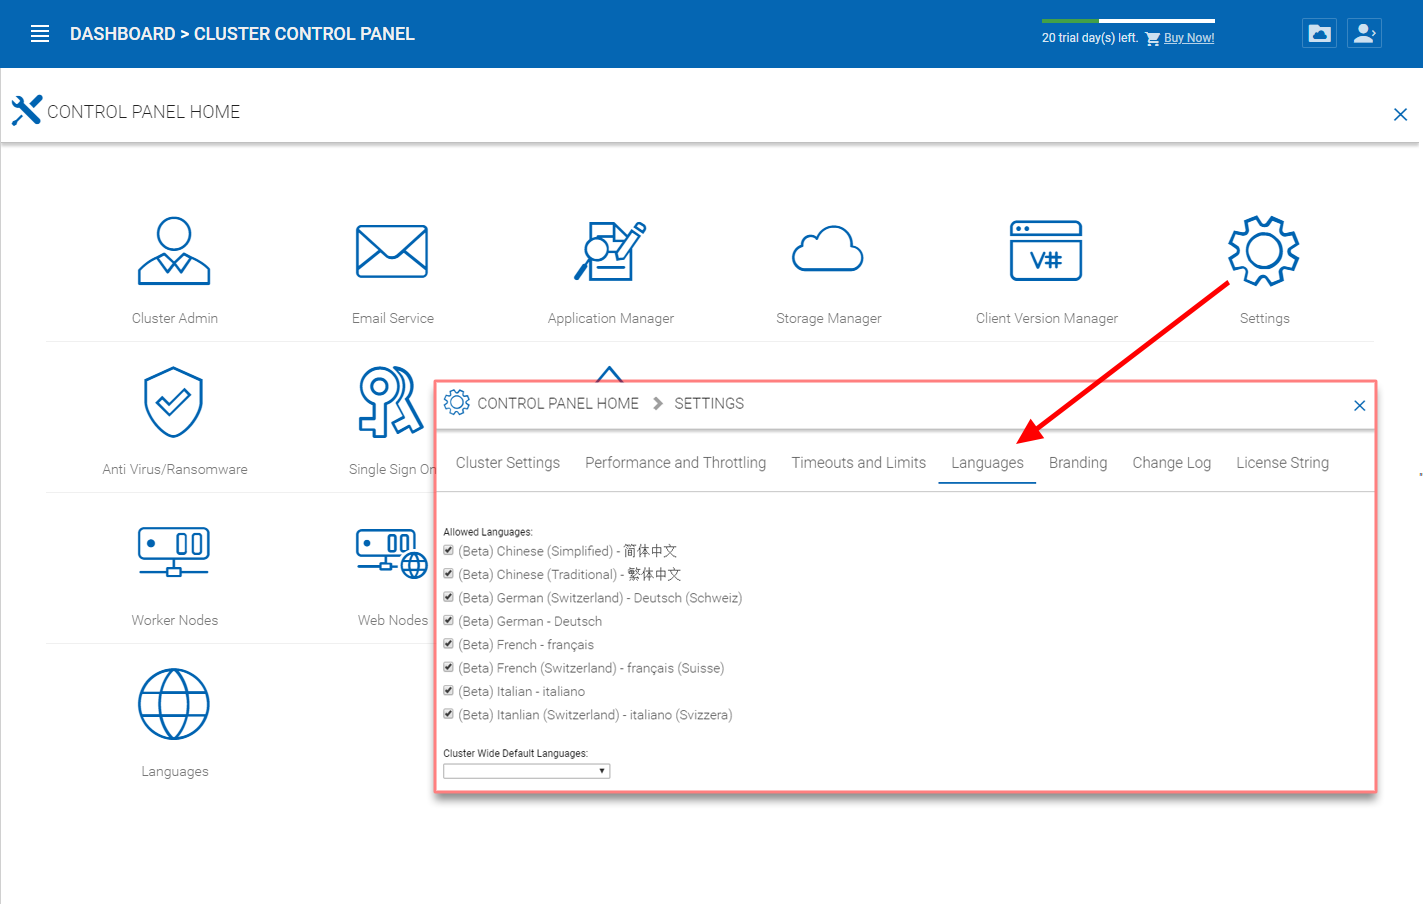
LANGUAGE SETTINGS
This section sets up the web portal languages and also the client application languages for Windows client.
We have automated translation and provided the resource files that you can use to localize the web portal and clients in the language of your choice. If there are strings that not translated yet in the language you want, just go ahead and select the string and put in the translated string in the window for the language selected.
Branding
Cluster Manager > Cluster Control Panel > Settings > Branding
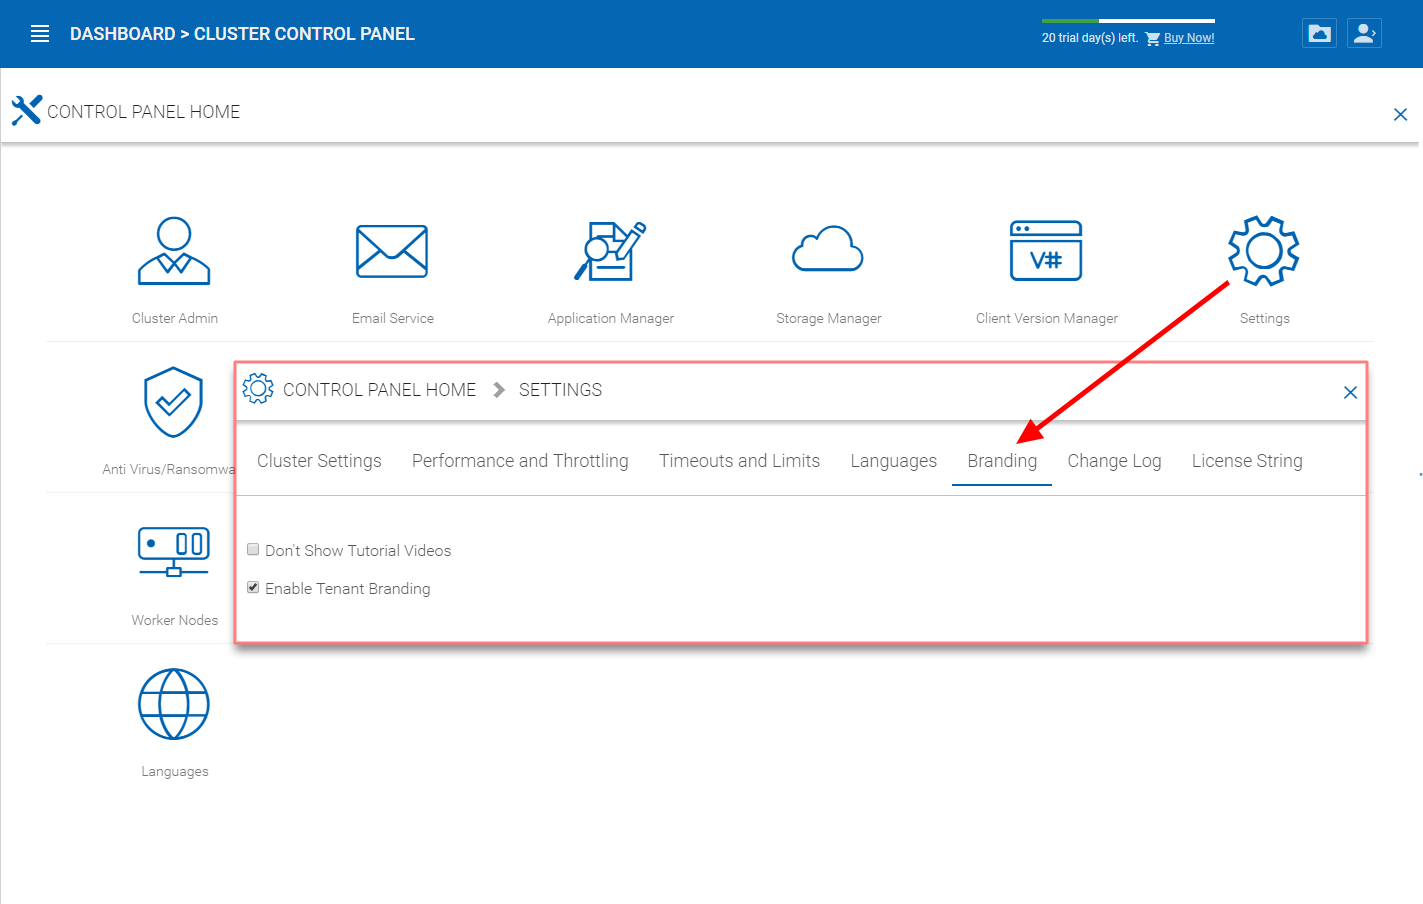
ENABLE TENANT BRANDING
Don’t Show Tutorial Videos
At different places in the web portal, there are tutorial videos. This setting is to hide those videos, which may have CentreStack references inside.
Enable Tenant Branding
Allow tenants in the system to have their own co-branding on a tenant-by-tenant basis. The branding can override the default Cluster wide branding when the solution is accessed via a specific URL. Most of the time, a wild card SSL certificate is used so the Cluster Server solution can be binded to different URL’s within a common suffix.
For example *.mycompany.com , while tenant1.mycompany.com is for tenant 1’s access.
Only allow branded client to access
This can lock out the generic client and only allow the branded client to connect.
Branding Id
This setting only applies to full-branding clients. For the full-branding client, it is possible to lock the full-branding clients to only connect to the branded Cluster Server. When set, it will lock out the white-label clients or other non-branding clients and will not allow them to connect.
Change Log
Cluster Manager > Cluster Settings > Settings > Change Log
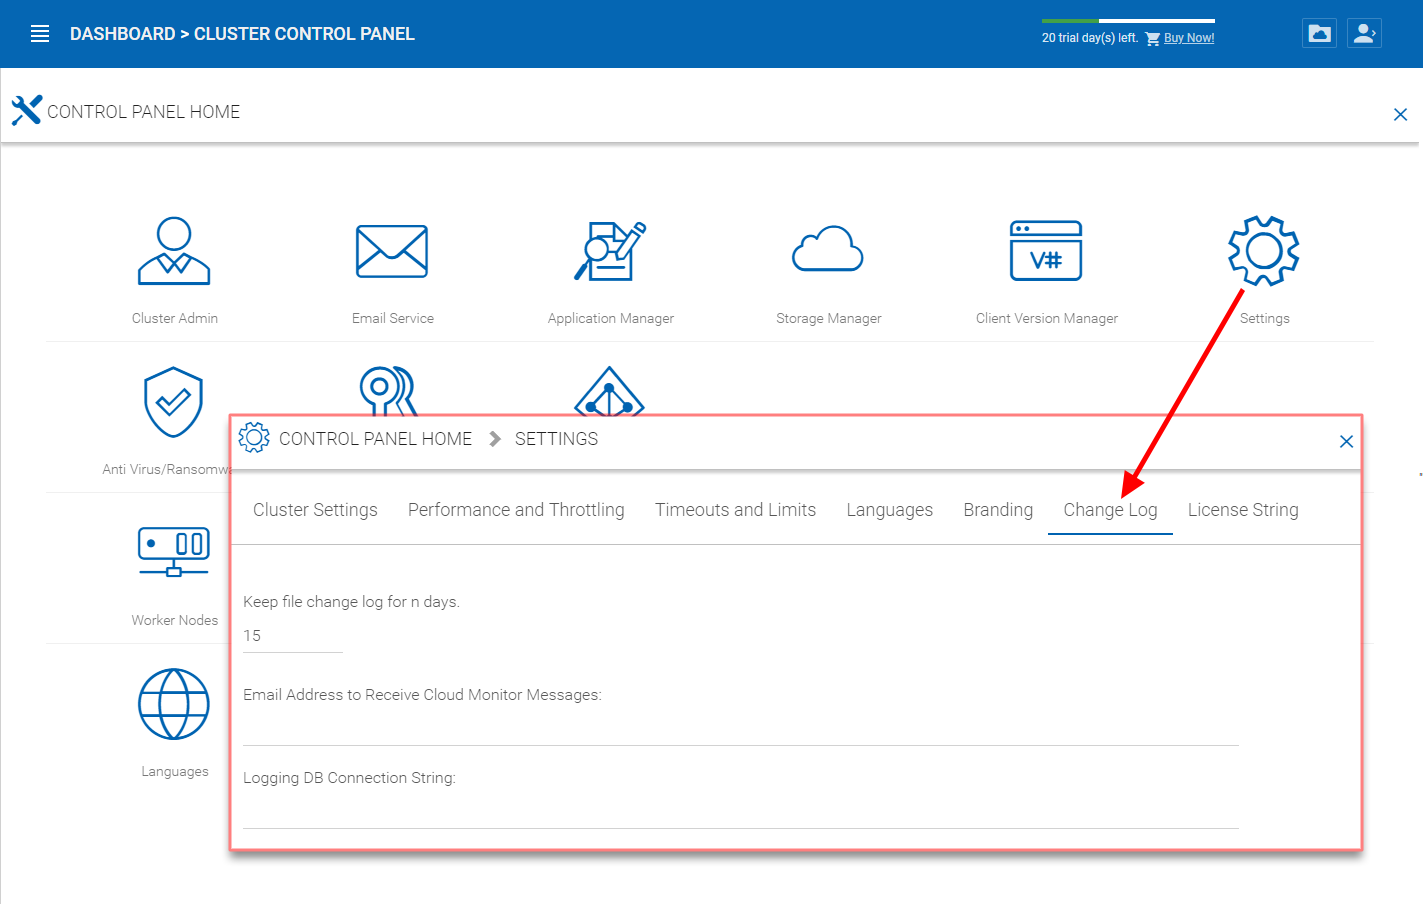
CHANGE LOG SETTINGS
Keep file change log for n days
This is a cluster wide retention policy for the file change log.
The file change log is in the SQL database, for deployments that are using SQL Express, it has size limitation for the database. In the deployment guide, there is option to split the file change log into MySQL database or split it to a different SQL database. This option typically is used to keep the size of SQL small.
Note
After the Cluster Server is running in production mode for a while, we recommend reviewing the file change log database table and the file index table to see how big those tables are.
Email Address to Receive Cloud Monitor Messages
From time to time, the cluster monitor service may send an email about the status and alerts.
Logging DB Connection String
This is to split the file change log, device table, file index table and audit trace table out of the main database into a secondary database. The secondary database can be a Microsoft SQL Server or a MySQL Community server.
The Cluster Server database is split into the core part and the logging part. The core part can store the DB connection string that connects to the secondary database. This setting used to be in the web.config file.
License String
Cluster Manager > Cluster Settings > Settings > License String
License String – Reserved.
This is for Cluster Servers that are isolated from the Internet, can’t be activated online and has to use a license string for offline activation.
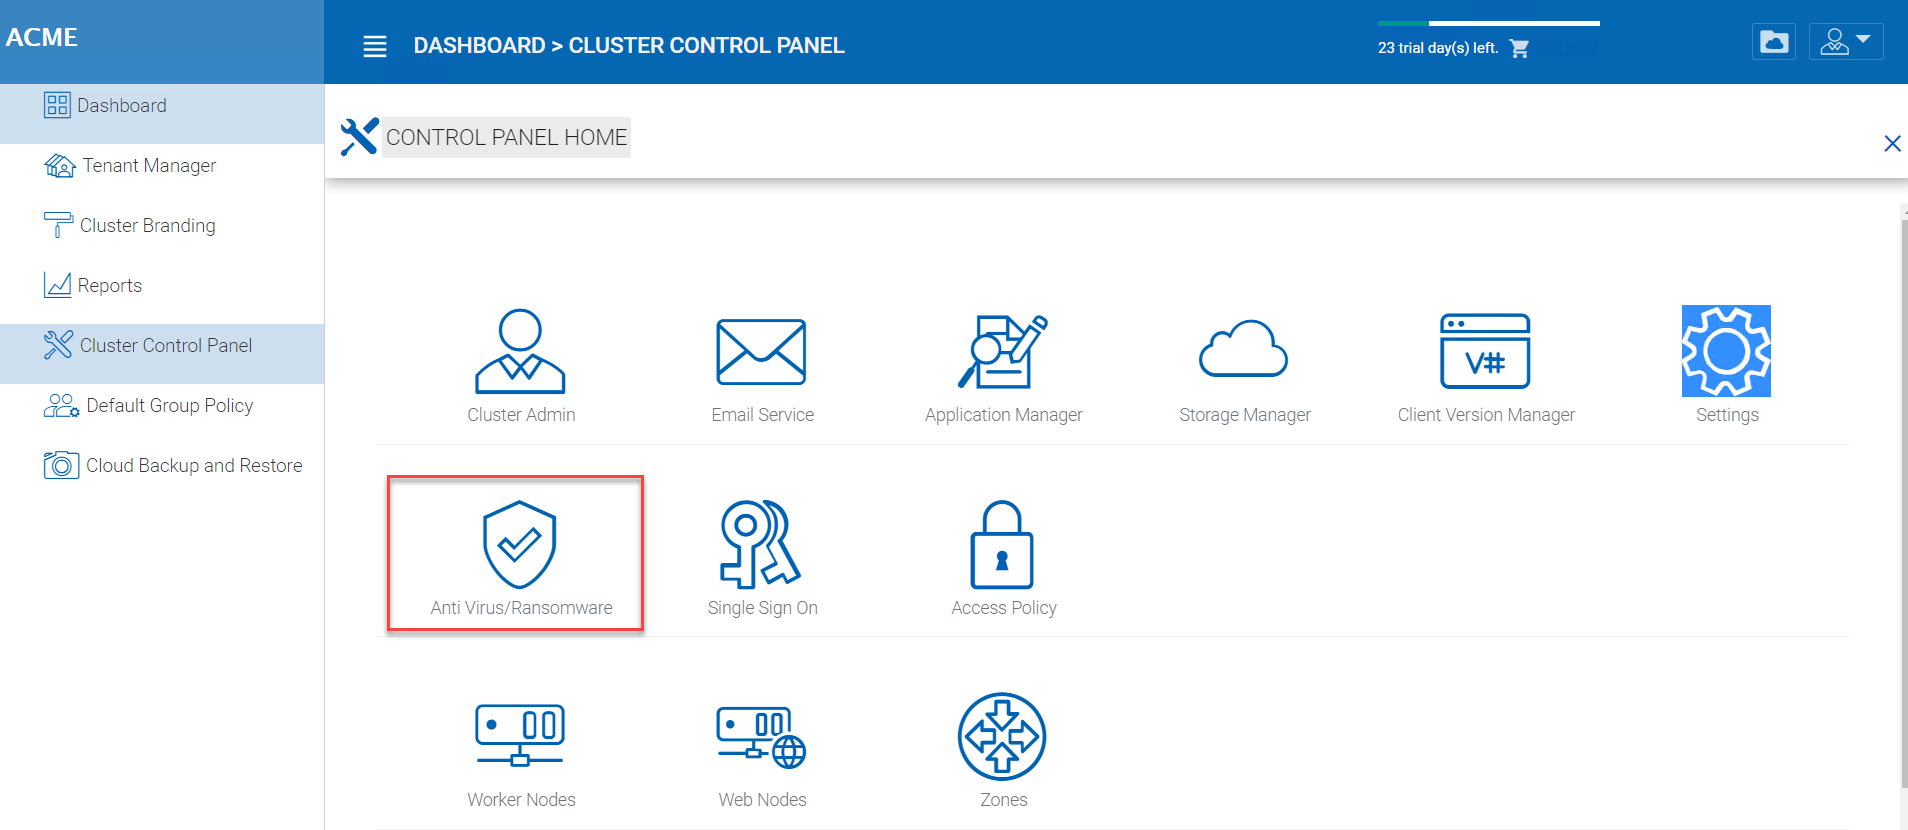
Anti Virus
Cluster Manager > Cluster Settings > Anti Virus
You can enable anti-virus protection which will ensure that the files being uploaded via the Cluster Server are scanned by the selected anti-virus software.
You will first need to obtain the anti-virus service that is independent from the Cluster Server, and get it directly from the anti-virus vendor. After that, you can integrate the anti-virus service into the Cluster Server.
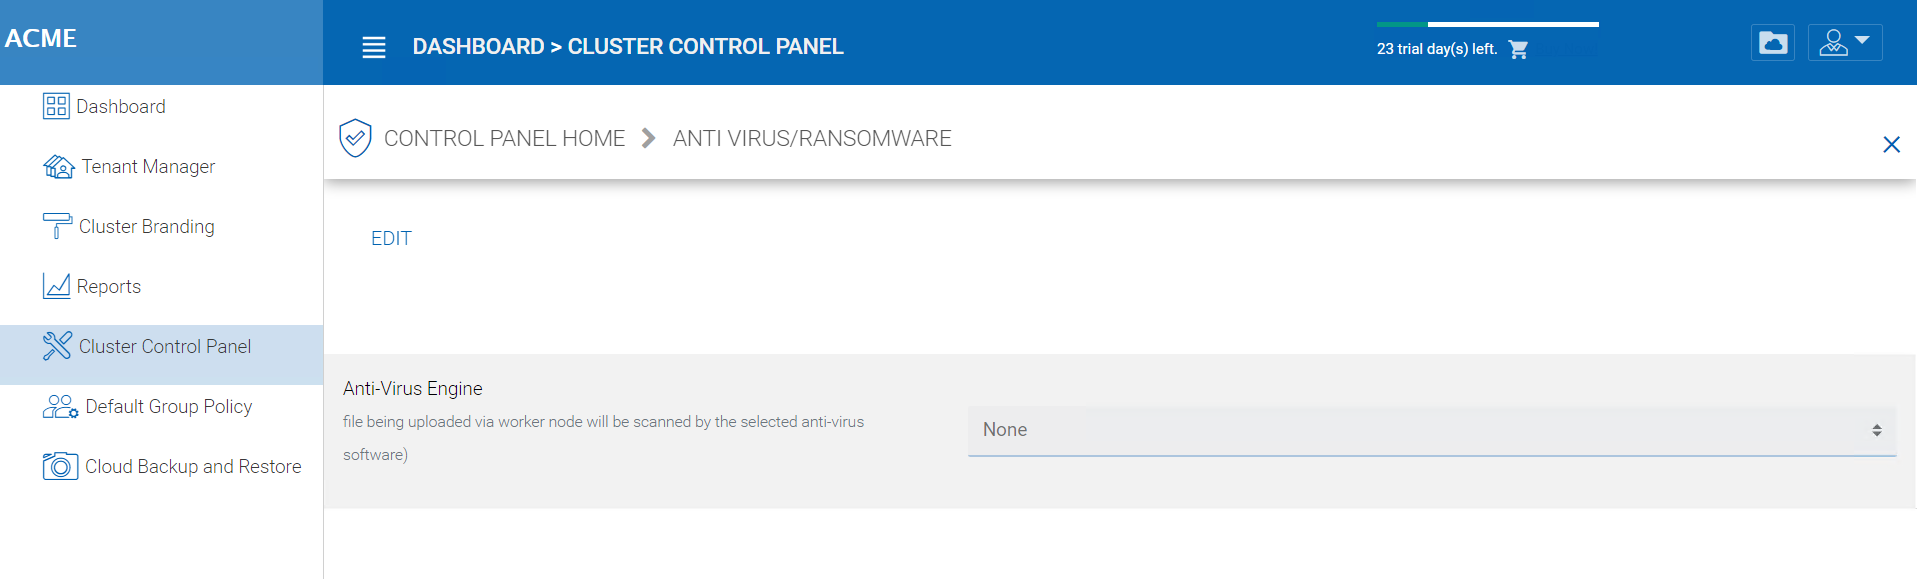
ANTI-VIRUS SETTINGS
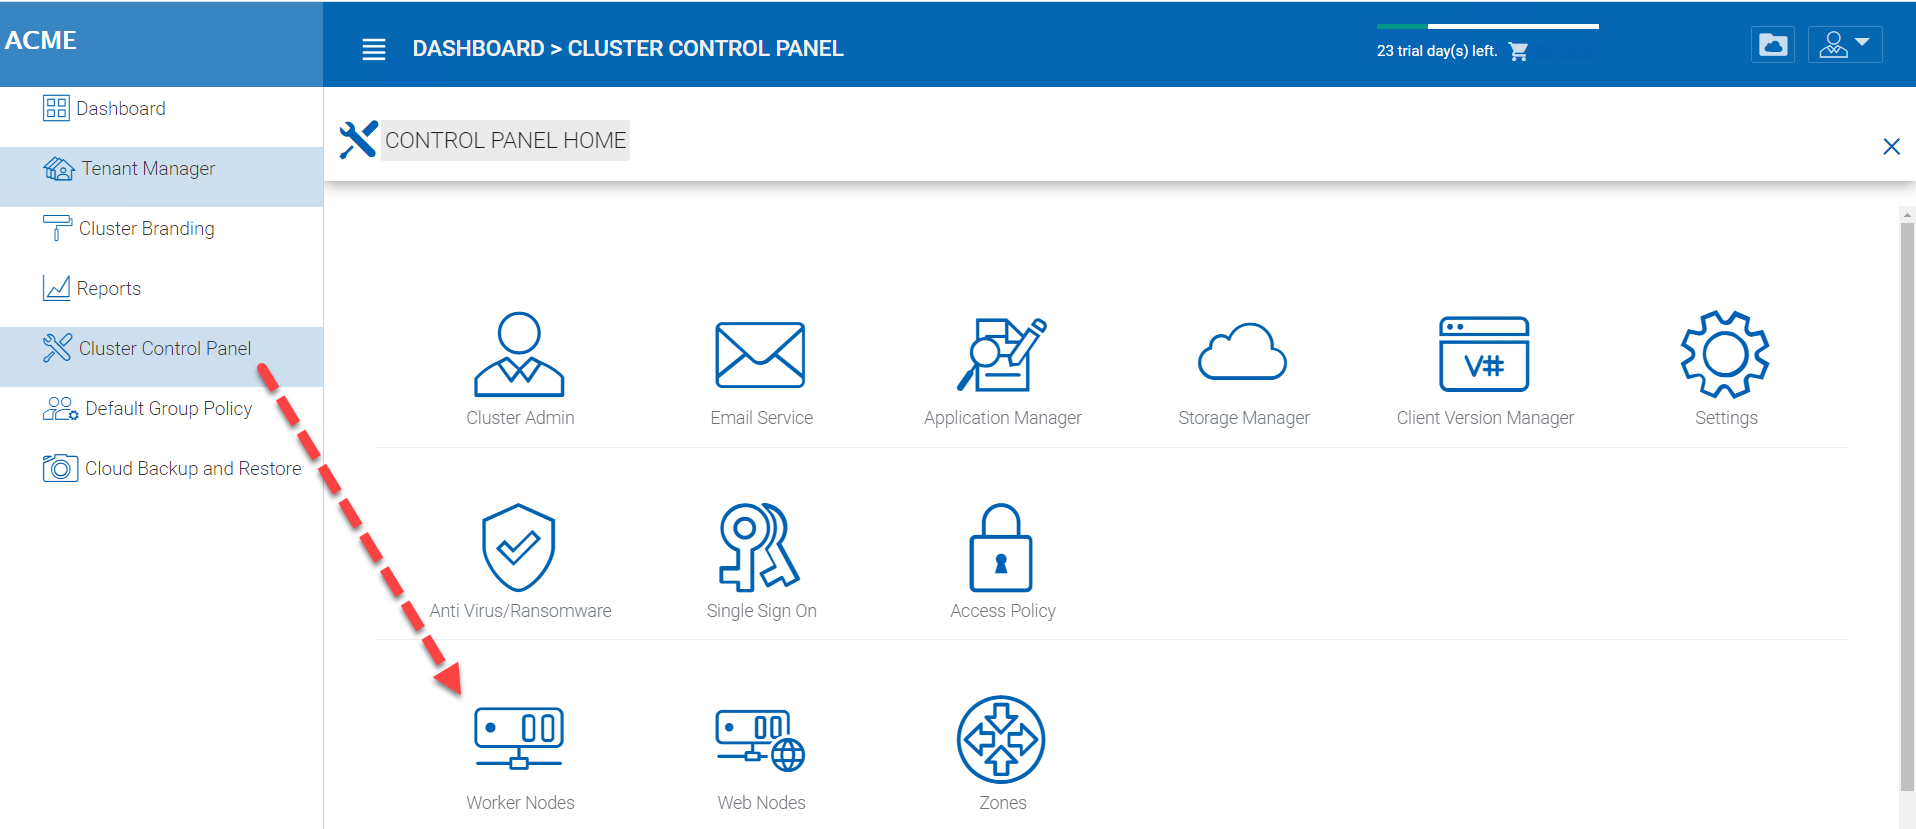
Worker Nodes
Cluster Manager > Cluster Control Panel > Worker Node
Cluster Server Farm has two types of nodes, one is “Worker Node” and the other is “Web Nodes”.
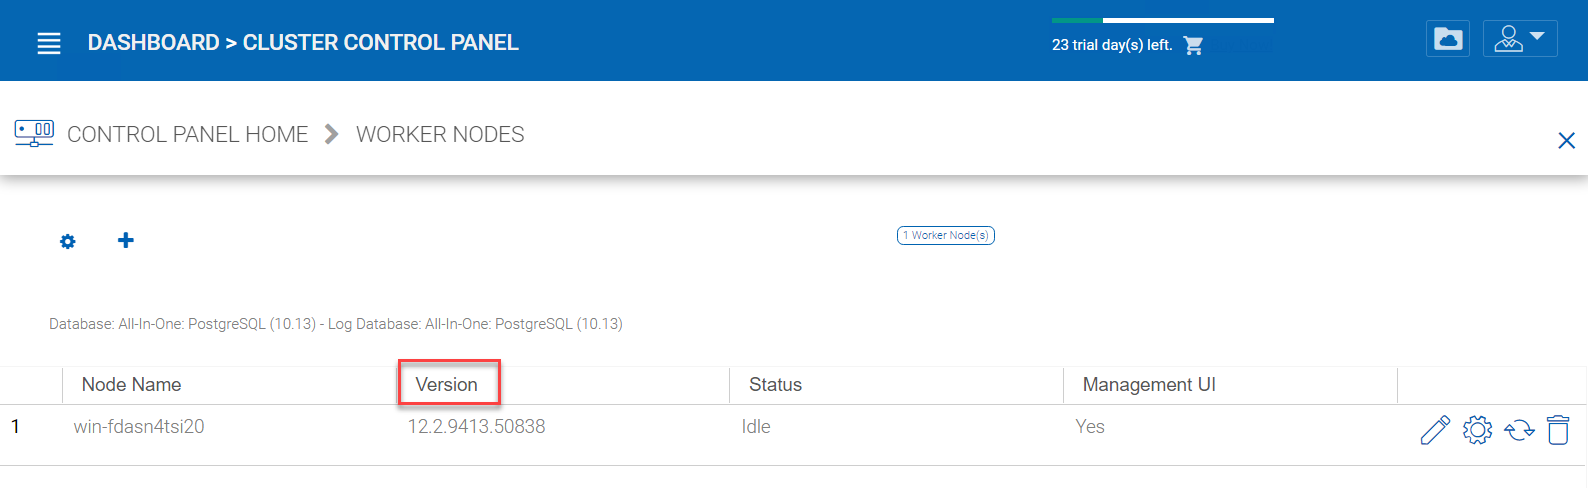
CLUSTER SERVER FARM NODES
This type of node will contain services like Web Browser Based File Manager, Storage Service Connectors, and etc. Again, additional nodes can be added as the load increases. Because there is cache information located on each node, users will have an affinity to a single node once it is assigned. If the load balancer distributes users evenly to all worker nodes, the cache information may exist on all worker nodes.

SSL NOTICE
Worker Node Settings
There are some settings that apply to all worker nodes. After you click on the “Settings” icon, the Advanced Setttings panel will show.
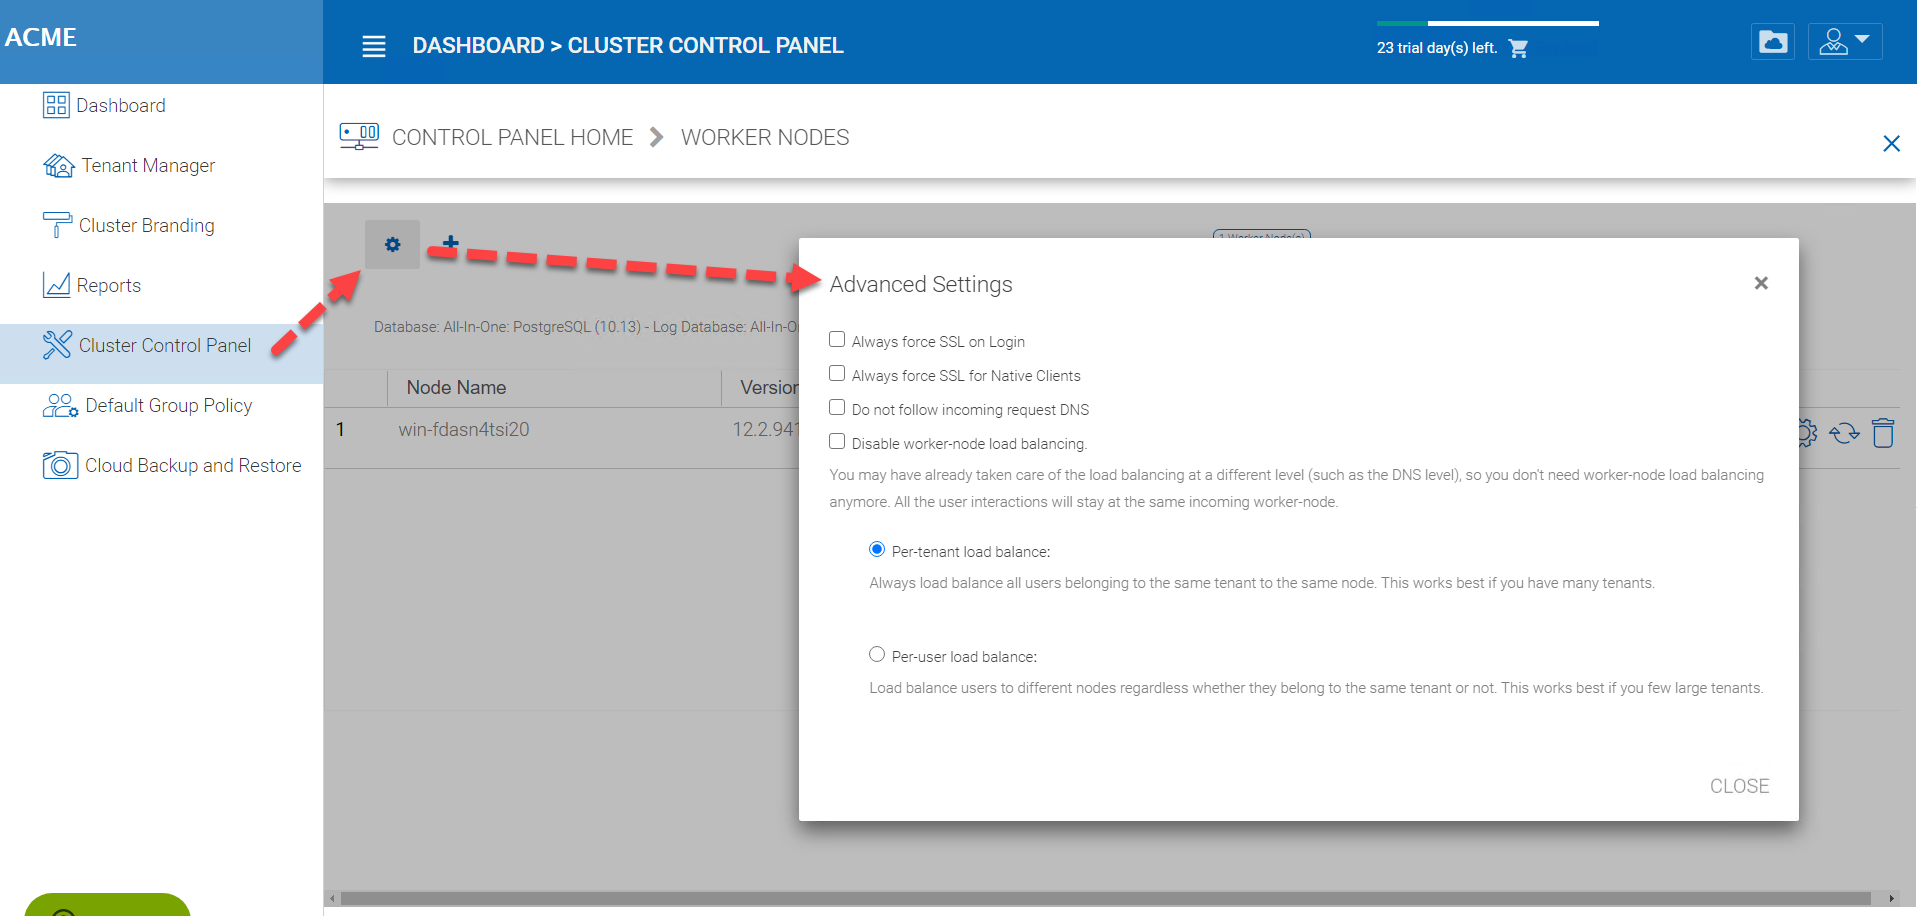
WORKER NODE SETTINGS
Always force SSL on Login
In a production environment, almost 100% of the time you will need to check “Always force SSL on Login”. When this is checked and when CentreStack detects that the incoming connection is HTTP, it will do a redirect to HTTPS. If you turn on SSL, you will need to setup SSL certificate first.
However, if you have SSL-offload, such that SSL is offloaded to a hardware appliance, and after that, the incoming connection is HTTP between the hardware appliance and CentreStack. In this SSL-offload case, you will NOT check “Always force SSL on Login” because it will create an infinite redirect loop because the incoming connection is always HTTP as far as the CentreStack Server is concerned.
Always force SSL for Native Clients
In a production environment, almost 100% of the time you will need to check “Always force SSL for Native Clients”.
Especially, in the case of SSL-Offload, you MUST check “Always force SSL for Native Clients”. Otherwise, the CentreStack Server may think that the incoming connection is HTTP so it will continue to encourage the native clients (such as Windows client) to use HTTP instead of using HTTPS.
Note
In iOS devices, the Application Transport Security may be enforced by the operating system and HTTPS must be used for an iOS Application to connect to the Cluster Server.
Disable worker-node load balance
When you have your own load balancer, you will disable worker-node load balancing. The Cluster Server has built-in node-affinity load balancing, which can be per-tenant or per-user. When you have your own load balancer, you may have session-affinity or just simple round-robin, either one is fine.
Note
How to add a worker node?
You just go ahead to install the Cluster Server during the installation and point the Cluster Server to the same database. Once the installation of the Cluster Server worker node is completed, reboot. The web portal page will pop up, asking you to add the worker node to the server farm.
Warning
What if you changed the Cluster Server’s Host Name?
For Windows server 2012 and later Server OS, when a server is newly provisioned, it is typically named in hostname format similar (WIN-ABCDEFG). Sometimes, it is desired to change the name in the Control Panel -> Systems. If the Cluster Server is already installed, changing the name will make the Cluster Server add itself again with the new name. So next time when you visit http://localhost on the Cluster Server after the server has been renamed, you will see the worker node section has both the node with the old name (which no longer exists) and the node with the new name (Which is current and good). In this case, you just need to simply remove the worker node with the old name.
Worker Node Properties

WORKER NODE PROPERTIES
You may need to modify the worker node properties when you setup SSL and the DNS name for the cluster.
Node Name
The Node Name needs to match the worker node’s hostname. Sometimes, if you rename a worker node’s Windows hostname (NETBIOS name) after the Cluster Server installation, upon reboot, the Cluster Server will pop up a web page, asking you to add the new worker node. In that case, you can go ahead and add the new worker node and then delete the old worker node.
External URL
The External URL needs to match the worker node’s external URL. In a production environment, this typically is in an https:// format with the node’s DNS name.
External URL is a critical property for Email templates. Once the Cluster Server installation is finished, the dashboard will have a warning message, ‘External DNS has not been configured for this worker node. Some functionality may not work properly. Config Now’
The moment that you have finalized on the External DNS name of the Cluster Server, you must come here and configure the ExternalURL property for the Cluster Server.
Internal URL
The Internal URL is the node’s internal URL, typically in the form of http://local-ip-address format. In later Cluster Server builds, this property is hidden and there is no need to set it any more.
Disable management functionality
You can create an internal facing worker node (that doesn’t have an externalURL) and only allow management functionality on this worker node. This is a security feature.
Edit Cloud Monitor Setting
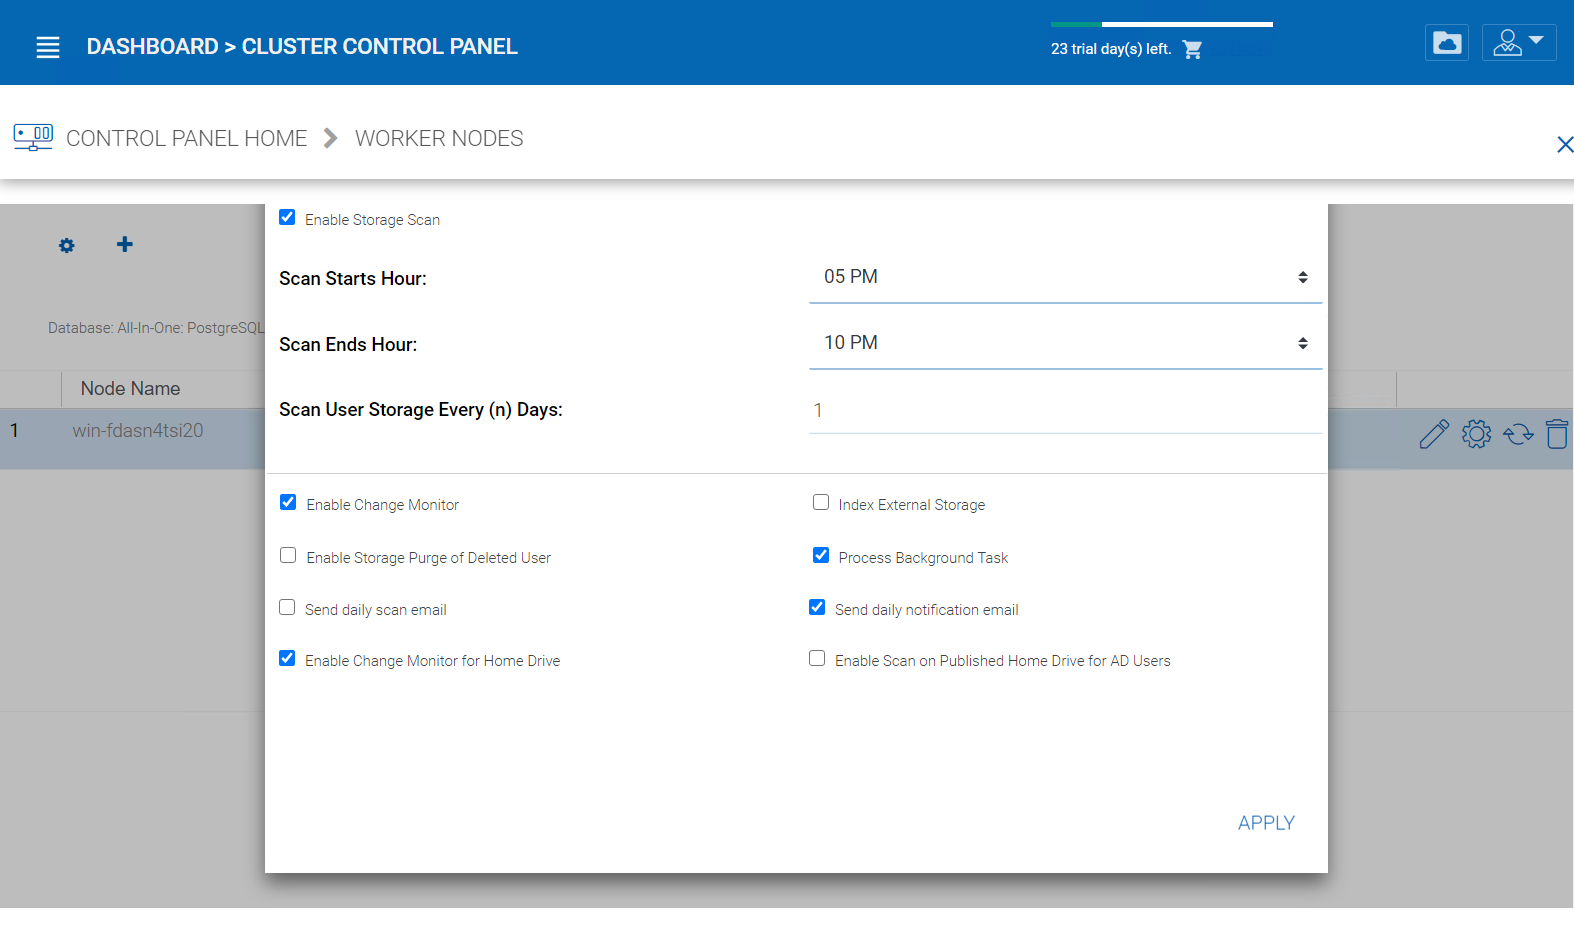
CLOUD MONITOR SETTINGS
Enable Storage Scan
Enables or disables storage scan on the worker node. On the worker node, there is a cloud monitor service. The service will be doing background monitoring and make scan storage from time to time to correct quota calculation and perform other maintenance tasks.
Scan Starts Hour
Typically you will set the scan start time to sometime in the early morning like 1AM.
Scan End Hour
Typically you will set the scan end time to sometime in the morning like 8AM before everyone comes to work. The main idea is to leverage idle time (when people are not at work) to do the scanning.
Scan User Storage Every (n) Days
Typically you can set it to every week or every other week. so a number between 7 to 15 is reasonable.
Enable Change Monitor
Enable change monitor monitors the attached local storage such as storage from file server network share and report file change notification to remotely connected clients. This usually is required if your users are both modifying documents directly from the backend attached network share and also from the front end Cluster access clients.
Index External Storage
This setting will index storage services added via the “Storage Manager”. The index will be written to the files table in the database.
Enable Storage Purge of Deleted User
When a user is deleted from the system, the user’s home directory is not immediately removed. And a lot of times, you don’t want to delete it at all. For example, a user is deleted from the Cluster Server, but the user may still continue to use the files and folder directly from the network.
Process Background Task
Whether this specific node will process background task.
Enable Change Monitor for Home Drive
If Active Directory Home Drive integration is on, this will allow the Cluster Server to monitor the changes on the home drive and notify remote client agents that the files/folders have changed.
Send daily scan email
If the storage scan is enabled, a daily scan email will be sent to the cluster administrator about the result of the scan.
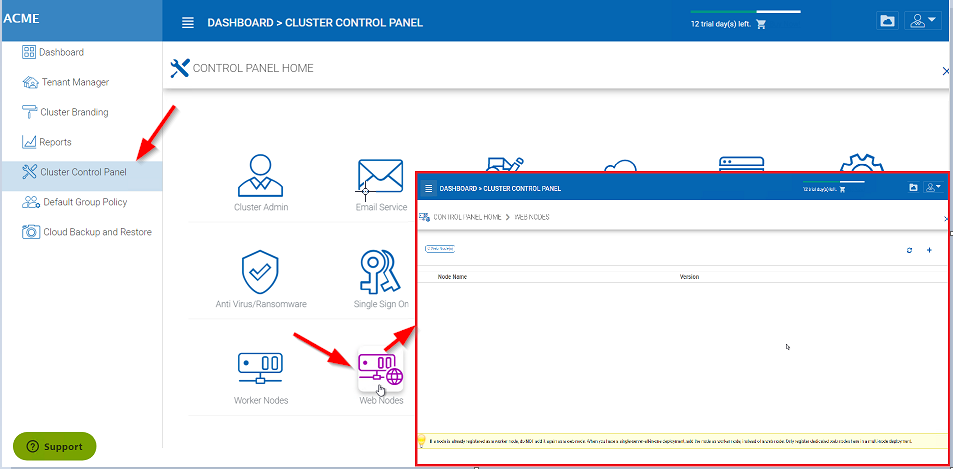
Web Node
Cluster Manager > Cluster Control Panel > Web Node
Note
In a small deployment, there is no need to have web nodes. You can go straight to worker nodes since worker nodes by defaults are web nodes too.
The Account Management, Sign-in and Load-balancing services will be installed on this physical machine (or virtual machine). Depending on the load, you may need 1 to N such nodes. Normally, we recommend for every web front node, you can have 10+ worker nodes. When you have small deployments, you can skip web front nodes and combine them into worker nodes. All the installation work is the same. If you do not need web front node, you do not need to assign them in the cluster manager.
WEB NODE
Example:
- ACME Corporation deploys two web front nodes node1.acme.com and node2.acme.com. Each node is running a copy of the Cluster Server connecting to the same SQL database.
- ACME Corporation acquires a domain name (DNS) of cloud.acme.com which is load balanced to node1.acme.com and node2.acme.com.
When Users point their browsers to https://cloud.acme.com it is directed to one of the nodes login page.
Note
NOTE 1: If you have hardware load balancing available, you do not need to use web nodes at all.
NOTE 2: Windows 2012/R2 comes with Network Load Balancing (NLB). If you use NLB, you do not need web nodes at all.
Basically, if you have any existing load balancer, you can omit web nodes.
Zones
Cluster Manager > Cluster Control Panel > Zones
The concept of zone is to associate your worker nodes with the location of the storage. When you think about zones, you will think about your storage location first.
For example, I have storage in LA so I have an LA zone. I also have storage in NY so I have a NY Zone.
You can have worker nodes from different zones as well and assign users to specific zone. If user’s home directory is coming from LA zone, the user will need to be assigned to LA zone.
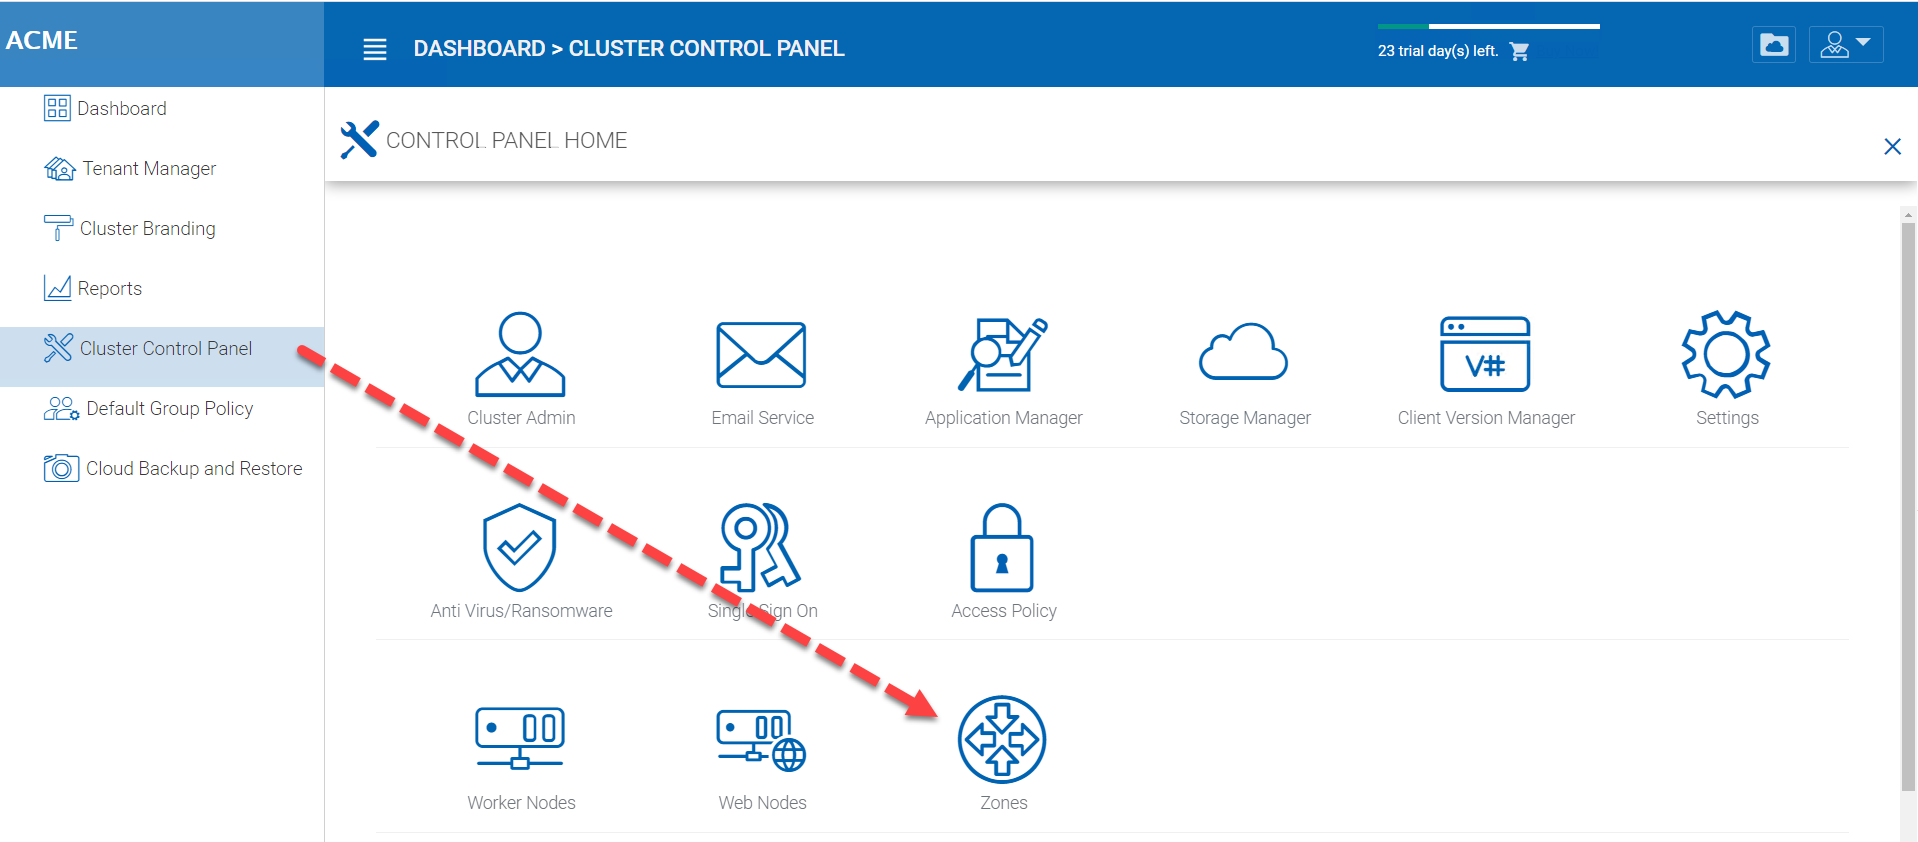

CONTROL PANEL STORAGE ZONES EDITOR
Default Group Policy
Cluster Manager > Default Group Policy
Default group policy can be applied to all tenants in the cluster. However, if the tenant also defines its own group policy, the tenant policy can over ride cluster wide default group policy.
Please reference the Group Policy in the tenant administrator section for full list of policy items.
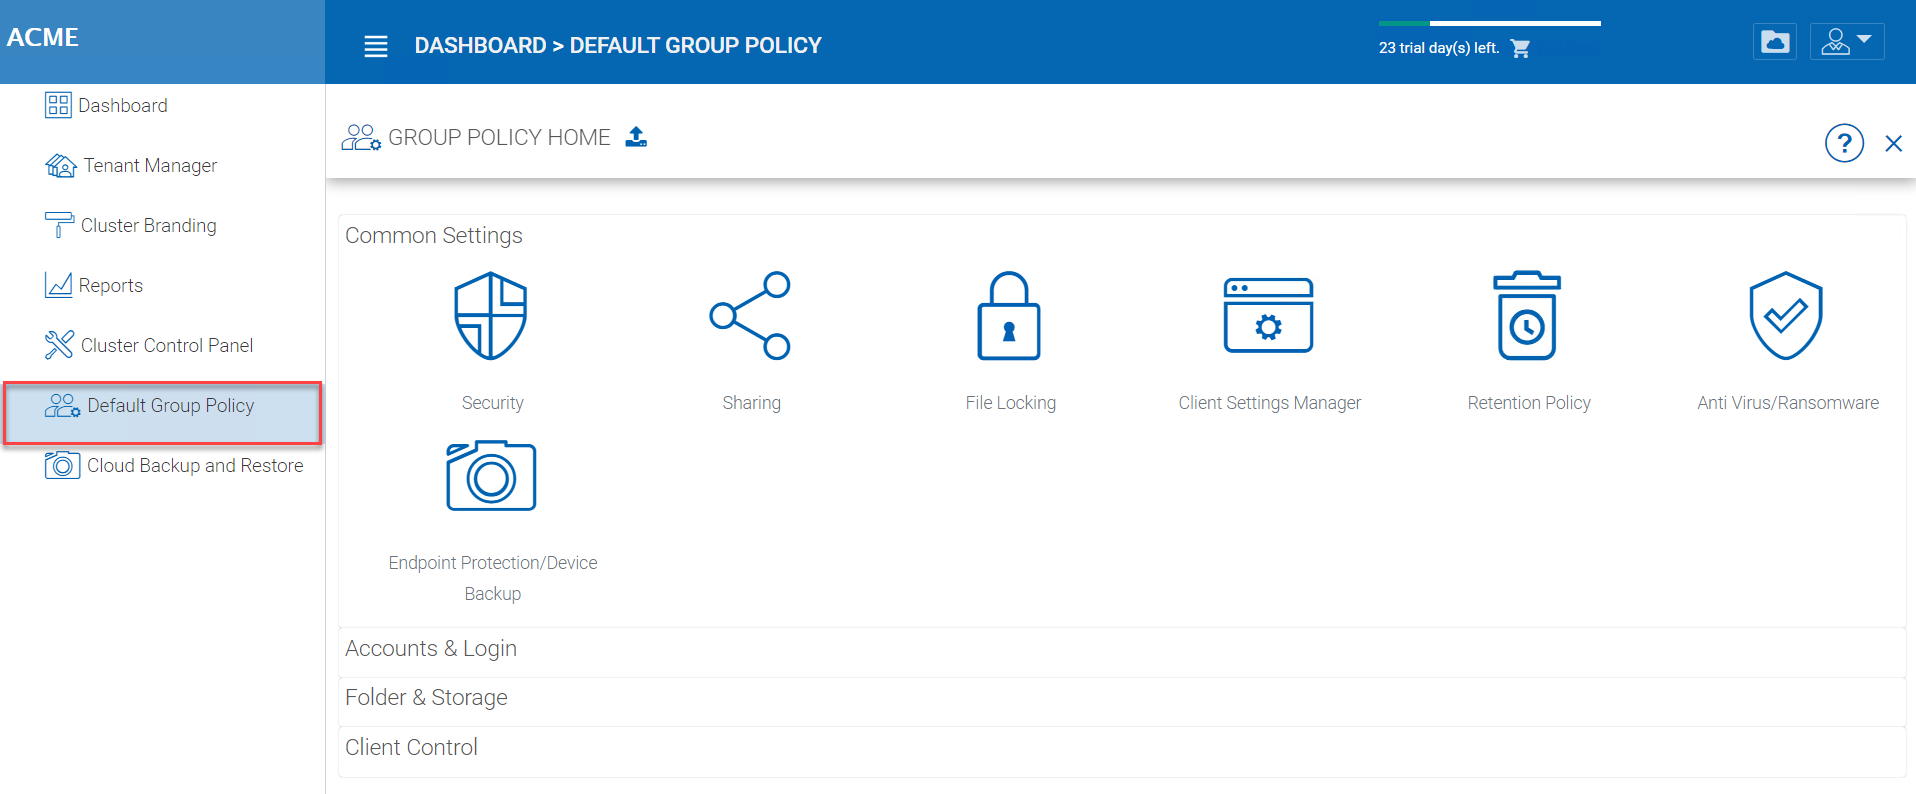
GROUP POLICY SETTINGS