Tenant Administrator
Please reference the Admin Guide for full documentation of the tenant administration. Here we will go over several commonly touched areas for tenant administrators.
After you enter the “management console”, you will be in the dashboard. When you are at the dashboard, you can access the tenant by clicking on the desired tenant from the options.
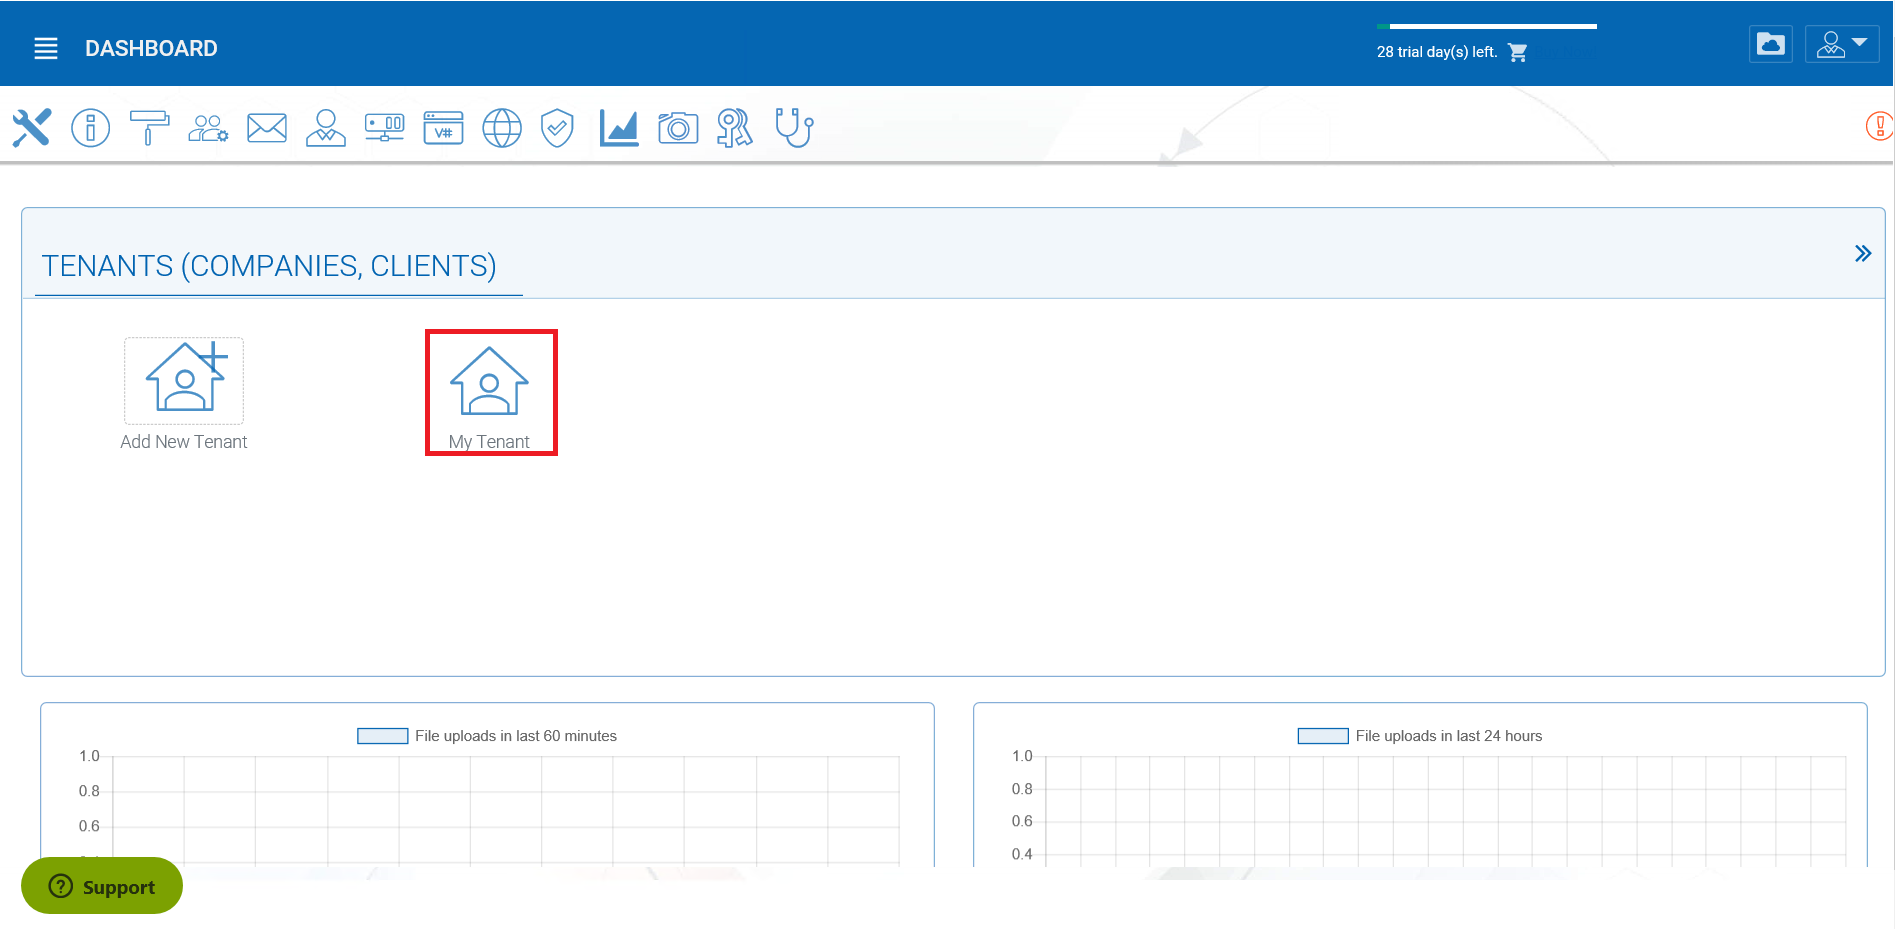
Under Management Console, an admin can configure storage, monitor shared objects, create and manage team folders, manage users, configure granular group policies, add new tenant administrators, look at different reports, and under advanced configure AD etc.
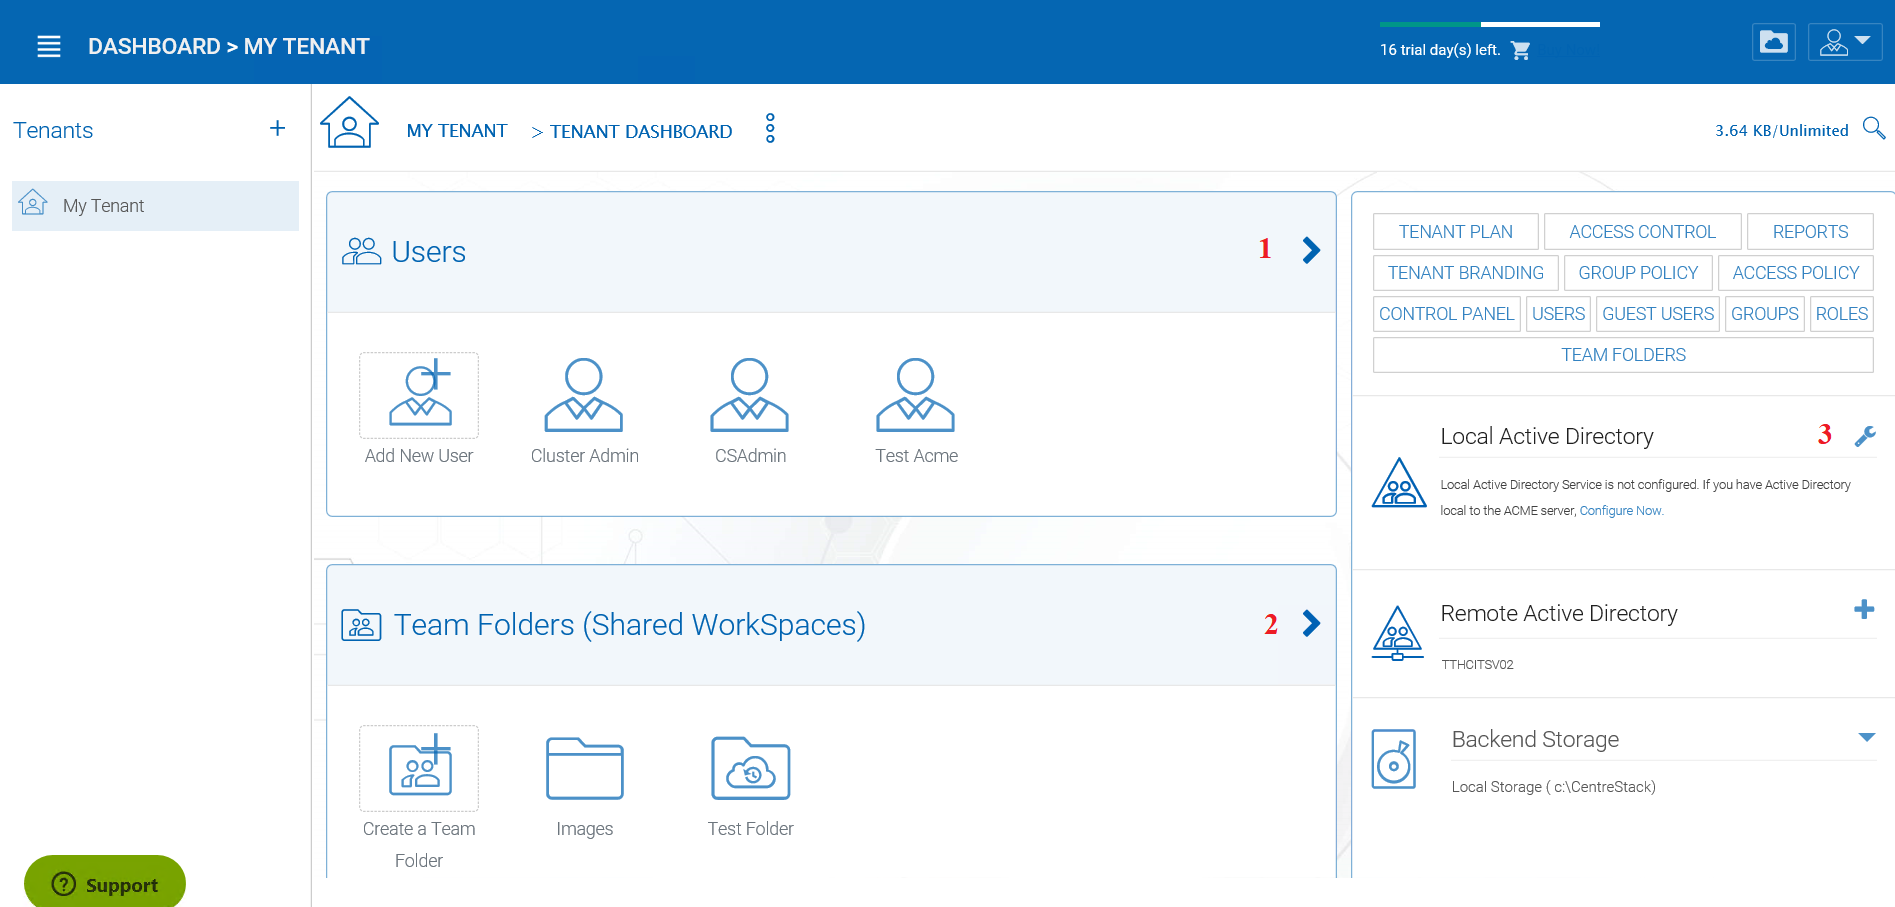
The top two objects to manage are users (1) and folders (2). If you are using an Active Directory for importing users and permissions you can connect to your Active Directory by clicking the wrench icon (3).
MANAGE USERS AND FILES
User Manager
You can access the user manager by clicking one of these three items in the Management Console.

ACCESSING THE USER MANAGER
Active Directory - LDAP
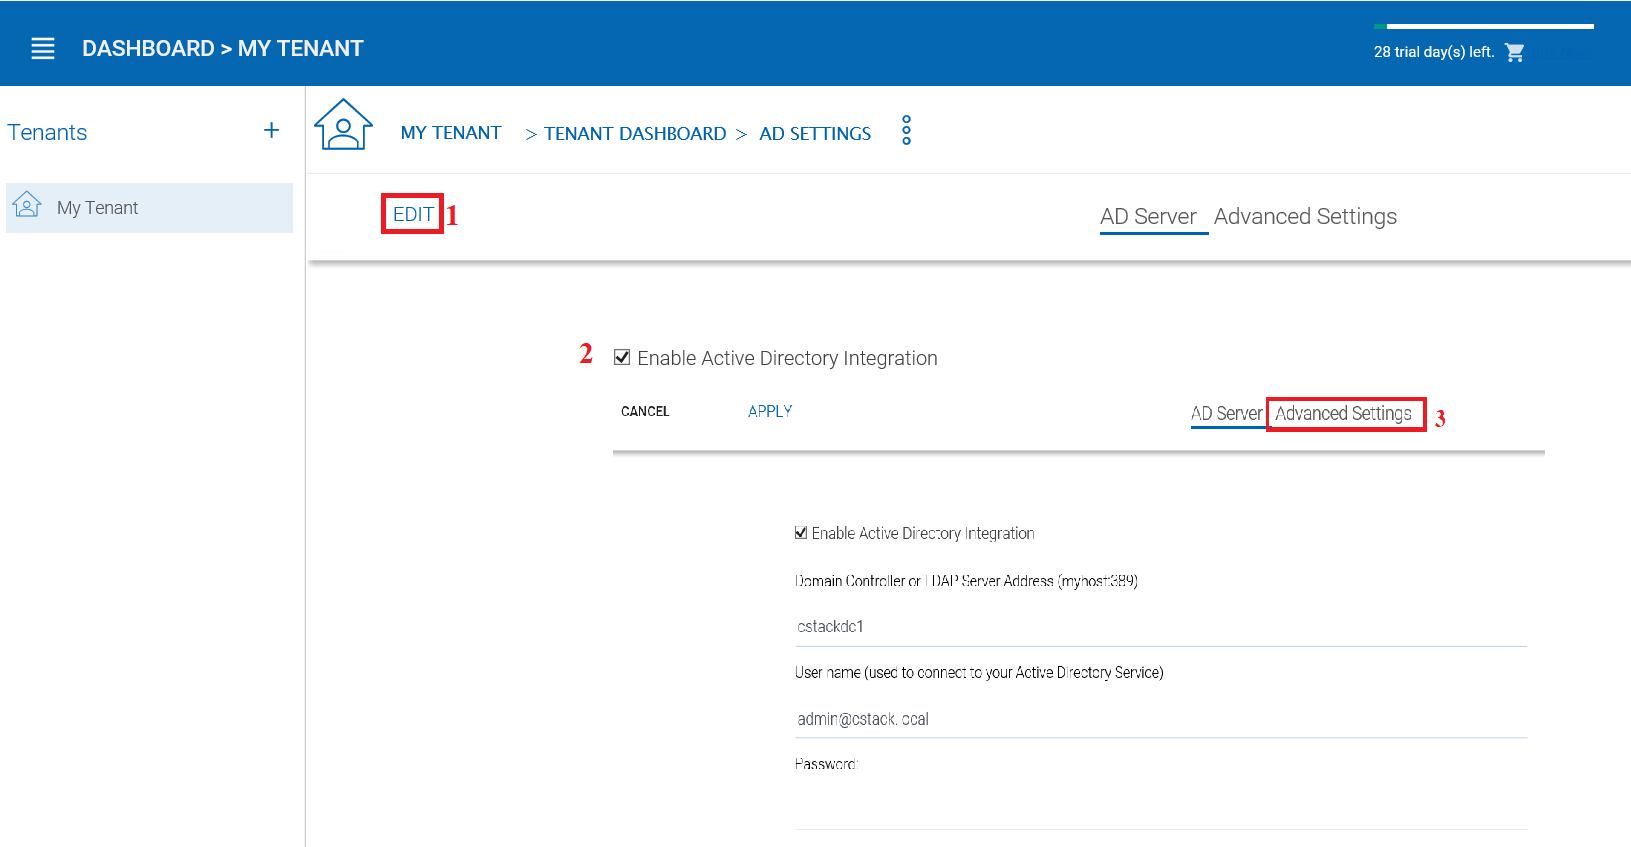
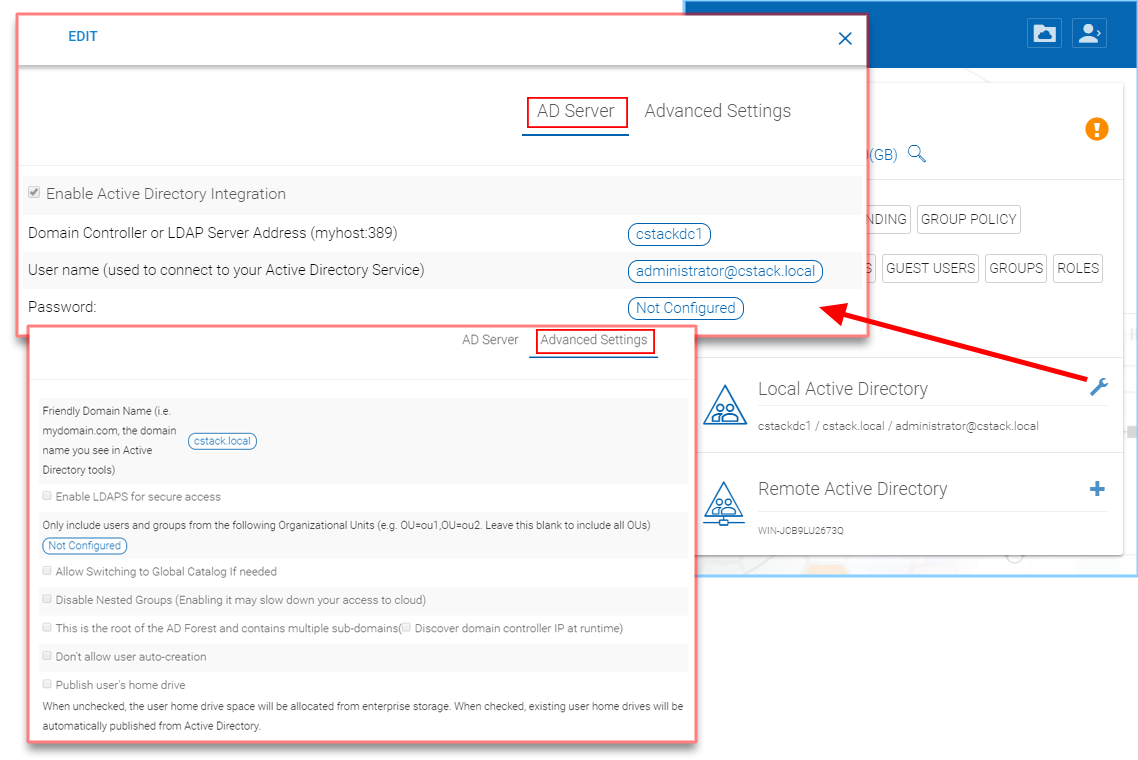
In the AD Settings view you can add your local settings. Click Edit (1), then select “Enable Active Directory Integration” (2).
CONNECTING TO ACTIVE DIRECTORY (AD)
This gives you access to all the settings fields and the Advanced Settings Tab (3). Once you have filled in the settings with an Administrator User account from your Active Directory, click APPLY to accept your changes.
Active Directory - Remote
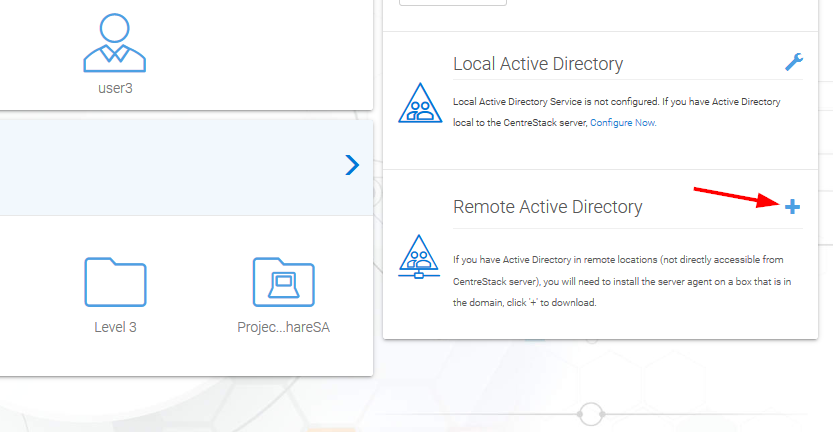
If the users are coming from remote locations, away from the CentreStack server (so it is not in the same Local Area Network), the first step to take is to install the “server agent” software on a remote file server, as long as the file server is in the same remote Active Directory domain. Log into CentreStack from your File Server and download your Server Agent client. You can access this by clicking the (+) icon. Once this is setup on your File Server, CentreStack can access it to connect to your Remote Active Directory.
ACCESS YOUR SERVER AGENT CLIENT
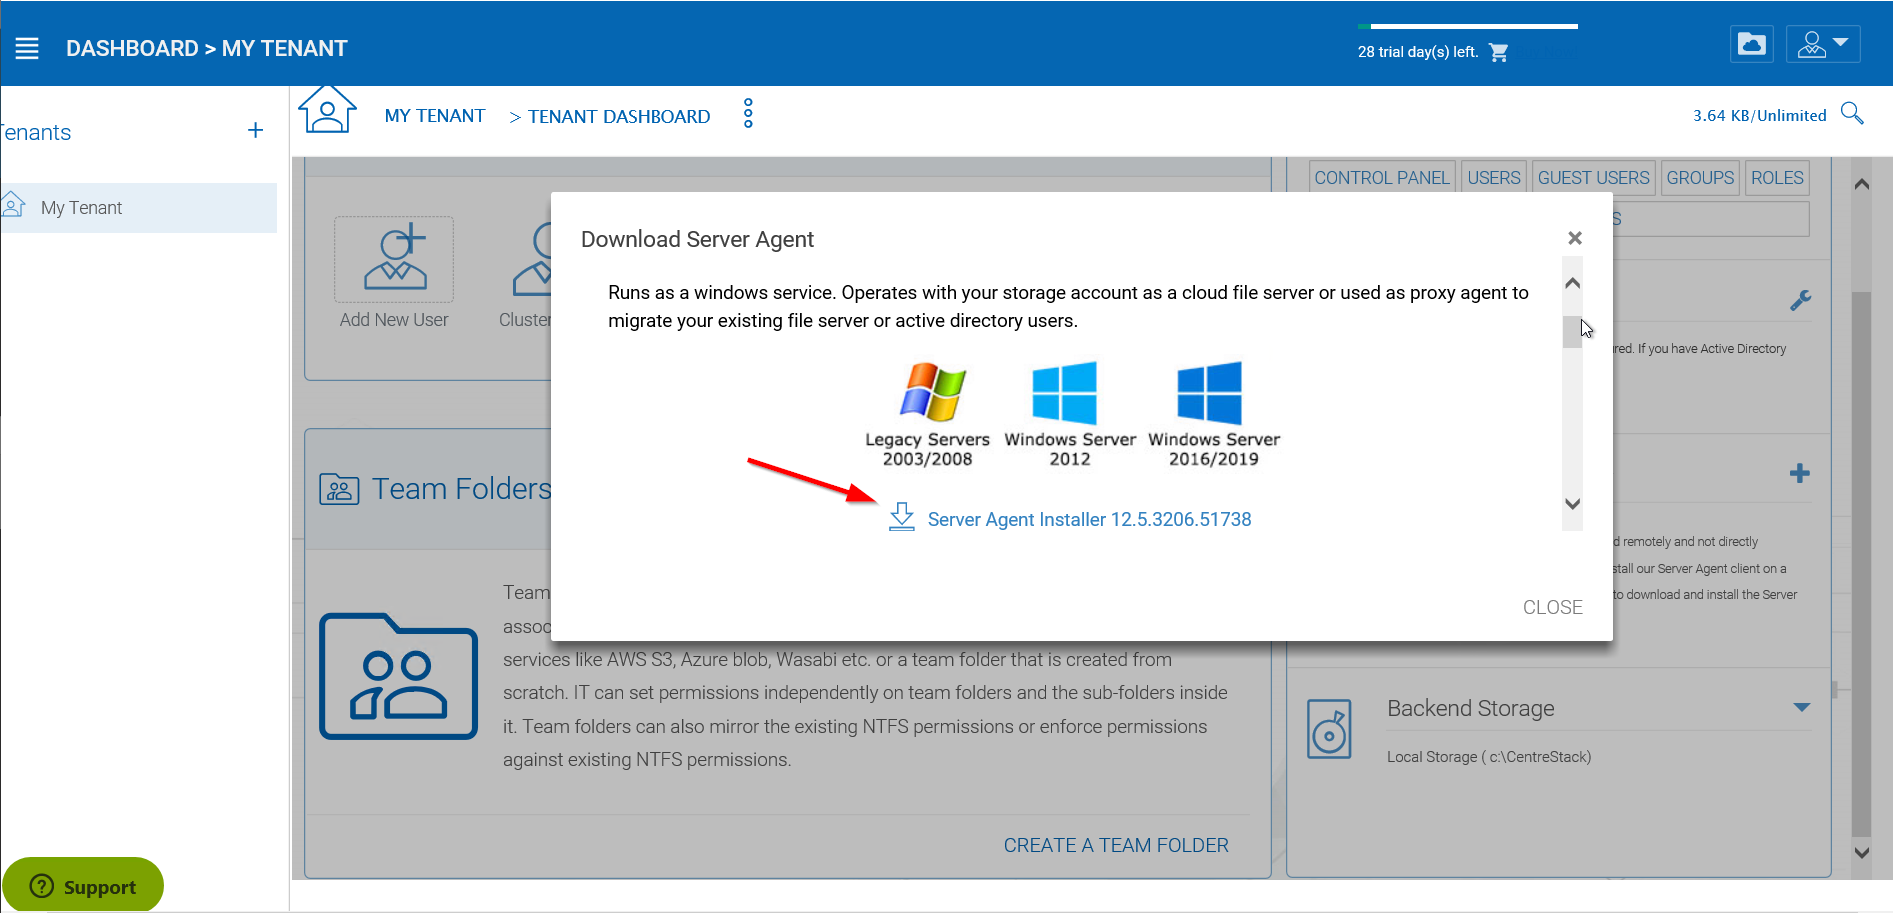
DOWNLOAD AND INSTALL
Note
“Server Agent” software can import remote file server network share, and also import remote Active Directory users. Once Server Agent is installed and setup in remote location, the tenant administrator can use the Client Management Console “Migrate CIFS Shares” and “Migrate Users” (1) to import shares and users from Active Directory. Other actions are availible through the dropdown menu (2).
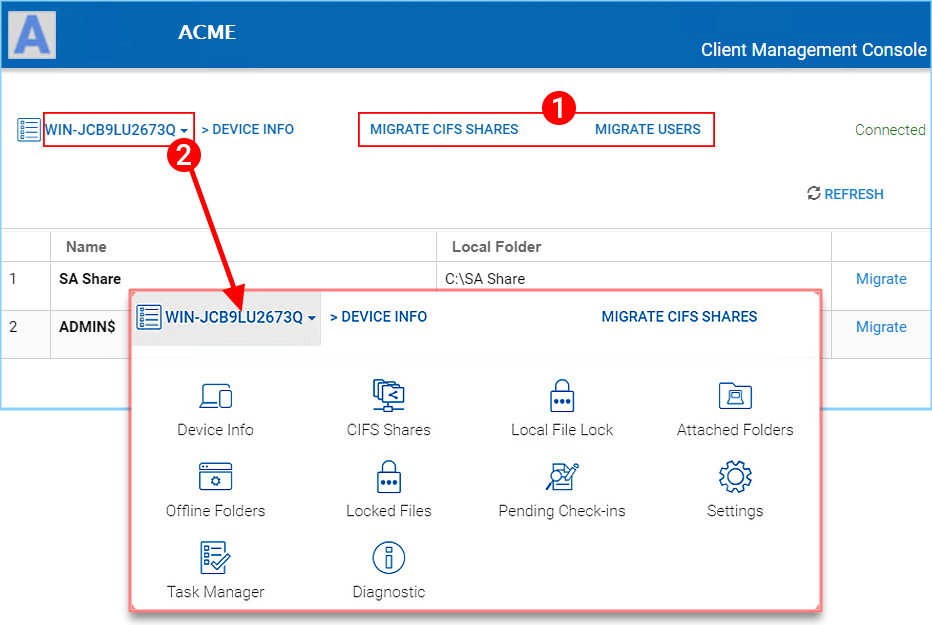
MIGRATE SHARES AND USERS
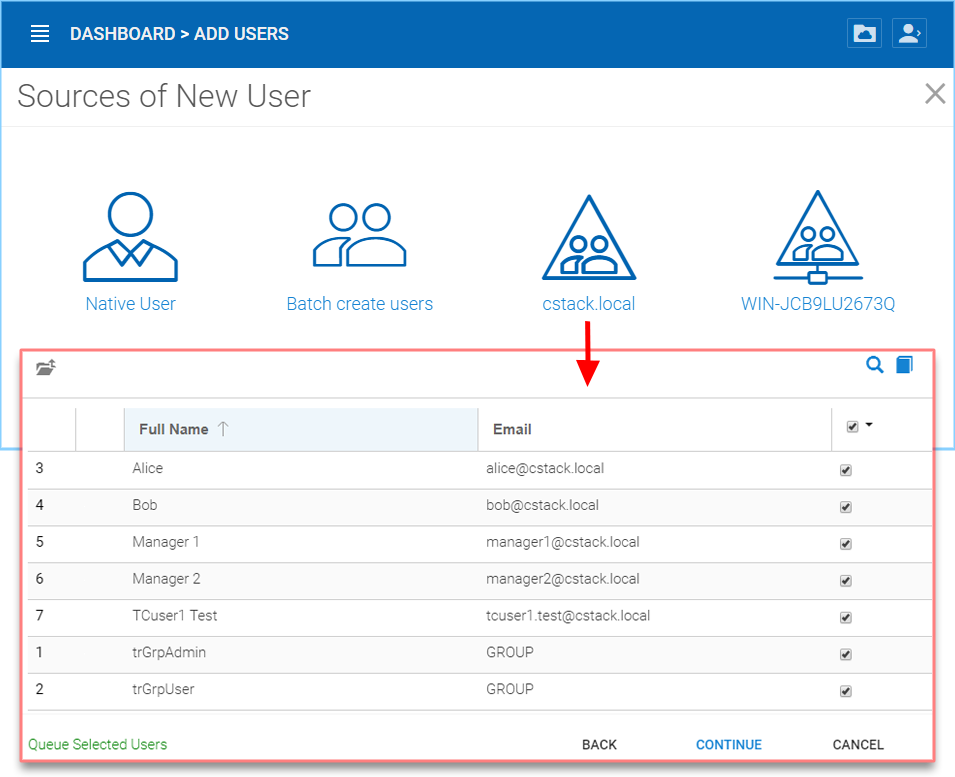
Add Users
You can add users from within the User Manager or simply click the Add New User button to open the “Sources of New User” panel. In that panel you have several options: add a Native User, Batch Create Users, import Active Directory users and permissions, and if you have Server Agents actively connected, you will also see those servers listed here as well.
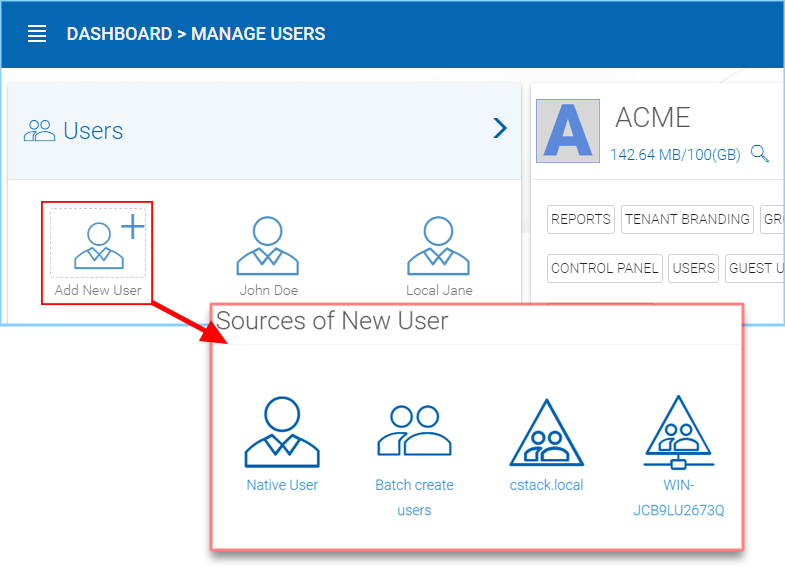
ADDING USERS
Native User
Native user refers to CentreStack user that is not related to any Active Directory.
Batch create users
These are native users in a comma separated file that can be paste into a text area so the users can be batch created.
Active Directory
Active Directory means users from Local Area Network (LAN) that is in the same network as the CentreStack server.
Server-Agent-Name
If you already have the “Server Agent” installed and the server agent is actively connected to CentreStack, you will also see the server agents listed by name in the Add User page.
Native Users
When a new user is created, the administrator will specify the amount of cloud storage that the new user is allowed to use. The email address will send a welcome email to the new user and will serve as his/her username.
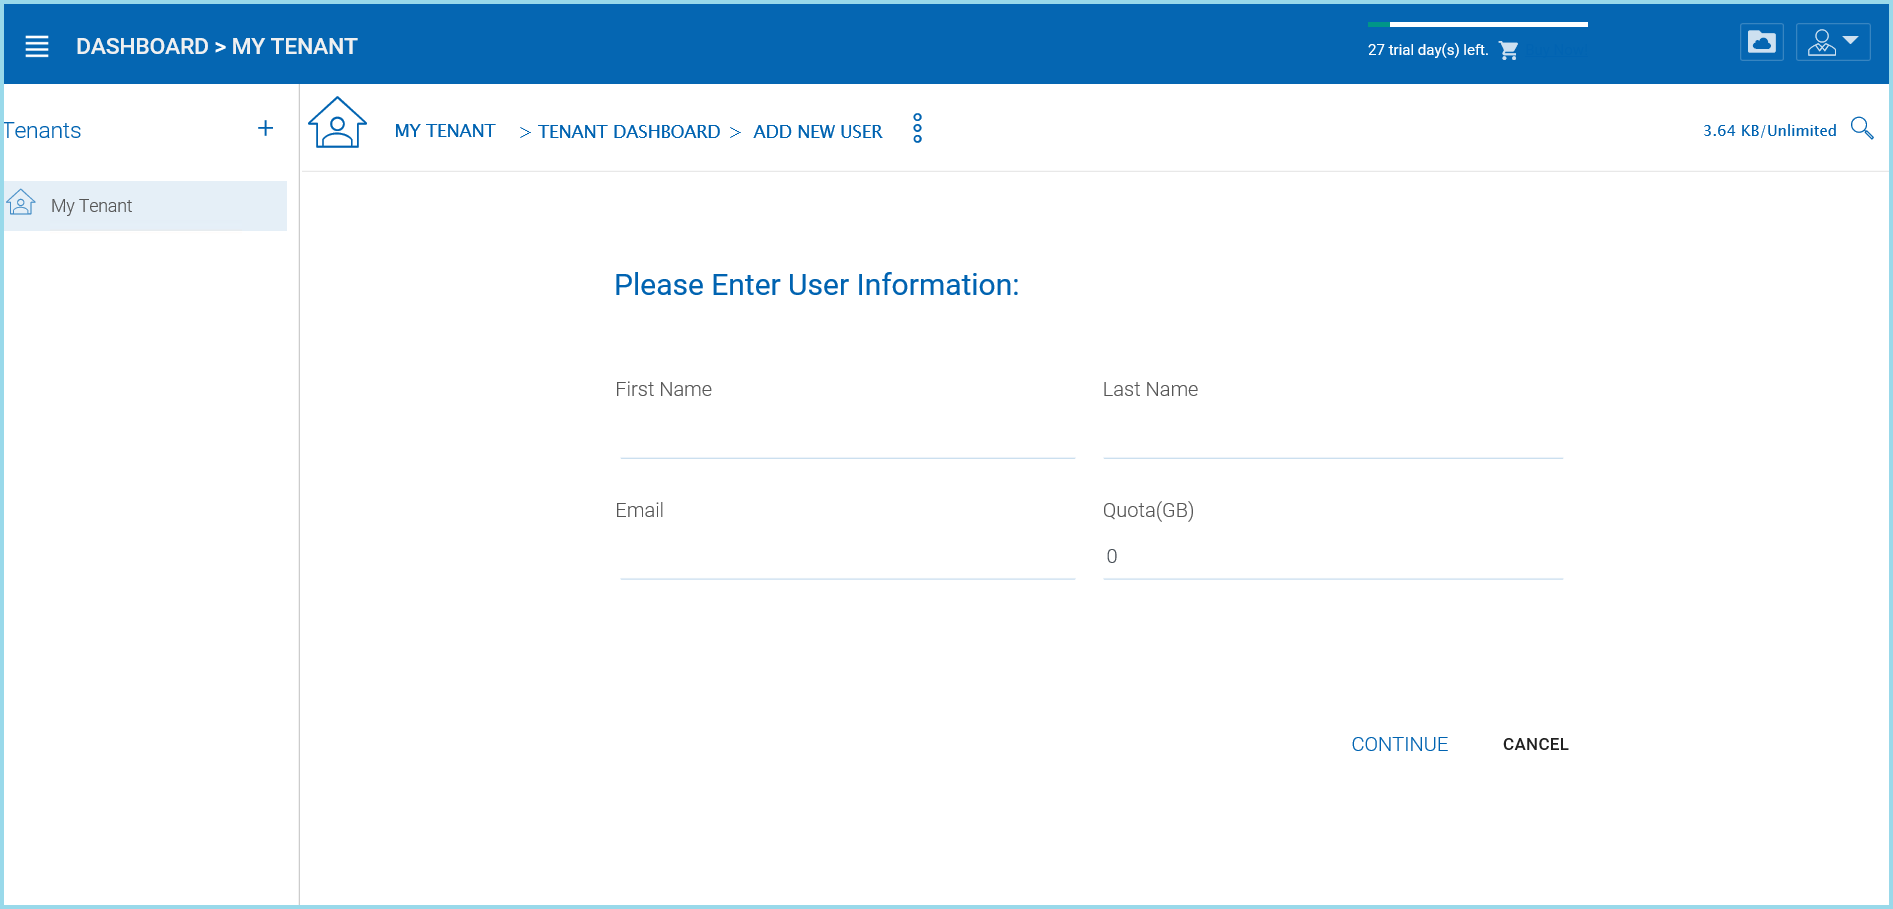
ADDING A NATIVE USER
Note
When quota is left as zero, it means no limitation until the tenant quota limit is hit.
Active Directory Users from LDAP
If the Active Directory (LDAP) is not already configured, you will need to configure it first. Click the wrench icon in the right Local Active Directory panel to access the settings.
CONFIGURE YOUR ACTIVE DIRECTORY SETTINGS
If the Active Directory (LDAP) is already configured, you will see the Active Directory name at the bottom of the AD icon in the “Add User” view.
Add Active Directory Users where those users are from local area network.
ADDING ACTIVE DIRECTORY USERS
After the Active Directory is configured, you can use the Add User wizard to import Active Directory users into CentreStack.
Note
For best practice, you will only configure Active Directory via LDAP if the file server is also local in the same network as the Active Directory server.
Active Directory Users from Server Agent
When the Server Agent is available and connects to the specific tenant in CentreStack, the Server Agent will show up with the server’s name at the bottom of the icon.
Click through the Server Agent icon, you will see the “Add User” wizard and complete the wizard to add users. This is very similar to the add AD user from local LDAP process above.
Note
When the Active Directory is at a remote location, not directly connected to CentreStack server, Server Agent can be used to facilitate the communication. Server Agent doesn’t need to be installed directly on a remote Active Directory server, the Server Agent needs to be installed on a remote file server that is part of the remote Active Directory domain.
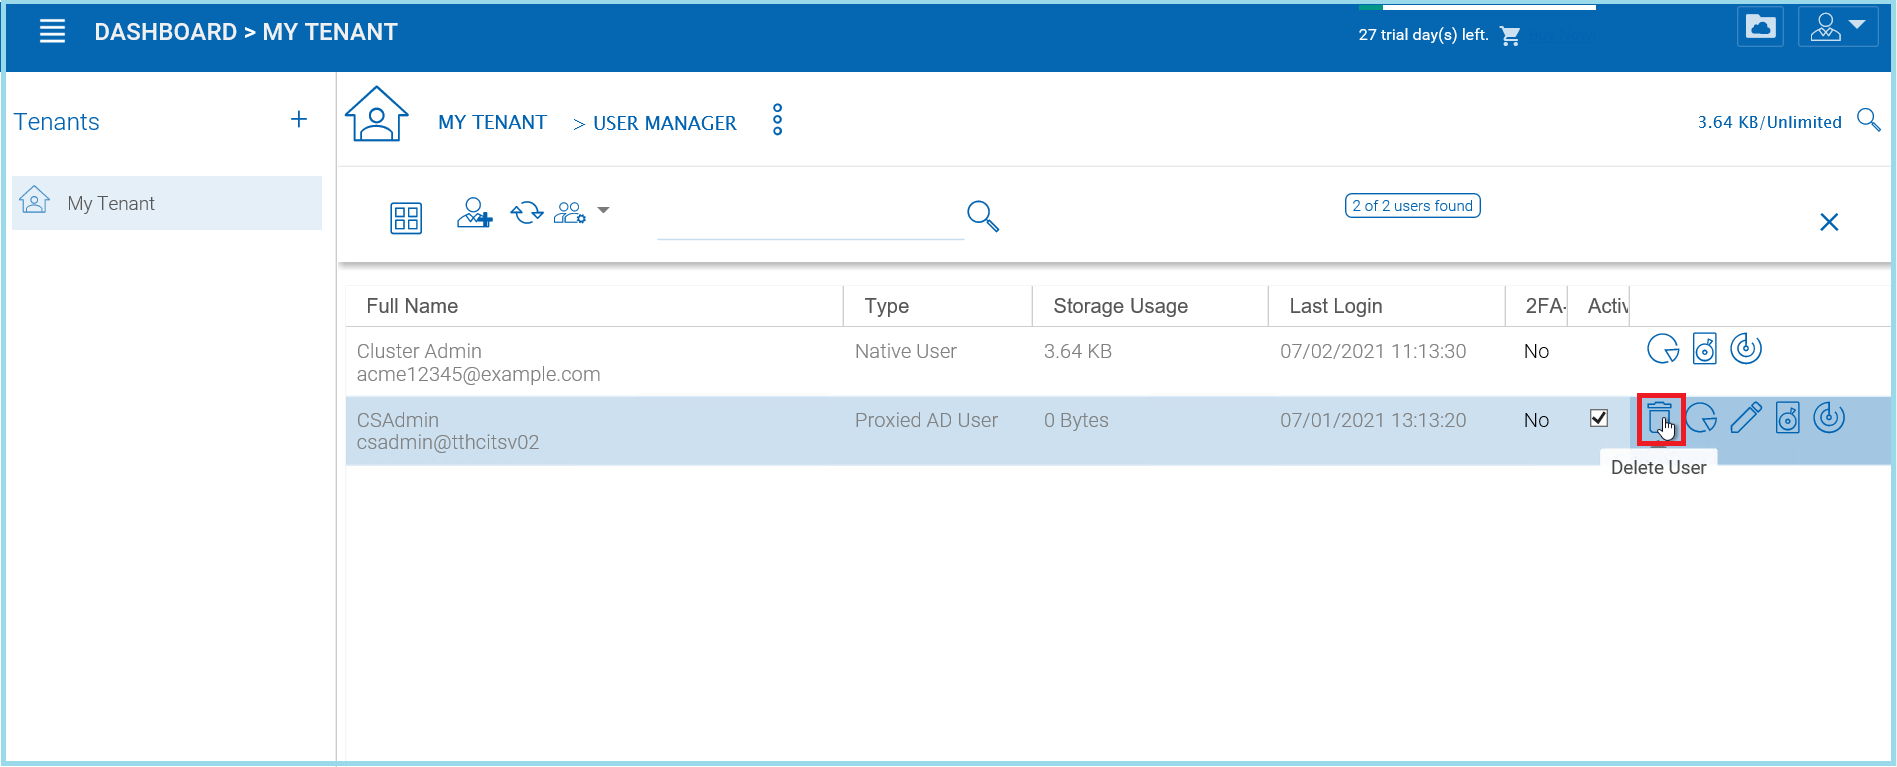
Deleting Users
When a user leaves the team, administrators can delete the user’s login. Just click the Delete icon in ‘User Manager’ window.
DELETING A USER
Managing User Quotas
Administrators can assign a quota to each user. A user will not be allowed to upload files to CentreStack once their quota has been reached.
If the quota is 0 for the user, there is no limit on how much storage the user can use.
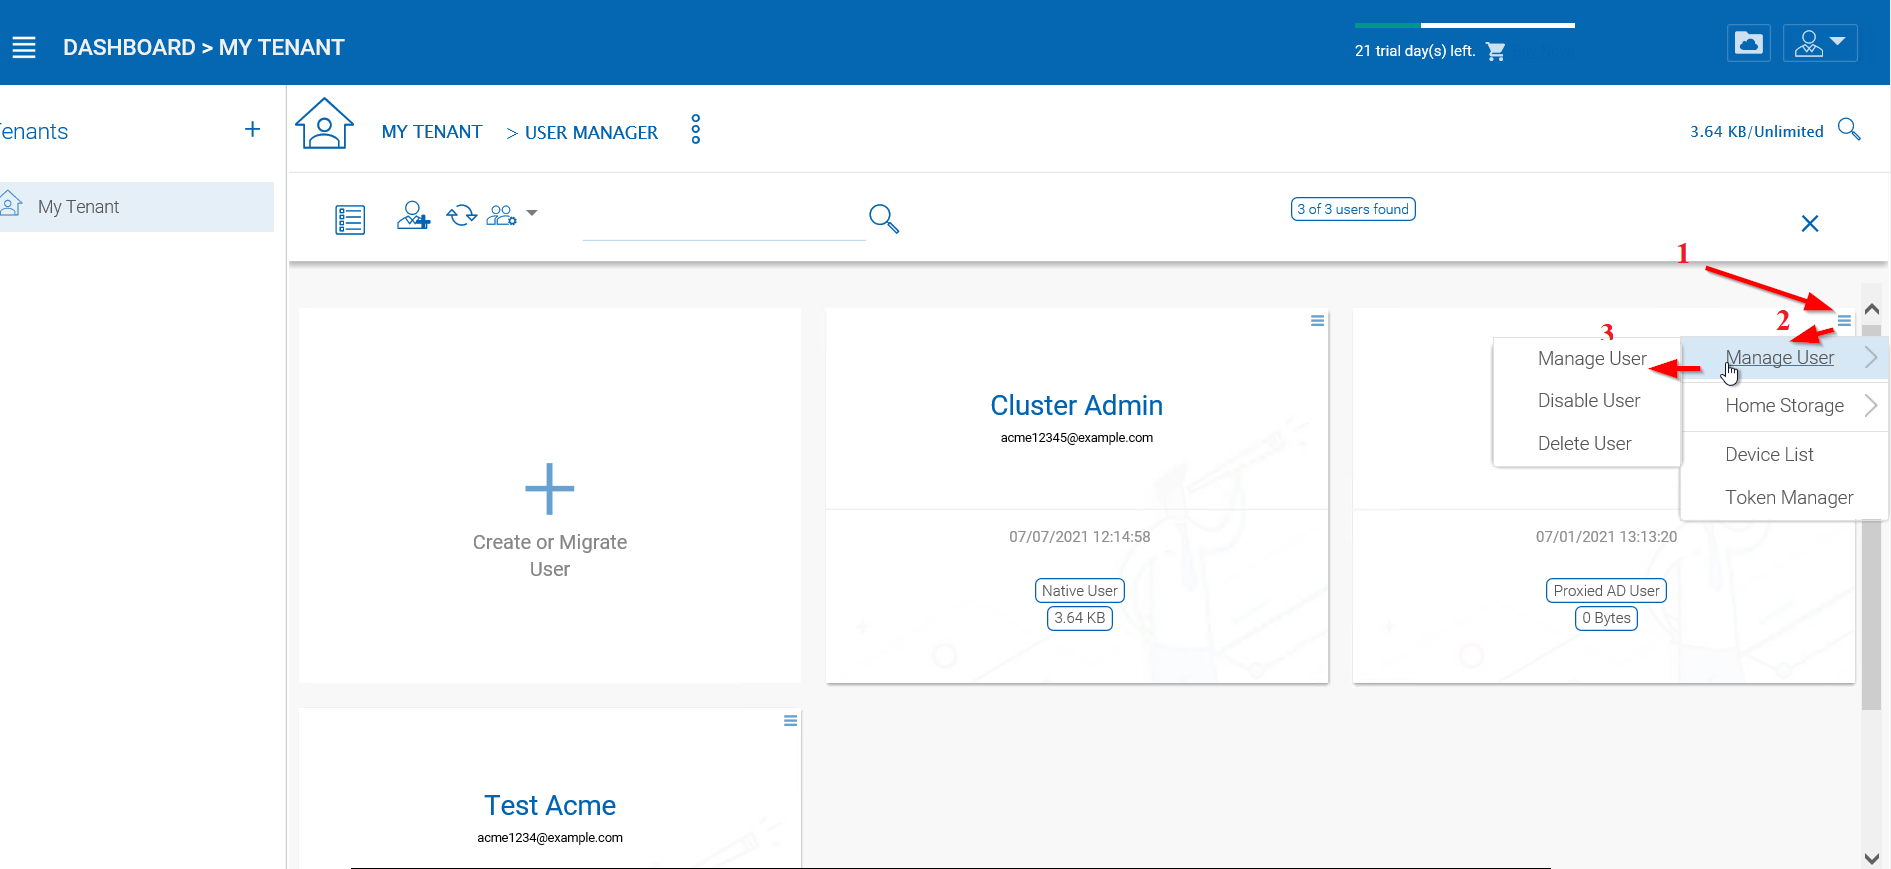
Click the ‘Management Console’ and select ‘User Manager’. Click the “Manage User” menu on a user to manage and select “Set Quota”.
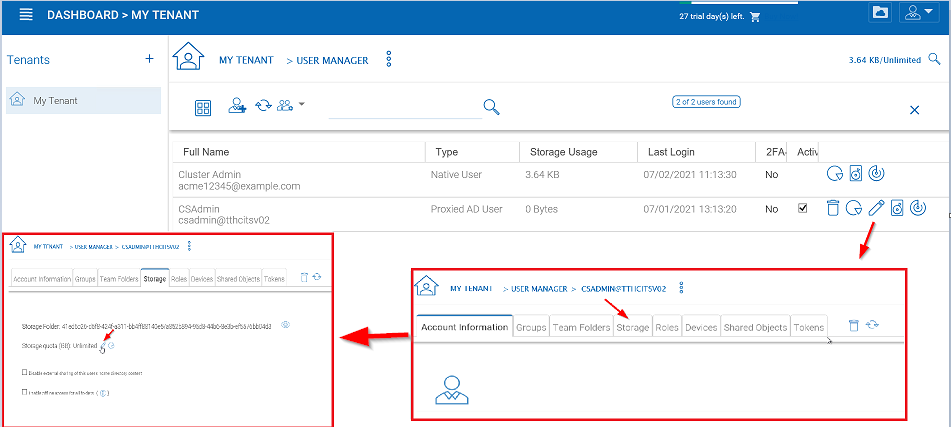
EDITING STORAGE QUOTA
Managing User Credentials
Admins can change user passwords and login emails, if needed.
- Click ‘Management Console’ and select ‘User Manager’
- Click the “manage user” menu icon in the user block
- After that, can use “Reset Password” link to help the user.
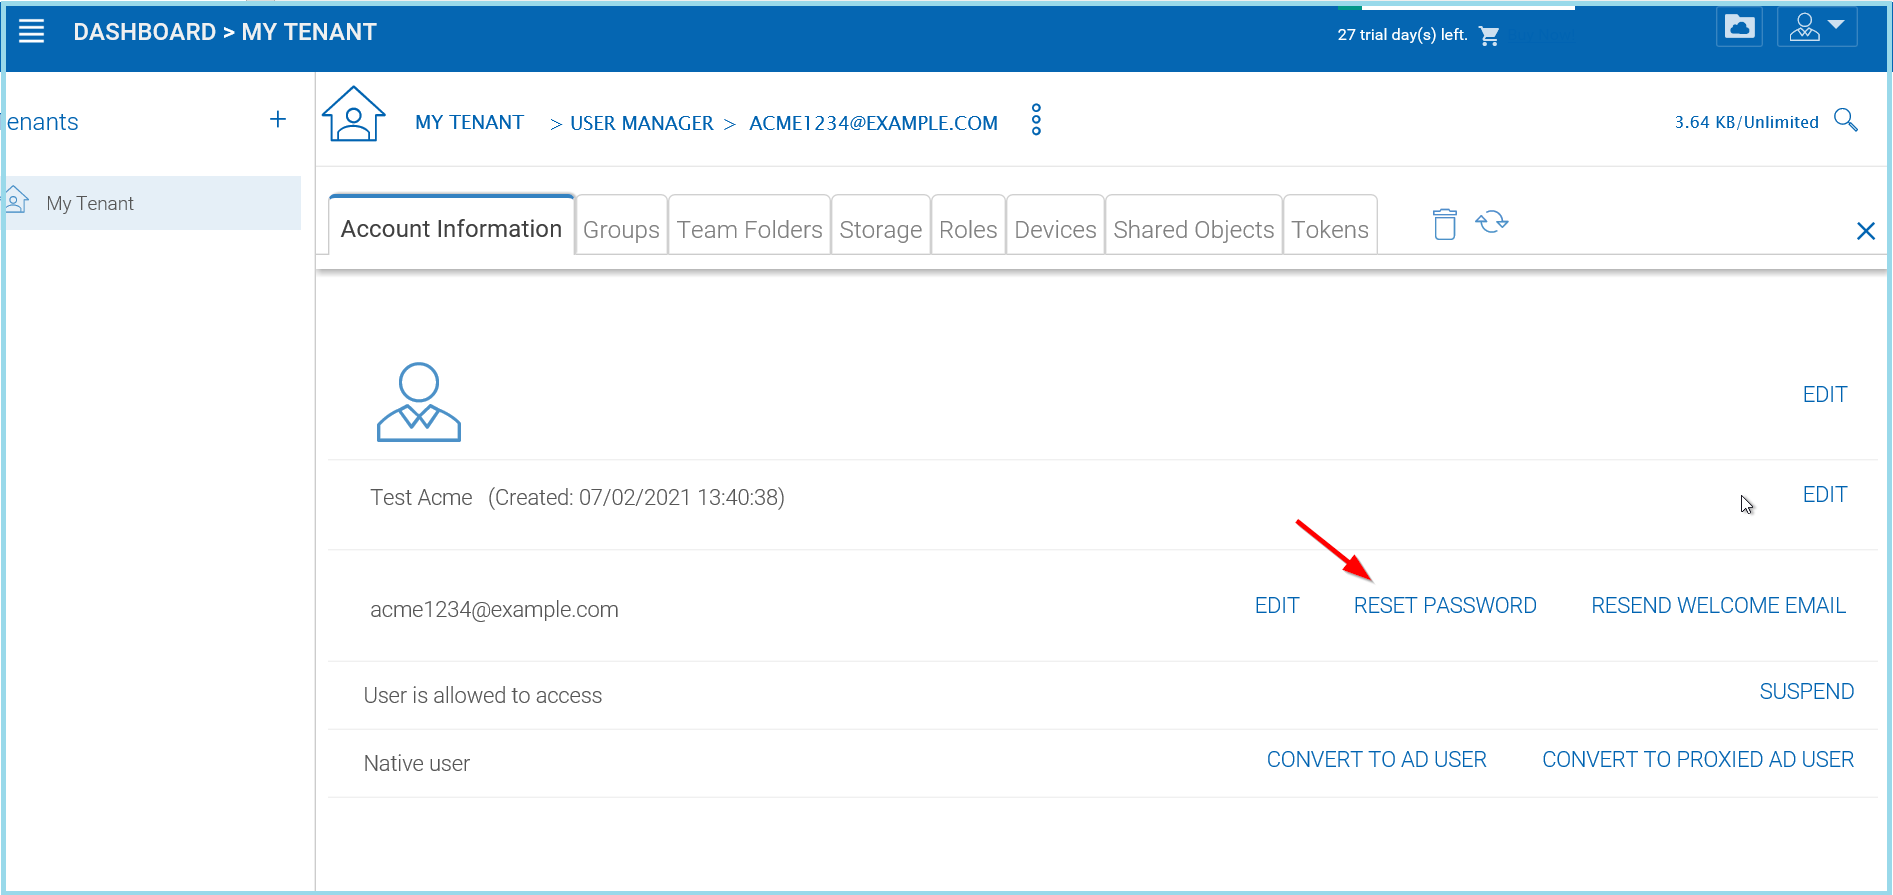
RESET USER PASSWORD
After changing the login password, an email will be sent to notify the user of the change. Admins can choose to include the new password in the email, or exclude the new password from the email. If the password is not included, the admin will need to convey the new password to the user in some other way.

PASSWORD OPTIONS
When either the email or password is changed, please update the corresponding login credentials in the CentreStack Cloud Desktop or Cloud Server.
Warning
This only applies to a native CentreStack user. If you have Active Directory users, you will need to manage user’s credential the Active Directory way.
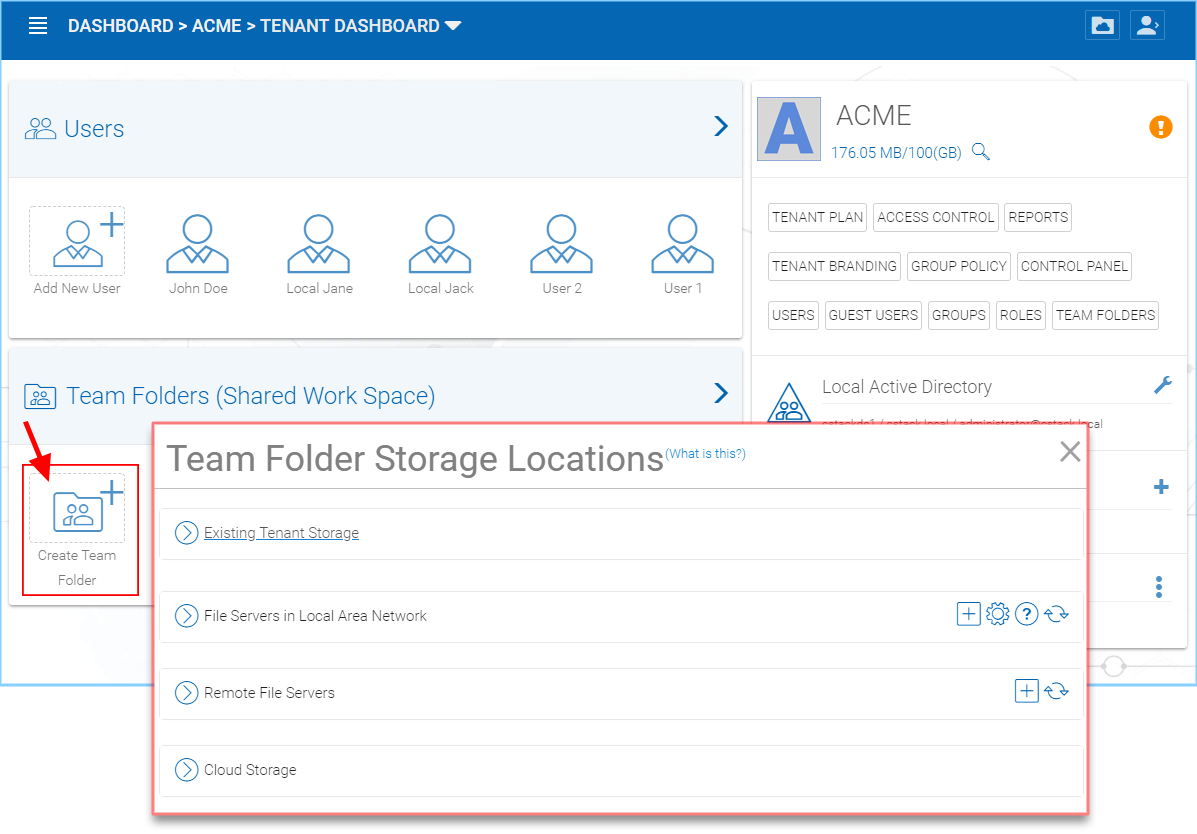
Team Folders
Adding files and folders can be accomplished by clicking “Create Team Folder”. Once the “Team Folder Storage Locations” view opens you can choose from many options: Existing Tenant Storage, File Servers in Local Area Network, Remote File Servers or Cloud Storage.
WAYS TO ADD STORAGE LOCATIONS
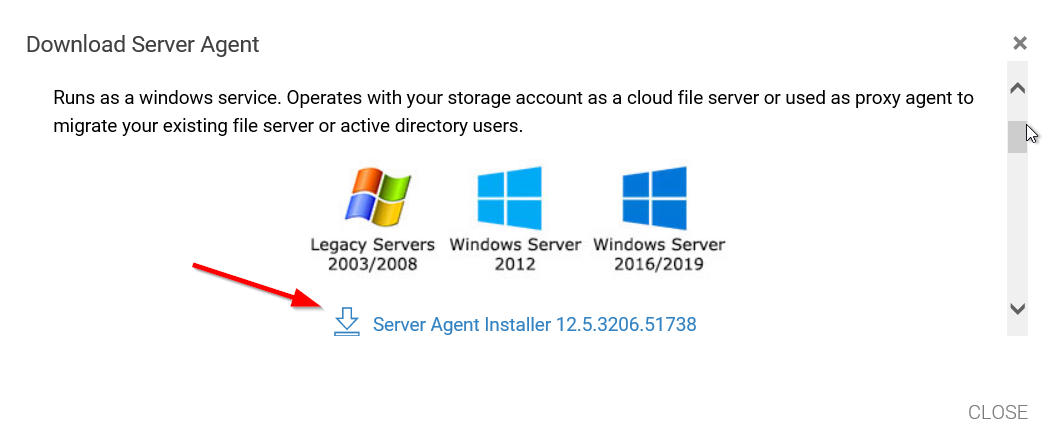
File Servers
If you have an existing file server in the Local Area Network (LAN), you can import the network share directly to CentreStack (1). Under Remote File Servers, you can install the Server Agent client (2) and access your file server remotely.
ADDING REMOTE FILES
Note
- The Server Agent is only required when the remote file server doesn’t have direct LAN (local area network) access
- to CentreStack. The Server Agent will be used in this case to facilitate communication between the CentreStack server to the remote file server.
CentreStack enables the creation of team folders which are owned by the administrator and published to other CentreStack users.
Once a folder is published, it is displayed as a team folder to the users who have access permissions. Users can access these folders from CentreStack Web or other client agents. The published folder will appear under the user’s root folder, and its name will be appended with “(Team Folder)”.
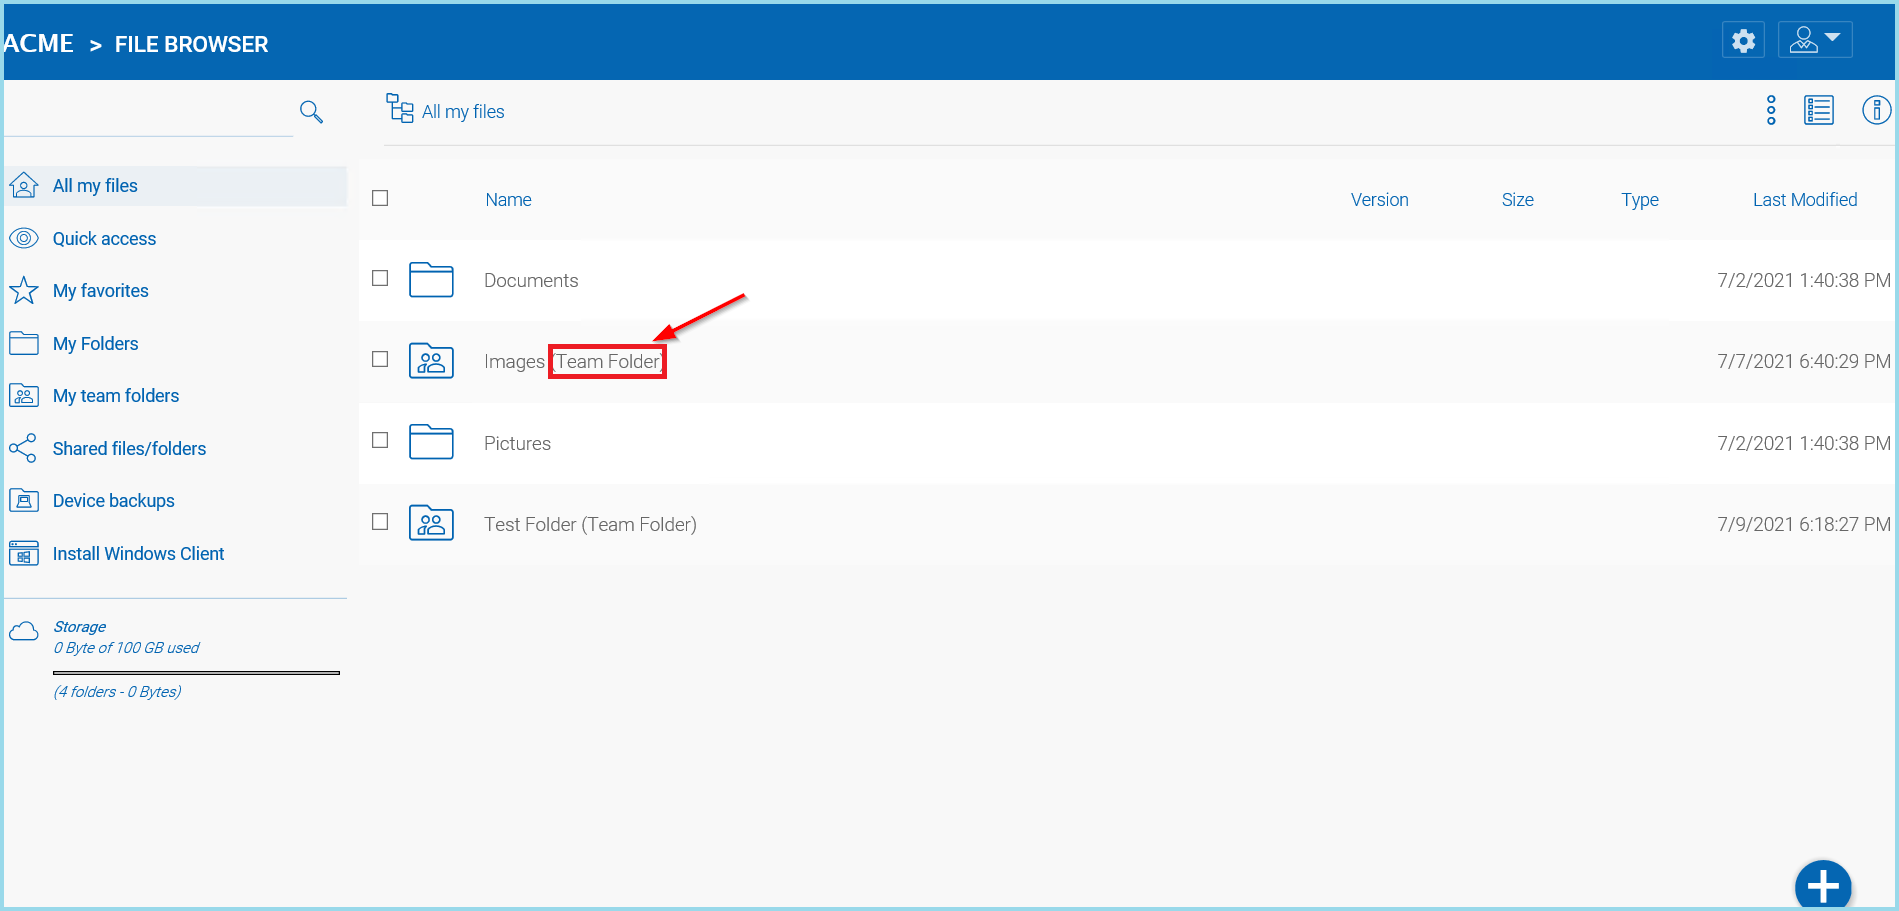
TEAM FOLDER TAG
Warning
Different upload methods may have different advantage and disadvantage on different web browsers and different web browser configuration, such as whether it is HTML5 enabled, Java enabled or Flash enabled.
By default, only one upload method was exposed in the web user interface. However, the tenant administrator, based on the kind of web browser the company is using and the kind of configuration the web browser has, can decide which upload method to expose to the end user (Team User).
Below is the Group Policy->Client Control->Web Portal setting administrator can control.
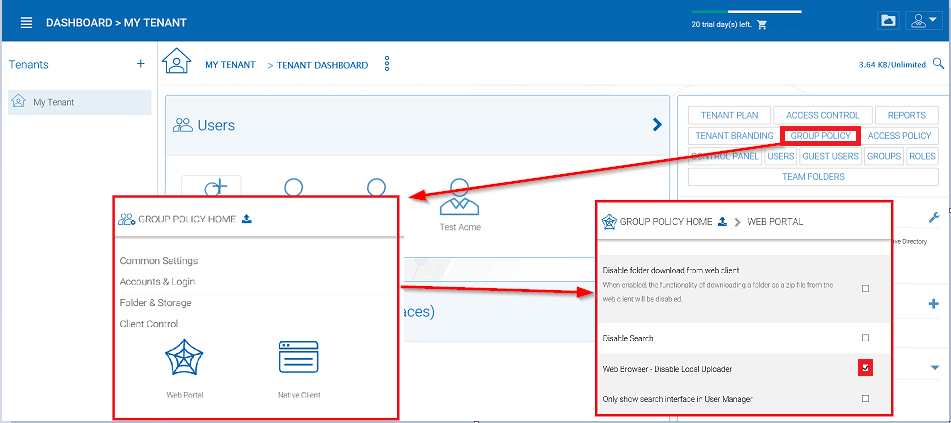
UPLOADER METHOD OPTIONS
Web Browser - Disable Java Uploader
Deselect this if your companies’ desktop system web browsers use a Java Uploader.
Web Browser - Disable Flash Uploader
Deselect this if your company uses browsers that require Flash uploader functionality.
Web Browser - Disable Local Uploader
Deselect this if your company allows the use of a local executable to upload files.
Sharing Security
Preventing Users From Sharing
Sometimes for security reasons, users should not be allowed to share files/folders.
There are two types of files and folders a user can access.
- User’s own folders, including versioned folders and attached local folders from the user’s desktop.
When an administrator creates new users, he/she can disable sharing home directory content with external party, to prevent the newly created user from sharing his/her own files and folders.
MANAGE USER SETTINGS
In the Manage User panel use the drop-down menu (4) to access the “Storage” settings (5). Once you are in the Storage View you can select (6) the “Disable team-user share home directory content externally” option.
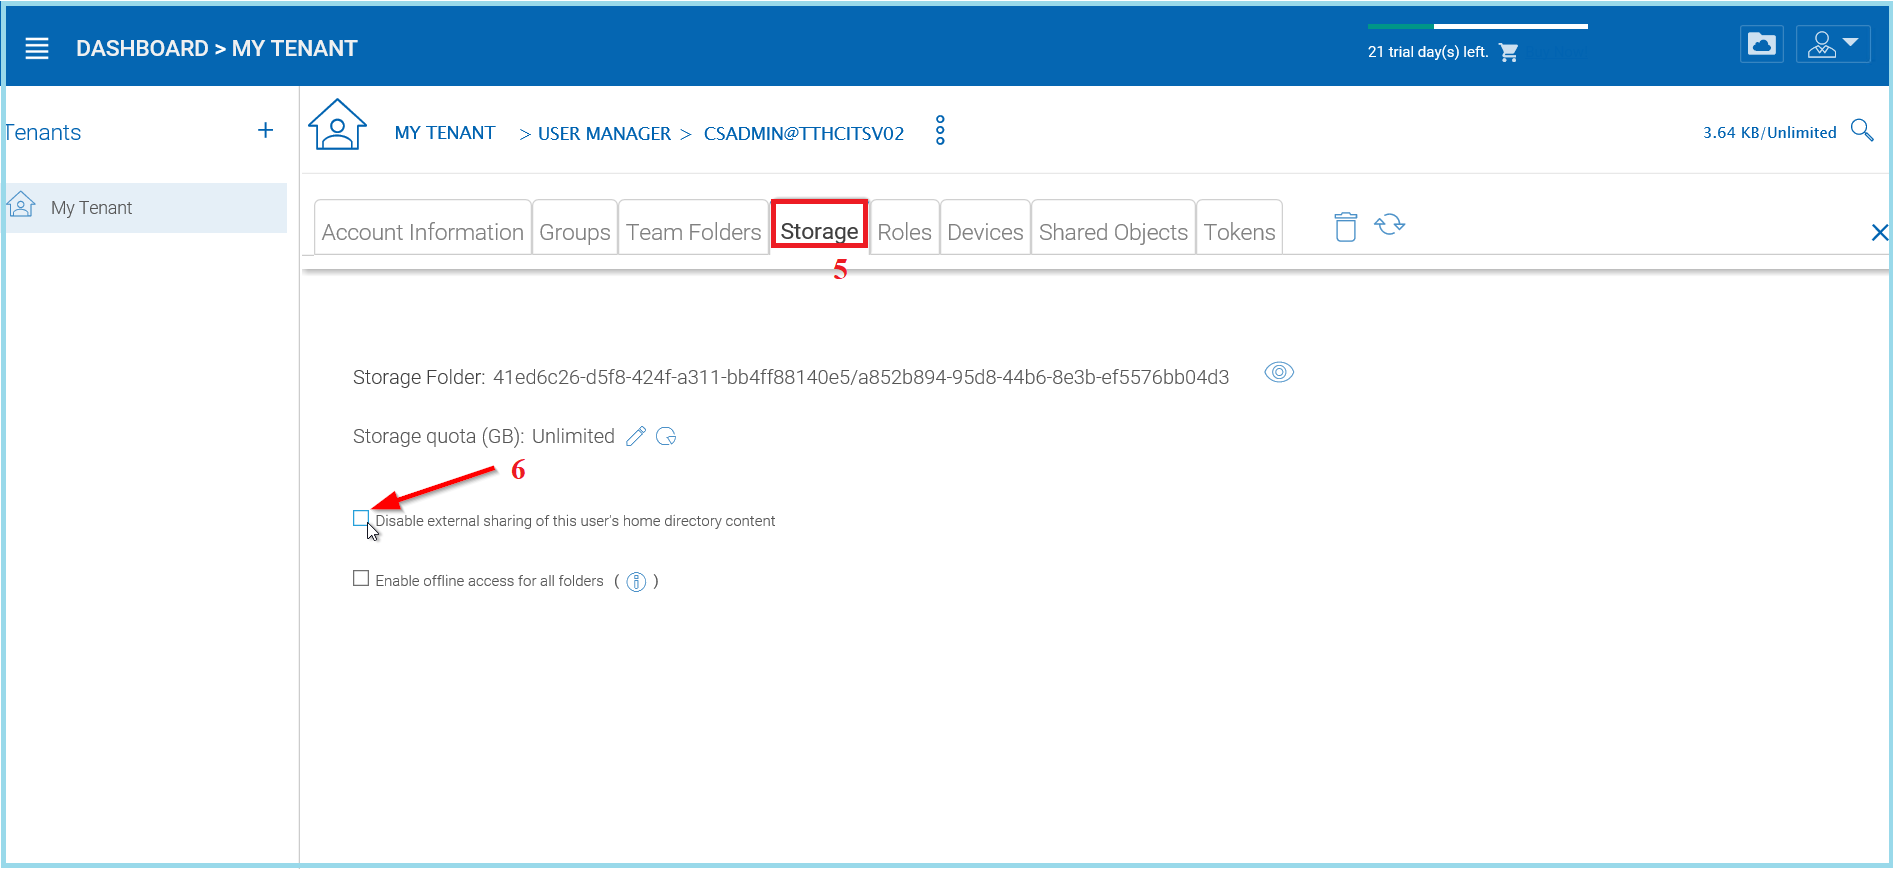
DISABLE EXTERNAL SHARING
When publishing a team folder, administrator can check ‘Disable further sharing’, to prevent users from sharing anything in the team folder. You can access this setting after choosing your storage location. Click the “Create Team Folder” icon (1) and select your storage type (2), then select the “Disable further sharing” option (3).
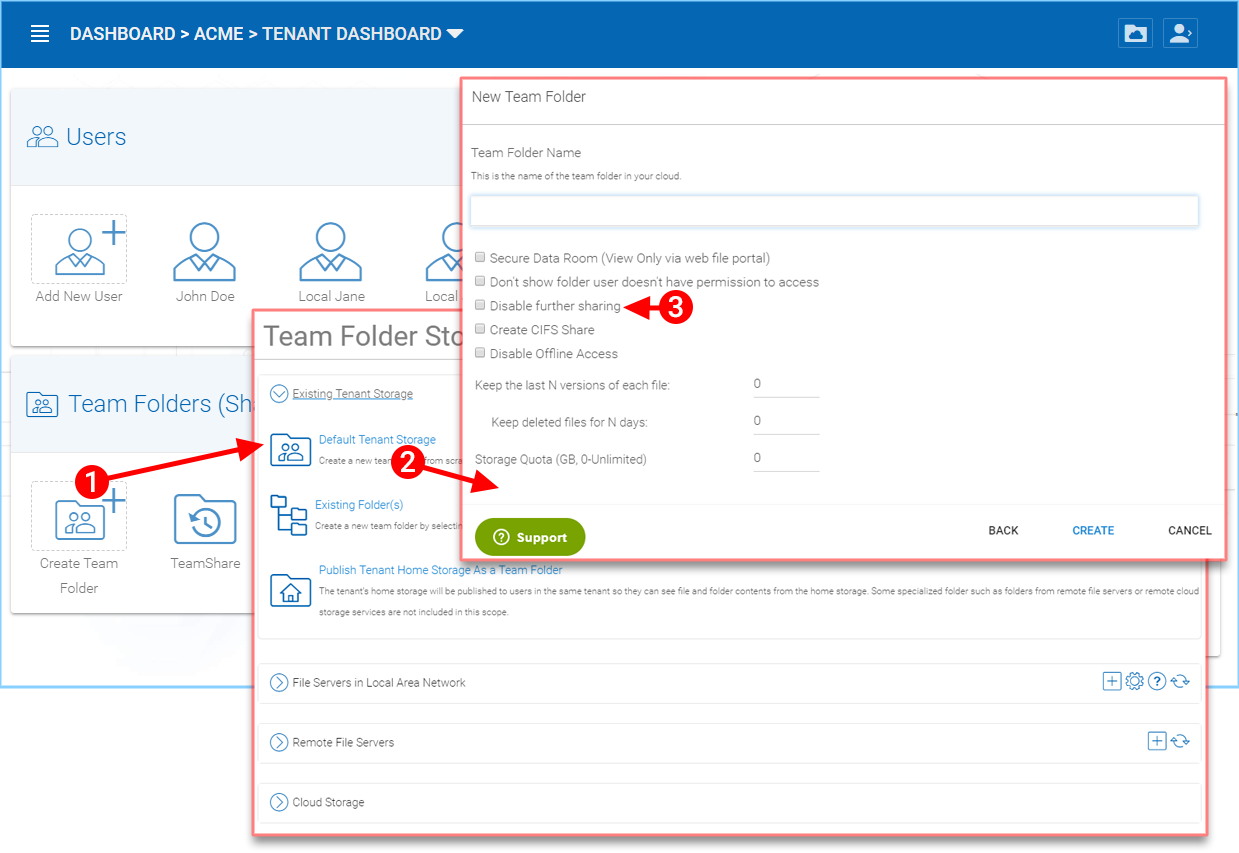
DISABLE FURTHER SHARING
Protecting Shares By Requiring Login
When a user shares a file or folder, CentreStack will generate a URL. By default, anyone can use the URL to access the share.
Administrators can protect shares by requiring login credentials. Once enabled, when a user accesses the share URL, he /she will be prompted to login to the CentreStack Cloud. After login, the user can view the file/folder shared with him/her under ‘Files shared with me’.
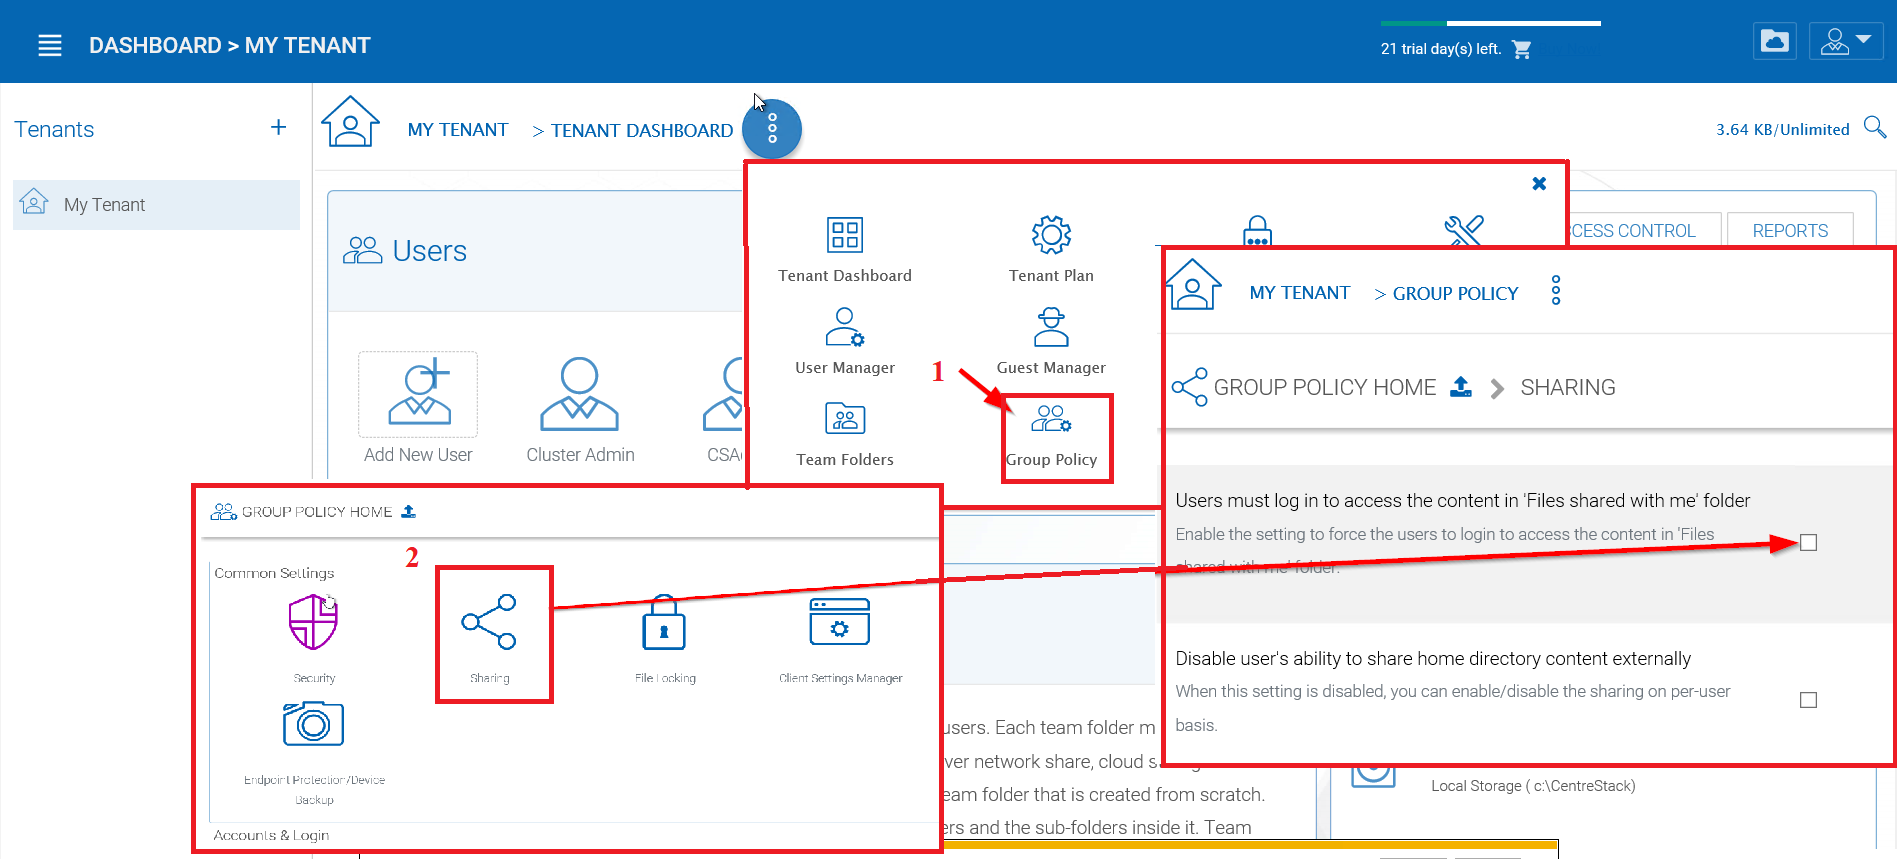
To access this setting use the drop-down menu (1) and in the “Group Policy -> Sharing” (2) panel, select the “…user must login to his/her account…” setting.
SECURING SHARED FILES AND FOLDERS